Showing posts with label Simply Saturdays. Show all posts

Saturday, 5 March 2016

Share a Recipe - Dawn Heald


Morning all,

Yay, it's the weekend!
Do these weeks seem to be flying by
or is it me?
Hope you all have something fun 
planned for the next few days....oh
and of course for those in the UK 
it is Mothers Day tomorrow....
a day when all of us mum's do nothing
all day but get spoilt!  Yeah right,
washing, washing up, cooking etc,
hopefully I won't be cooking dinner!

Today, Dawn is here with her 
project for us....

Dawn says....
Hello Crafty friends, this week I've
 decorated a small notebook to write down
 recipes in. Small enough to fit in my
 handbag too so when I see a recipe in
 a magazine in a waiting room etc, I 
can jot it down, or when I see something
 on social media. If it works and tastes
 good, then it can go in my larger recipe
 book. I've kept it simple and flat so I can
 cover it with clear adhesive sheets to protect it.


To make this project - 
Gather your supplies. Paint the covers with 
a coat of Snowflake paint.


Then squeeze your Fresco Finish Paints 
 colours onto mat and use sponges to
 apply to notebook covers. Build up the
 layers drying between each colour. I 
sponged light to dark and repeated.


Next stamp Baking Sampler with Versafine
 ink and colour. I've used Inktense
 Pencils and a water brush.


Cut out around image.
Stick to front cover and go between the
 stamped lines with Stickles Glitter Glue.


Products used -

Mermaid, Caribbean Sea, Teresa Green, Granny Smith
Watercolour Card

This is beautiful Dawn and what a
lovely gift it would make.  a good
idea to keep it small so that you can have
it with you when shopping for those
necessary ingredients!!

So, that is it for today, see you
tomorrow for our next letter in the
Alpha/Dictionary Challenge!

Jane x


Saturday, 27 April 2013

Simply Saturday takes flight with Viv and Gay

Hi, 
Simply Saturday takes flight... which is kinda true as after next week, you will have a new theme for Saturdays. Don't worry, we will make sure we have Clean and Simple samples on a regular basis, if not weekly, but we have thought of something a little bit different, which we hope you like... 
In the meantime, Viv and Gay have made some beautiful C&S sample.
I loved Viv sample as soon as I saw it. Plane and pink is not something you often associate but she succeeded beautifully, don't you think?
Unfortunately, we have sold out of the plane stamp she used, but I have given you an alternative below.
This is Viv's last post. I would like to thank her for the beautiful work she shared with us the last 4 weeks. Keep on checking her blog, she is a truly talented lady.


I first cut a  white textured card base (13cm x 15cm) and used it tent fold. Then I cut another piece of white card (12cm x 13cm) and cut a border from the bottom. 
I sponged the spare piece of card  around the edges to give it  more of an antique look.
I shaded the border piece in pink then  in a brown shade to match the main card. 
I cut a circle then  sponged it  in pink then in a brown shades around the edges to give it a distressed look. 
I stamped the plane then coloured and shaded it. 
I printed a sentiment and used a corner rounder on the edges then gave it a distressed  look also. 
I used small 3d pads to stick the spare piece of card to the base card to give it a bit more dimension. 
I stuck the border down using some spray adhesive as it was less fiddly than using glue ( handy tip) .I stuck the circle to the spare card using  3d pads to raise it up a bit. I did the same with  the plane image.
After adding the sentiment I added a few birds for extra interest, using a black permanent pen, that completed my card.


Materials

plane stamp alternative: Warehouse District

Nestabilities  Parisian accents ( used for border), Plain round circle, used for sun.

Inks: Memento Angel Pink, Distress ink ( Antique Linen & Frayed Burlap.)

Promarkers Lipstick Red & Cocktail Pink ( used on plane image).

Sentiment computer generated

Birds hand- drawn Permanent pen black

3d pads


---------

After the very pink Take Flight version, here's Gay's gorgeous sample, masculine this time. You get the best of both world today, aren't you lucky? 


My card is stamped on the coloured base, after I sponged Distress Inks in green and blue. The aperture I cut out after I used one of the tags for a template. 
I thought the name fitted with the theme of up in the air!


I really dislike sending these lovely heavy tags to be recycled especially when they have heavy cord tying them together. I painted them with Fresco Fisnish paints and stamped with StazOn, good to go for a gift tag.


Materials Gay used:


Our special offer this weekend: Spend and save
Every order of £25 or more placed between 6pm on 25th April and 
6pm on 28th April will receive a voucher in their parcel 
worth £5 off their next shop with us.  
Vouchers are valid for one month

See you tomorrow


Saturday, 20 April 2013

Small Scale Simply Saturday - Viv

Hi everyone,
Beautiful spring-like matching cards, tags and bookmark from our talented guest designer Viv today. 
Love those little sets. They are quickly done, and it's so nice to have a matching set along with a present, don't you think? 
Why not let Viv know what you think of her samples in a comment below?


Cards
I first made three white card blanks using some textured card to measure 9 1/2 cm x 9 cm and used them tent fold. 
I stamped a  large butterfly on a matching piece of card ( approx 7 cm x 6 cm). I love how the stamp has writing on to add a bit of interest too. 
I used a Memory Box die to cut some tiny butterflies. I stuck four of the largest butterflies to the body of the large butterfly stamped earlier. 
I added two smaller butterflies to the middle of the other four. 
The last butterfly I coloured to match the large  butterfly and stuck that one to the centre of the large butterfly stamp. 
I added a clear gem ( coloured to match using a  Promarker pen),..... handy tip. 
I used small 3d pads to stick the butterfly topper to the main card. 
I used three nice bright Spring coloured inks to make three matching little cards. 
I am so temped to make three more now !

Tags

 I first printed a few sentiments onto some white textured card. 
I then cut it to (8 cm x 2 cm) and used a corner rounder to round  off the edges. 
I sponged some ink to add a bit of distressing to the edges. 
I punched a small hole for the ribbon and stuck a tiny butterfly to the tag ( after first colouring using more  ink to match). 
I coloured some narrow satin ribbon ( using same method
as  when colouring the gem) and added that to the tag. 
I made three tiny tags in all to match the cards.

Bookmarks
I used three of the smaller butterfly stamps ( from same set as the large one used earlier) to stamp on to a piece of white card (13 cm x 4 cm.)
 I stamped a sentiment from the same butterfly set also. 
I rounded the corners again then inked the edges. 
I punched a hole and added some matching ribbon (coloured to match) 
I like the fact that you can have a card, a matching tag for a gift and even a bookmark as the gift itself maybe :)


Viv used
White texured card
Memory Box 'Butterfly delights'
Stamps: Woodware  clear stamp set 'Butterfly medley'
Inks Memento (Dandelion,Tangelo,New Sprout, Tuxedo black)


Special offer for this weekend is 10% off Shrink Plastic
Just enter SHRINK10 at checkout

See you tomorrow


Saturday, 13 April 2013

Simply Saturday circle - Viv and Gay


Hello :)
Simply Saturday circles today with Guest Designer  Viv and ... Gay is back too this week (happy dance here). Both ladies have interpreted the circle theme quite differently as you will see. 
Can't wait to read your comments. 

I made a tent fold card using the Lacey circles die using some textured white card. I layered another piece of white card cut using the the Fleur De Lis  die using some tiny 3D pads.
I shaded the Fleur De Lis die cut just at the edges using some Memento 'Angel Pink' ink and also a touch of Heliotrope at the very tips. 
I layered another circle using some lilac card and cut using the Nestabilities plain circle .
I cut another plain white circle which I had first used the flower die to cut out the flower impression, I used tiny 3D pads to layer again. I then used two Aquamarkers to shade just the tips of the flowers through the die cuts. I stamped a small butterfly using the Heliotrope ink and cut it out, I covered it with some glamour dust using a quickie glue pen.
I stuck the butterfly to the card. I attached an off-cut of some lilac ribbon to the card
and also added part of a heart from the 'Precious hearts' set. I added a few clear gems to the heart.


Material:
Textured card: white, lilac card off cut.
Nestabilies dies: Large Lacey circles, Large plain round, Large Fleur De Lis Motifs.
Memory Box dies: Wild Blooms, Heart, Precious Hearts.
Woodware clear stamps: Butterfly Medley.
Memento ink: Angel Pink
Versacolor ink: Heliotrope


------

Now here's Gay's card, with a more modern approach, both of them could be used for teenager or men cards me think

I used the Spellbinders circles die cut for my background and Tim Holtz distress inks sponged through. The sentiment is popped up with foam pads.


Crafty Individuals happy Birthday stamp from CI-307
Tim Holtz Stamps Bitty Grunge
Distress inks: Rusty Hinge, Wild Honey, Frayed Burlap
Spellbinders standard circles large.


Our special offer this weekend is 10% all Spellbinder dies 
(not Grand Calibur)
Just enter 10SPELL at checkout


See you tomorrow


Saturday, 6 April 2013

Simply Saturday upcycle and Guest Designer Viv

Hi everyone,
Great news today and for the next 4 weeks, we have a new Guest Designer joining us: Viv (aka Daizy Mae's Crafty blog). Fell in love with her work one day when I was blog hopping and was really pleased when she agreed to join us as a GD.


  Hi everyone, my name is Vivien Hodge and I live in the U.K.  I have been making cards and wire jewellery for over 10 years now.  Retired.... I turned 61 last year (oh my!) and happily married for 42 years this year. 
 We have three wonderful grown up children (now all happily married also) and two very young grandsons, who I absolutely adore. 
My husband is also into crafts and makes lovely things out of wood, turning mostly and now carving too.
  I got into card making when I watched QVC and saw Dawn Bibby making cards, and thought..... I could do that.  Little did I realise what an addiction it would be and I now have my own craft room overflowing with 'stuff '!
I also make wire jewellery and my latest idea is to use real silk handmade & hand dyed ribbon and beautiful stones to compliment them.
I like to make mainly quite simple cards using digital images, rubber stamps, etc.  I love my new Happy Cuts A4 machine, my Cuttlebug, Copic Markers, Promarkers & Flex Markers now too. I  love using Distress inks and the lovely effects they can achieve.  I often make a bookmark to match a card as an extra gift or sometimes even a matching envelope too. My new thing is to make my own paper flowers (after much trial and error) and add them to my cards.
I look forward to joining The Craft Barn as a Guest Design Team member, such a great site for all our crafting needs. What an honour to be chosen by them also.


Here's Viv's first sample. I am sure you will love it. 
More to come next week

First I made a 144 mm card base & used it tent fold style.
I used an old lemonade can, I cut the top and bottom part off then cut the cylinder in half using scissors.


 I punched three butterflies from the metal, then ran those through an embossing folder for texture.


 Using some TH Alcohol ink in purple I dabbed some onto the butterflies.I used a heat gun to set the colour. Then I used three Promarkers to add another colour to each butterfly & heat set those also.  I used a dark blue Promarker to colour the separate body and feelers, heat set again and then I glued them onto the main butterflies.


  I printed a sentiment and stuck that to the card after first distressing it with some TH purple ink. I cut two more strips of white card and used little 3d pads to raise them above the main card area either side of the sentiment. I cut a strip of purple card & added that to the side of the other strips. A few clear gems added to the butterflies & that completed this card.


Products used
Empty lemonade can
Memory Box Moonlight Butterfly die
Cuttlebug embossing folder Script
TH Alcohol ink Purple Twilight,
TH Distress ink Dusty Concord
Promarkers Cobalt blue, Carmine, Forest green, Indigo blue
Clear gems


 As part of our Grand Opening celebration following our move,
from 6pm on Friday (5th April) to 6pm on Monday (8th April) 
we have
free P&P on all UK orders 
(for customers outside the UK shipping is free for orders over £30)

See you tomorrow


Saturday, 16 March 2013

Simply Saturday die-cutting - Izzy

Hi, 
Very easy and very quick to make C and S cards with die-cuts. Those three must have taken 15 min at the most. 
Just play with colours and contrasts, that's the key me think... 
With two musicians in our house, and their teachers being close friends, I always need music related cards and gifts. So that's two more music cards done :-)

Card one: 
Die-cut the Memory box Virtuoso Music, glue it to the card (but not the end, to give it a 3D effect).
Die cut the Resting Birds in a contrasting colour and glue 3 of them on the notes.
Stamp Crafty Individual's sentiment with a matching colour ink, here Distress Wild Honey

Card two:
Stamp the Crafty Individuals Springtime Music Background (double inking in Wild Honey and Black Soot)
Glue the Memory Box Treble Clef on top. 
There will be a sentiment added later, when I know who I give it to and what the occasion is ;)

 Card three:
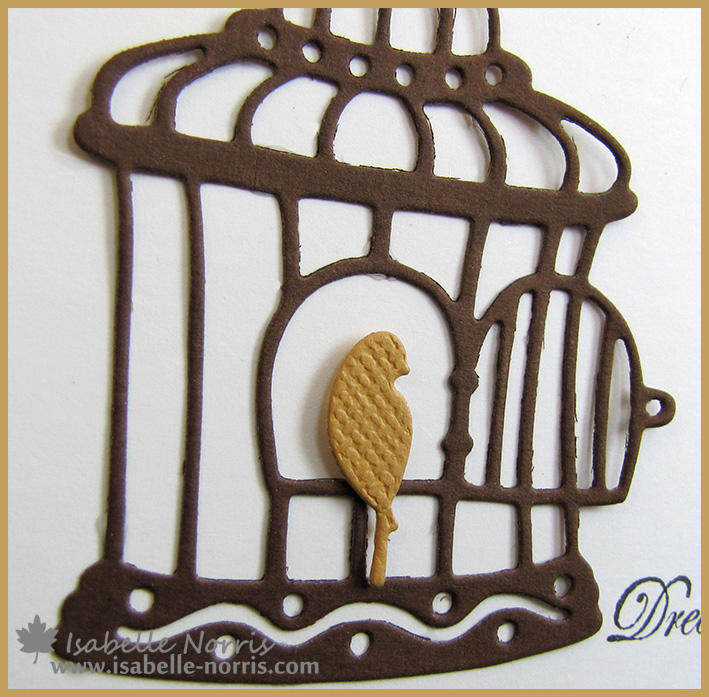
Die cut the Crafty Individuals cage in brown Bazzill Cardstock and glue it down. 
Same as the 1st card, do no glue the ends of the branch nor the cage door. 
Add the teeny bird from Memory Box Resting Birds in a contrasting colour. 
Stamp the words

 Close-up

Materials:
Crafty Individuals die: Cage
Crafty Individuals stamps: CI-194 - CI-256
Distress inks: Wild Honey; Black Soot

See you tomorrow


Saturday, 9 March 2013

I stamp 6 ways for Simply Saturday - Gio & Izzy

Hi, 
Gio and I have been "Simply-Saturday-ing" this week using the Hobby Art Harbour set. 
First of all a colourful card from gio. Simple but so effective...
Here is how she made it...

I cut a piece of cardstock to size. 
I stamped the row of houses and the boat using Hobby Art Clear tamps: Harbour Scene-it. 
I coloured them with Distress inks. 
I stamped the sentiment using CI-256 - Handy sentiments with Ranger Archival Ink pad: Jet Black

Materials
Hobby Art Clear Stamps: Harbour Scene-it
Crafty Individuals background book 6 (Seaside)
Ranger Archival Ink pad: Jet Black
Zig BrusH2O Waterbrush: Detailer
CI-256 - Handy sentiments

----

As for me (Izzy), I could not have done more simple than what I did on this cards. Could have called this "frame it up". 
I simply stamped the boat on the first one (wooden panel, bird etc... on the second) and drew the frames around it. 
I drew a cord frame for the first one, and a wooden frame on the second. 
Coloured with Coloursoft pencils, a bit of shadowing et voilà.
Did not add any sentiment, as I tend to leave it until I send it and choose then accordingly


Hobby Art Harbour Scene-it

Our special off this weekend is
10% of Hobby Art stamps
Enter the code HOBBY10 at checkout


See you tomorrow


Saturday, 2 March 2013

Simply Mother's day Saturday - Jane and Gio

Hi, 
Both Jane and Gio today for the Simply Saturday's post. 
First of all, Jane made a lovely "mum" hanging heart, using the Tando Creative set and the Americana paints. 


I have used the Tando 'Mum' wreath. First I painted all the pieces and their edges and then used a contrasting paper on the heart.

Use an embossing ink pad on the painted Mum and then cover with Ultra Thick Embossing Powder.

I like to to ink again and put a second powder layer on so that it is nice and smooth. Stick to wreath. 

I actually decided to add Tando Butterflies instead of the flowers

 Before heating the second layer of powder, I sprinkle some glitter

Decorate with a ribbons and self adhesive gems to finish.


Materials used - 
Tando 'Mum' Heart with Flowers
Tando Grab bag - Butterflies
Ultra Thick Embossing Powder - Clear
First Edition Paper Pad - Daydream

-=-=-=-=-=-=-=-=-=-=-=-=-

We also have a lovely card by Gio today who used the same Poppy stamp that she used on her scrapbook page.

We hope that you enjoyed this mother's day week and you are now ready to make a lovely project for the 10th March (in the UK). 


I decorated the white cardstock with several Distress inks using the The Crafters Workshop template - Mixed-up alpha stencil. I sewed the flower steam and all along the border. I glued the flower stamped using the Woodware clear stamp: Poppy and I stamped the sentiment using the plate Kanban acrylic stamps: Birds of paradise-peacock. I added some Rocaille beads mix: Pales greens.

Woodware clear stamp: Poppy
The Crafters Workshop template - Mixed-up alpha
Zig BrusH2O Waterbrush: Detailer
Rocaille beads mix: Pales greens
Claudine Hellmuth Studio - Gesso
Kanban acrylic stamps: Birds of paradise-peacock


Our special offer this weekend, is 
10% off Imagination Crafts stamps and stencils. 
Starting Friday 1st March until Monday 4th March included
Simply enter the code ICRAFTS10 at checkout

See you tomorrow