Showing posts with label scrapbooking. Show all posts

Thursday, 11 January 2018

At Random


At Random


Hi Everyone!

Hope you are keeping warm!  
Dry too. 

I think I secretly love this time
of year.................coming in from
the cold, cup of soup to warm
the hands as well as the inner me,
snuggling up to the fire with a
good book or watching a boxed
set on the TV................

Let us see what Jane Castle
has for us today:

"Some of you may remember that earlier 
this year I made a start on a scrapbook 
and today I'd like to share another page of 
this with you. 

If you are new to scrapbooking today's page is 
a simple layout that could be adjusted to most 
nesting dies you might already have but if 
not the Find-It media die I have used in this 
project has so many uses that it
 is well worth investing in.


The 2, 12x12 papers I've used are by 
Bo-Bunny and Kaisercraft. 

The base sheet was cut to 27cm square 
and the narrow strip from one side was
 then attached across the centre.

Then onto the die cutting.


The larger of the 2 dies was used to cut
 the mount from top to bottom from the 
paper and the smaller on from side to side. 

I then cut another smaller mount from 
some kraft card and trimmed this to size.

The lovely door with a heart wreath on was
 torn from a piece of rice paper. I felt this 
symbolised the starting of a new home 
and life together.

After cutting the letters for the happy couple's 
names using my Memory Box Lower Parker
 Alphabet Die I stamped a few flowers onto 
the remaining Core-dinations card.


I deliberately didn't add too much ink to the
 stamp as I wanted a slightly faded look. 

These were cut out and a small envelope 
was made from some thin cream coloured card.

The edges of the mounts were distressed 
with a little ink and then everything was attached.


The tag will then have the details of 
the people in the photograhs, the date 
and place all added.

The gorgeous paper collections that are 
available now really does make putting 
together a scrapbook a joy and a great
 excuse to flick through all those 
lovely old photos."

Thank you Jane, I do agree there's
nothing quite like an old photograph
particularly when you are able to
put names to the faces and using that
torn scrap of Rice Paper is a masterstroke.
Just lifts everything from the austerity of
the times.

It is a wonderful way of preserving 
those memories too

Have you any old photos lying in a
drawer or a tin box?  I know I have
so I think I shall have to pop into the
SALE and see if there are any papers
that grab my fancy - I know there will be!

'Till tomorrow

Mickie xx


Saturday, 16 January 2016

Hats - Neil Walker


Happy weekend,

Yes, it is Saturday again, the
week has flown by again!

A pretty sad start to the New Year too,
we've already lost David Bowie 
and Alan Rickman.....not liking
2016 so far!  

Neil is here with us today and I've
been trying sooooo hard not to say 
this, but sorry.....I've got to....
'Hat's off' to Neil for his post today!!
Ha ha, sorry!


As I seem to have acquired a selection of
 hats over the last twelve months I thought
 I'd create a simple layout using photos of 
my hats out and about. I grabbed a piece of
 embossed cardstock from my stash and
 spritzed the page with a selection of 
Dylusions inks to reveal the design.


To border the page I used Black Soot Distress
 ink and my Winged Pattern mask to add
 another layer round the edges.


I printed and mounted my pictures onto
 black card and added a couple of metal
 embellishments to the page.


I used screw head brads to attach them.


Lastly I wrote onto the pictures.


The finished layout. I added a scrap piece
 of textured card to the top left (An ATC
 gone wrong !) to round off the design
 and to which I will add my journalling later.


This is what Neil used -
Tando Masks -Neil Walker - Winged Pattern
Distress Ink - Black Soot
300g Coloured Card - Black
Assorted Metal Shape Embellishments
Woodware Imitation Screw Head Brads 

So that's Neil's hats, love the 
scrapbook layout. Just makes our 
photos so much more interesting.

I'll be back with our first 
Weekly Challenge of the year......
any ideas what it will be???

Jane x

Wednesday, 23 October 2013

Autumn leaves - Gio

Hello bloggers, 
Scrapbooking today with Gio and a colourful autumnal page using Cosmic Shimmer mister and masks by Tando Creative.


 I cut a 30X30 square from the Pebeo Cotton Pop Art canvas pad - A3
I laid down the Tando Creative Masks: Leaves mask and I covered it with a small amount of PaperArtsy Grunge Paste spreading it with a palette knife. When dry I laid the same mask on the canvas on the right and I sprayed several colours of Cosmic Shimmer Misters. I dried them with a heat gun to have brighter colours. I trace down the mask leaves on a piece of Metal sheet and I cut out the branch. 
Since it was real copper I heated it with a flame until it changed colour. 
I brushed some Treasure Gold: Brass on the raised area. 
I stamped randomly the scripts using the CI-214 stamp and Ranger Archival Ink pad: Jet Black.

I cut the title out of some paper leftovers. 
I glued the pictures, the title  and the metal embellishment to the LO. I added a little journaling using Stampendous Small Typewriter Alphabet  and Ranger Archival Ink pad: Jet Black.

Gio used:
Metal sheet - real copper
CI-214 - script 
Ranger Archival Ink pad: Jet Black 
Treasure Gold: Brass

See you tomorrow

Izzy


Saturday, 31 August 2013

Saturday Savers binding - Izzy

Hi, 
It's my turn (Izzy) for Saturday Savers and I really had to put my thinking cap on for this one.... I had to choose a binding technique that was not showcased this week AND something to upcycle that could be bound.
Then I remembered those beer mats I have had for several years now and thought that they would make the perfect mini album. Team this with yummy products and we are good to go.

The sizes I am going to give you are based on the size of my beer mats, but you will had to adapt it to any beer mat you have
1/  I used Kaisercraft papers, 5 beer mats and grunge paper
2/ I cut 4 pieces of white cardstock (I could have gone for any colour really) and I scored them
In this case, they are cut to 14 x 6.3 mm and scored to get 3/ 0.3 /3 cm
3/ I used a strong adhesive (double sided red tape) to adhere them to the beer mats as shown
4/ This is what you will get once it's glued. 
5/ I cut my papers to size (scored them in the middle too) and adhered them to your beer mat album
6/ Close up of the bound album
The front and back cover are left uncovered as they will be glued to the cover

TIP
If you want to make sure your album with hold, add some washi tape before gluing the papers
Peace of mind, better be safe than sorry


I then made the cover using Grunge Paper which has the advantage to be strong and easily altered (painted, stamps, punched etc). Probably my favourite for a mini album cover (or to make a passport cover as I had done here)
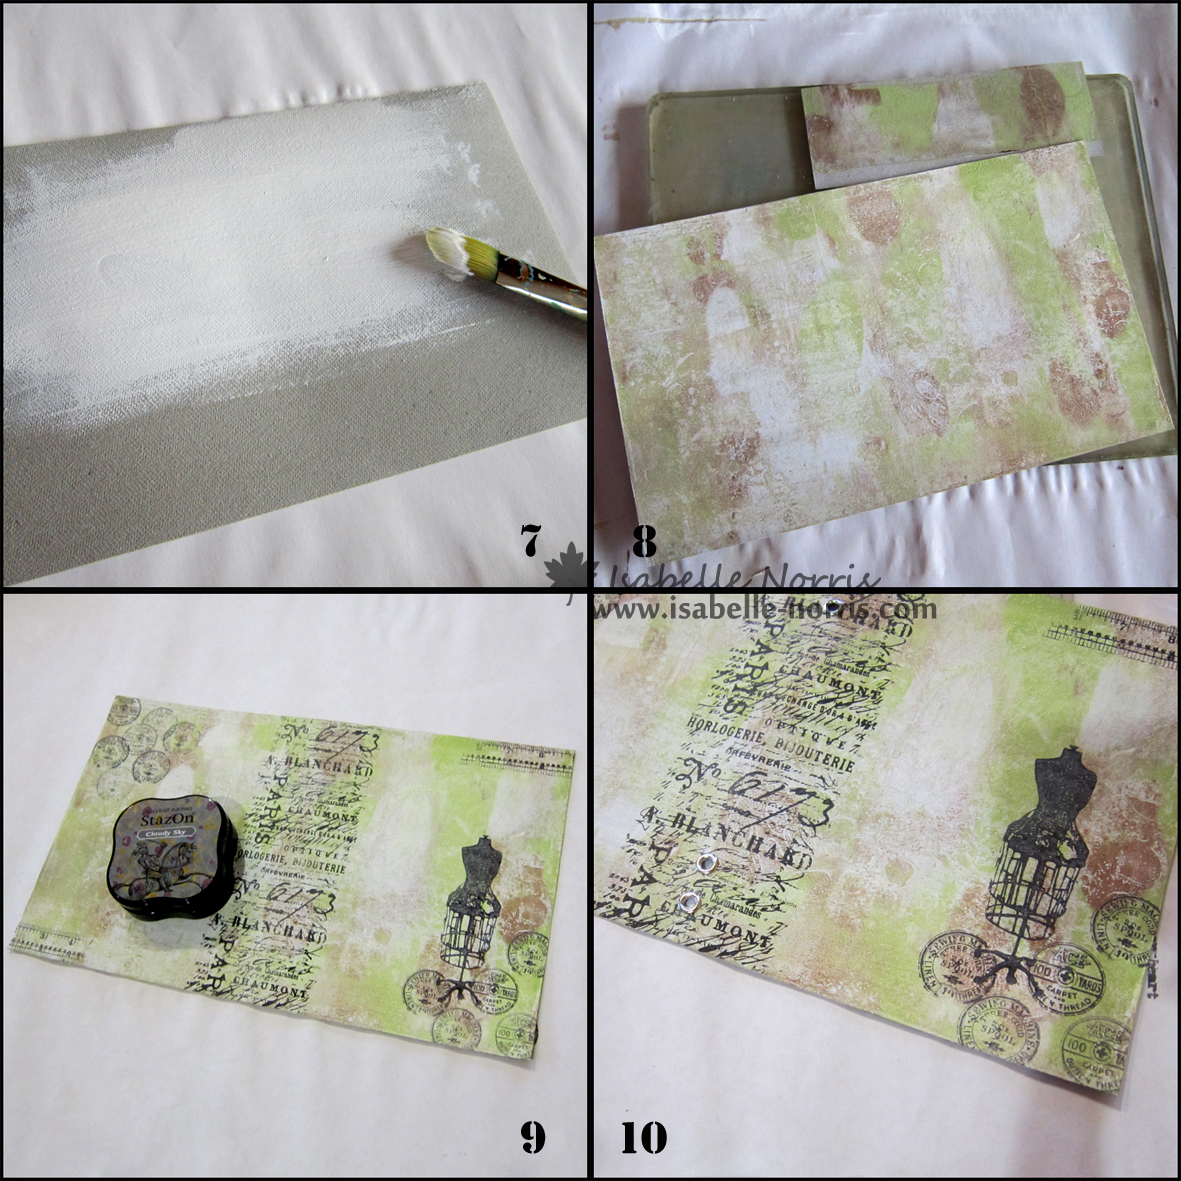
7/ Paint both sides of the cover with a layer of Gesso first and dry.  
8/ Use your Gelli Arts plate and a few masks/stencils along with PaperArtsy (or Americana) paints to make the cover. 
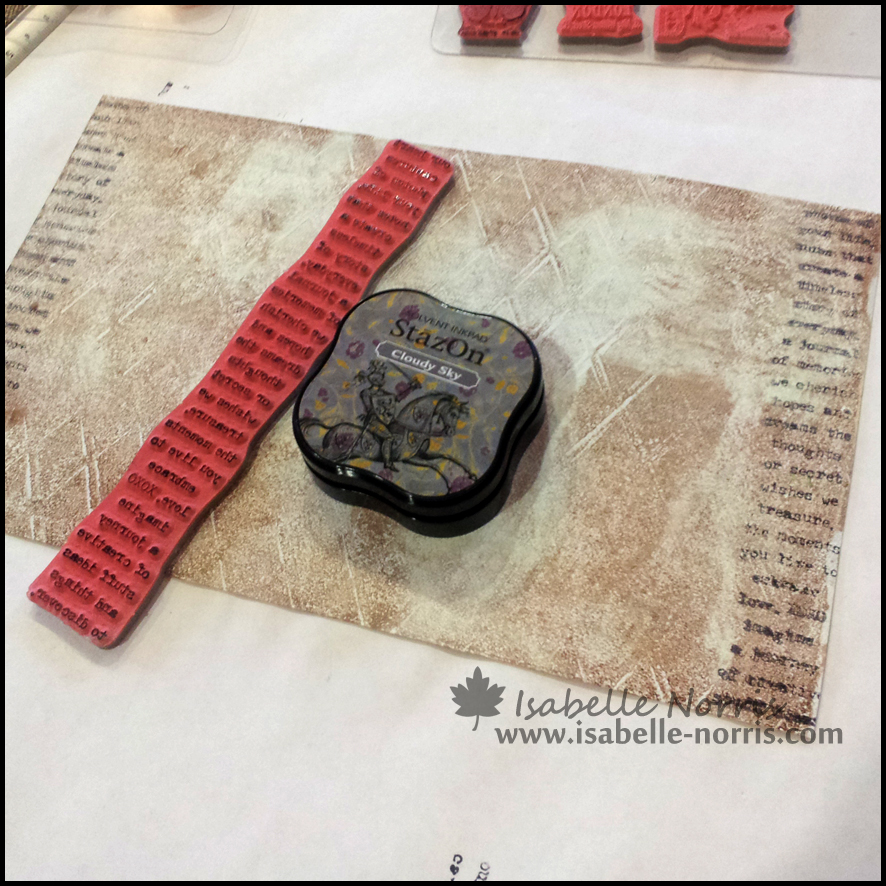
9/ Stamp using StazOn ink
10/ Punch two holes top and bottom and add eyelets for your ribbon 

This is what the inside cover looks like


Stamp the cover using StazOn ink (I went over the dress form with a permanent black pen to make it stand out) and add a layer of your favourite varnish/sealer.
Glue the cover on the beer mat album
Make sure you add the ribbon BEFORE you glue the cover to the beer mats
much easier :)

Front

back

inside

Embellish the spine with a few buttons and a metal charm


I used
Beer mats
Stamps - Tim Holtz: Stuff to Say and Attic Treasures
PaperArtsy Fresco Finish paints: Snowflake, Chocolate, Guacamole, Honey Dew
Gelli Art plate: 8 x 10"
Tando Creative mask: Harlequin
Imagination Crafts stencil: Bay Leaf
StazOn midi: Cloudy Sky


See you tomorrow

Thursday, 29 August 2013

Binding week - Gio

Hi, 
Here's another different way to use book rings, which I must admit I had never seen before. It might be new to some of you too. 
Gio made a mini album and a rubber stamp holder. Love the gorgeous colours too. What about you? Let us know in a comment below


 For the mini album:
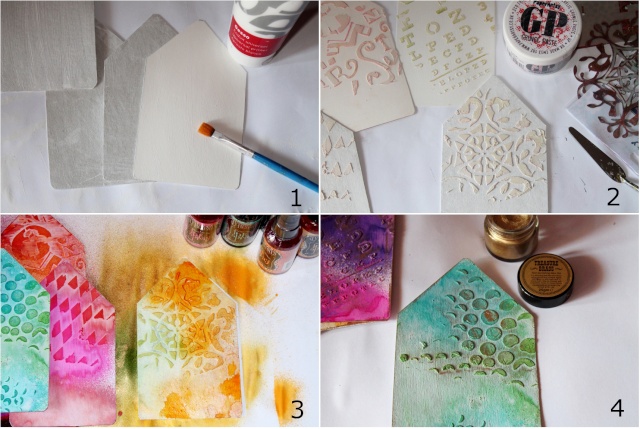
I cut grey cardstock to get some house shape and I gessoed them with the Pebeo Gesso. I used some different stencils, from the Crafters Workshop and Crafty Individuals and I spread some PaperArtsy Grunge Paste with a palette knife trough the stencils. When dry, I sprayed several colours of Dylusions ink sprays. I highlighted the raised areas with the Treasure Gold: Brass, using my fingers. I stamped every page with swirls, text and flowers from Hot Picks 1006 and Hot Picks 1206 using plates Ranger Archival Ink pad: Jet Black.
For the binding: I made some holes for the 25 mm rings, 2 cm one from another. I put the book rings trough the holes in vertical way, using two holes for every ring.


For the rubber stamp holder 
I cut two rectangles of heavy cardstock to size,  I gessoed them with the Pebeo Gesso. 
I folded them and I glued one to another on one side to create a folder. I reinforce the corners with some washi tape. 
I used some different stencils, from the Crafters Workshop and Crafty Individuals and I spread some PaperArtsy Grunge Paste with a palette knife trough the stencils. When dry I sprayed several colours of Dylusions ink sprays. I highlighted the raised areas with the Treasure Gold: Brass, using my fingers. I stamped them with swirls, text and flowers from Hot Picks 1006 and Hot Picks 1206 plates using Ranger Archival Ink pad: Jet Black.  For the binding: I made two holes at the time, for the 50 mm rings: 4,5 cm one from another. I put the book rings trough the holes in horizontal way, using two holes for every ring.

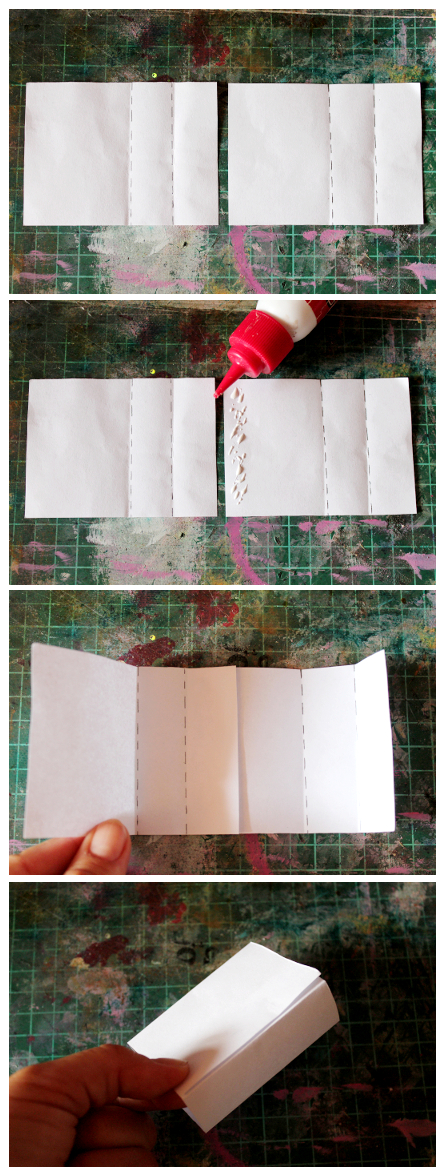
Here's a little step by step template Gio made to show you how she created the folder.


The Crafters Workshop template - Circle explosion 
The Crafters Workshop template - Eye chart , Harlequin , Mixed-up alpha 
Crafty Individuals mask: Magic roundabout 
PaperArtsy Hot Picks rubber stamps: 1006 and 1206
Ranger Archival Ink pad: Jet Black 
Pebeo Studio acrylic auxiliaries: Gesso 250 ml  
Treasure Gold: Brass 
Washi style paper tape: Barcode  

See you tomorrow


Wednesday, 28 August 2013

Binding week - Sylvie

Hi, 
Here's a first approach of binding a mini album with a book ring with Sylvie who made a lovely album with the Gelli Art plate and PaperArtsy paints and stamps. 
Here's some of the pictures, but there will be more on her blog


Use several white cardstocks to make different backgrounds. 
Use the Gelli Art plate, a brayer and a selection of paints (here Fresco Finish) 

Choose different masks to add patterns to your background. 
Try to layer them for different looks

I then cut 8 circles in cardboard and 16 circles from the GelliArt backgrounds I had made. 
Glue the backgrounds on the cardboard and punch a circle in each of them to add the ring later

Use masks and Grunge Paste to add texture. 
Once dry, use Distress inks to add touches of colour

On the other side, I stamped the PaperArtsy JOFY images with black Archival ink and painted them with Fresco Finish paints. 
I then covered them with a layer of Fresco Finish Metallic Glaze. 
I bound the circles with the ring to make a mini album and added ribbons. 
You can then add your favourite pictures and this will make a perfect little gift

I used :
PaperArtsy Fresco finish paints (Guacamole, Mermaid, Lilac, Snowflake, Sherbet, Claret, Hey Pesto, Autumn Fire,South Pacific, Zesty Zing)
PaperArtsy Jolly collection: stamps 10-11-12
Imagination Crafts stencils: Bay Leaf 
The Crafters Workshop templates: Cornflowers, Harlequin
Artemio Ribbons: Flowers, street, girl
Tando Masks: Distorted hive
Andy Skinner designs Masks: 12x3 burning
PaperArtsy Fresco Finish paints: Metallic glaze
Archival ink pads: Jet Black

See you tomorrow


Monday, 19 August 2013

Hexagon week - Jane

Hi, 
This should have appeared on the blog last week, not sure what happened there (sorry Jane). 
But I am posting it now because I would not want you to miss out on Jane's gorgeous exploding box especially as she is sharing all the details on how to make it. 
I'm sure you will enjoy this. 
Let us know in a comment below.


I decided to do an exploding box, a bit different to the last one, and will show you exactly how to make it, this time in a hexagon shape

First make a pattern for the base, decide on the size you want and make sure all sides measure the same, mine will be 1 1/2"

Cut it out and sit it on a piece of 300g card, you need to add the sides so put it quite central.  Measure out 3" from each side.  You will be one short as the A4 card is not quite big enough. 

Draw around your pattern again and add one more side.  Stick the two bases together, one on top of the other.. 

Cut out 12 pieces of contrasting card and patterned paper and add to the sides of box, both inside and outside

Using your original pattern cut two hexagons slightly smaller than the base and layer together.  Before sticking to base, cut 6 slits with a sharp knife as shown in picture

These are for the acetate strips.  Cut 3 strips measuring 3/8" by approx. 10".   Thread through slits as shown.

Using ultra-sticky doublesided tape, stick to base and bend acetate strips up slightly.

Using the same contrasting card and paper, cut 6 butterflies (12 in total)

Add the butterflies to each acetate strip, staggering the heights slightly. 
Make sure the tallest one is no higher than the box side when standing up or the lid will crush it. 
Die cut a scalloped circle and stick to the base

To make the lid, using your original pattern again, add 1/16" around each edge.  measure out 3/4" on each side.  
Add an extra bit on each side to create a lip to stick the lid together.

Stick the lid together and make sure it fits on your box

Decorate the lid with more card and paper and finish with a large organza bow and 2 more butterflies.

Jane used:
Copic YG03 (for colouring ribbon)

See you tomorrow