
Christmas Flora
Hallo Everyone!
So, here comes our second
dip into the realms of Flora to
be found at Christmas time
Craftyfield is centre stage
today:

"Sometimes I need to wrap a present
and find myself without the right paper.
I don't know about you but I wrap a lot
of CD and video/games cases and I hate cutting
a small shape in a large roll, so much waste...
Also, with wrapping paper the shape gives
the game away immediately so I like
to use bags for those gifts.
How about some options to create your own,
quickly and easily, with supplies you
already have ....
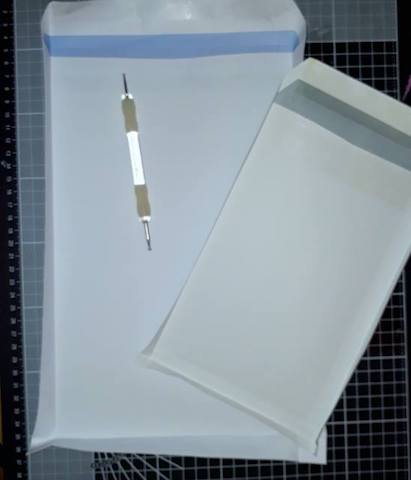
My first option is to transform envelopes
into bags. A C5 envelope works well for
CDs and a C4 (letter size) for video cases.
First decide on the depth of your bag and
score the envelope on 3 sides at half the
depth you require.
My large envelope has been scored at
2cms to give me a depth of 4cms in the
finished bag, which can easily accommodate
2 video cases.

Before the next step in the construction
of the bag, it is time to decorate
whilst still flat...
Here I chose to create a Gelli print with
stencils (I used Andy Skinner's Sunburst and
Imagination Crafts Drop Screen)

Adding the large Woodware snowflake
twice embossed. First with white and
on a whim I re-stamped (thanks to the Stamping
platform) and sprinkled a mix of clear and
Sea Turtle powders.

I couldn't resist and added the small stamps
from the same Woodware set in
Brilliance Starlight silver ink, all over the bag.
For the small bag, I stamped directly on the
envelope with Versamark and embossed with
Cosmic Shimmer Brilliant Sparkle Embossing
Powder in Gold .
I added the smaller snowflakes
with gold ink.
For good measure I added both sentiments
from the stamp set in black ink!

With the bags decorated, onto the construction...
To finish the opening there are many options,
from a straight cut as I did on the small bag
or more elaborate using border punches, dies,
adding handles with ribbon or twine etc...
For my large envelope, after cutting off the
sticky flap I folded about an inch to the inside
to get a more sturdy base for my
twine handles.
Form the shape of the bag by pushing open
Form the shape of the bag by pushing open
along the score lines with your hand inside
the envelope.
The photo shows a side view of the bag
with the formed triangular flaps to be
stuck under.

The bottom of the bag should look like this
and double sided tape is applied on the small
triangles and stuck down to the bottom
of the bag.

If you don't have envelopes or don't
fancy using them, how about designer papers?
Bo Bunny and Kaisercraft have gorgeous
designs and the paper is of a decent weight
for the purpose.
You can also use your Gelli prints...
Or you can use cardstock, from the standard
card to Mirri and of course Glitter card
(if you're like me and hate being covered
in glitter, go for non shedding).
I created this simple template above for
a bag to be cut out of a standard A4
sheet with the least waste.
If using 12"x12" it is easy to adapt the design
by extending the drawing. Just remember to use
the same measurements for the bottom flap
and the right hand flap as this is what decides
the depth of your bag.

Here's my 2 A4 pages cut and scored.
One option is to add scoring lines at the
top and fold the top closed in a box shape

I went for the bag look and added handles
by die-cutting them with a rectangle shape.
I can thread a ribbon through it to keep
the bag closed to thwart the curious...

That large snowflake stands on its own
perfectly as a center piece and I embossed
it using that gorgeous Frantage embossing
powder in Shabby Rose.
To make up the bag use double sided
tape on both tabs (the 1cm wide seen
on the left on this photo), both side flaps and
one of the large flap which will be at the
bottom of the bag.
This bag is the perfect size, and sturdy
enough, for a (thick) paperback.

Just for you a close up of the shiny bits..."
Supplies:
Supplies:
Christmas Woodware stamps:
Embossing powders:
Inks:
Gelli plate:
Fresco Paints:
Stencils :
Christmas Papers & cards:
Double sided tape:
Great idea there with the
envelopes Craftyfield.......not
to mention what you have
put in them....
That's my present list sorted
and wrapped!
'Till tomorrow
Mickie xx
Great projects. Happy creative week, Angela xXx
ReplyDelete