Wednesday 31 January 2018

At Random


At Random


Hallo There!

Well, here we are at the end
of the month.  In some ways
it feels to have been a very
long month, yet on the other
hand, the weeks have flown
by and we have had some
terrific projects to share with
you, well worry not, we have
yet more terrific projects
for you in February

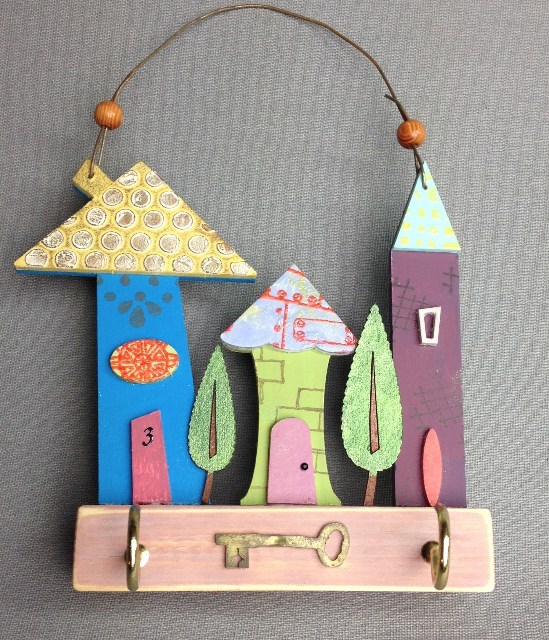
In the meantime, take a look
at this super cityscape from
Louise Thomson

"I started by making a background
 painting it first with gesso then fresco paints.
 I added paint splatters on top and used 
a kaisercraft stencil with distress ink to 
add the brick effect. 


Paper artsy stamps were added on top
 for a final layer along with washi tape.

Using Sizzix dies I cut out the buildings and
 trees from scraps of bazzil card. 

Each piece was then individually inked
 with distress inks and stuck down.


I repeated the process using the Sizzix vehicle dies. 

I blended a little more blue distress ink around
 the border before mounting on card."


Thank you Louise for giving
us this beautiful Cityscape

This would make an excellent 
picture for a child's room

I could quite happily use it in my
journal too - every picture tells
a story......  What tale would your
picture tell?

'Til tomorrow 

Mickie xx


Tuesday 30 January 2018

At Random


At Random


Hi Everyone!


Have you noticed we are
almost out of January?  
For some that is a loud
woohoo!  For me it's a
pessimistic - well that's
one-twelfth of the year
gone already!

No use worrying about it
let's have a cuppa and
relax with Craftyfield's
gorgeous canvas:

 "Whenever I have a bit more crafting 
time, I like to play with medias and
 techniques, especially if I have new stash
 to try...
Maybe after Christmas you have
 new stash too!


I first Gessoed my base card and applied
 a thin coat of gel medium in places,
where I stuck scraps of papers just for
 a short time, then ripping the paper off,
 leaving the ink behind.

I did the same with the Vintage
 image shown above. 

I added a few scraps of papers vertically
 to break up the horizontal writing.


Now for colours: 
I sprayed the card with water and tapped
 a (very small) loaded brush with 
Blue and Turquoise Brushos,
 adding a few sprinkles of mica powder too.

When this was dry I added Grunge Paste
 through Carabelle and Tim Holtz layering stencils.


Having unearthed treasures in my 
scrap box, I create a cluster around the
 center of interest, which will hold 
the focal image. 

A bit of vellum die-cut, a scrap of calico, 
some gel medium and Glitterbitz....
I also applied some 
Silver DecoArt Metallic Lustre 
on top of the stencilled Grunge Paste
 to highlight the texture.


To finish I popped up the Vintage 
image, added some gold wire,
 a small envelope, and
 a handmade flower."


A lovely canvas and a good
tutorial too.  Thank you
Craftyfield

I just love what you can do
with the bits and bobs that seem
to linger among the stash!  

Don't forget the SALE!

'Til tomorrow

Mickie xx


Monday 29 January 2018

At Random

At Random


Hi Everyone!


How are you all?  I'm
exhausted.........spent a
fair amount of time today
searching for the shed key.
All I wanted to do was to
see if it would be possible
to store some paintings
in there...............aaargh!

Cue Jane Castle to the
rescue .....


"Having sorted a couple of drawers
 out in the craft room I reminded 
myself of a wonderful pack of 
Tando Creatives Whimsical Houses 
so decided to have a play and create 
a wall hanging for my shed and 
back gate keys.

I cut a piece of wood to the required
 size and sanded well before giving
 it a libral coat of chalk ink. 

Having decided on which houses to use
 I then gave them a base coat of 
white gesso and then began painting the 
various parts in bright colours.


Then using various PaperArtsy stamps,
 inks, stencils and grunge paste began to
 decorate each of the pieces.


The piece of wood was then lightly sanded 
again and 2 holes made to screw
 in the cup hooks. 

A Shrink Plastic key was made using 
the stamp from HotPicks 1010 and 
once heated a little Treasure Gold 
was added.

A hole was made in the 2 roofs so
 I could attach some wire for hanging 
and this was done before glueing the
 houses to the wood.

 I then decided I needed some trees, so 
inking 2 leaves from Tando Creatives 
Mini Leaves 2 was the final addition 
to this project.


I'm very pleased with how this turned out
 it's fun, practical and different to anything
 in the shops. 

Have fun creating X"


Thank you Jane - your timely
project is going to save me
so much time spent looking
for the keys!


First I need to visit the SALE

'Til tomorrow

Mickie xx


Sunday 28 January 2018

At Random


At Random


Happy Sunday Everyone!

There's a treat for you today,
Helen Chilton popped in with
a delightful canvas  to remind
us all of beach days and
holidays to come......


"I love this fish bones stencil by Crafters Workshop:


To start off with I'm using a sprayed book page
 as my background and then some 
Sea Green Infusions.


Once you've sprinkled the powder, spritz and blot.


Here's the result.


After that I added coloured Grunge Paste 
stencilling over the top. 


Then I doodled some outlines in black
 and white to make it pop."


Thanks Helen, reminds me of that
canvas we did a couple of years
ago - how quick the time passes

I think I might adapt this to make
a triptych using the other two
fish on the stencil.

'Til tomorrow

Mickie xx


PS Everyone, don't forget to look
in the SALE

Saturday 27 January 2018

At Random


At Random


Hallo Everyone!

I'm sure you have all guessed that
"At Random" indicates we have a
SALE!  Yay!  Who doesn't like a
bargain?.................  

More stamps have been added and
some alterables.  It's a good time 
to stock up on the basics too......

Nothing basic about our project 
for today.  Claire Jackson has
made a beautiful canvas for us:

"I started by spreading gesso on
 the canvas to create some 
background texture. 

I used a DecoArt stencil and PaperArtsy
 grunge paste to add the hills across 
the centre.

 Using a palette knife I scraped some
 DecoArt crackle paste on the edges and
 corners and used a heat tool 
so that it bubbled. 

Then the whole canvas was given
 a coat of gesso.


I painted in the background with
 PaperArtsy fresco finish chalk paint. 

I started off with a paint brush but 
used fingers, paper towel and cotton buds
 to get even more texture onto the canvas 
and gradually built up layers of colour. 

To finish I added a little bit of stamping
 in black archival ink.


I painted the Tando whimsical bird pieces,
 assembled them and stuck them to
 the canvas. 

The set makes 6 birds so I have plenty
 of parts left over.


It would make a great picture for 
a child’s bedroom. 


I think it should be entitled 
‘Look at Me!’ 

What do you think?"


Thank you for a lovely project
Claire.  I do agree that it would
be good for a child's bedroom

Think I might even hang it in
the kitchen and call it
'What!?  Another one?"

'Til tomorrow 

Mickie xx


Friday 26 January 2018

At Random

At Random


Hi There!

It's another squally, dull day
here on the coast.  How exciting
you may imagine.  No, just a
day to spend indoors by the fire.
Perhaps do a little crafting.

Here's Angela Radford with a
great idea to take your mind
off the weather:


'Hi all, here today to show you how 
I had fun with Starlight paints. 

First painted all over with one colour 
then embossed and added more colours
 with a dry brush.


You can see here how much these colours shine, 
love them.


Cut out some Kim Dellow stamped images.


 Then mount and glue them in position. 
I've also used some Tim Holtz dies here too.


Finally just an extra photograph 
showing the butterfly . 

I mounted the book pages onto card so 
the wings could be shaped to stand out.


 Happy crafting, Angela xXx"


Thank you Angela.  Love that
background


Think I'm going to be spending some time
making a few backgrounds and doing some
fussy cutting

I'm not the greatest fussy cutter but at 
least you can do whilst watching the TV
.................hmmm........perhaps that is
why I'm not the greatest fussy cutter ....!

'Til tomorrow 

Mickie xx


PS:  Have you checked out the
SALE today?

Thursday 25 January 2018

At Random

At Random


Hallo There!

It is always nice to meet up
with an old friend and today
is a bit of an exception as
not one, but two old friends!

The one is Hazel Harler and
the other is Crafty Individuals
who have got together to
make a beautiful project
 which could also double
as a very acceptable 
greeting card:


"Hi everyone, I have a decorated
 notebook to share with you today.

I covered a notebook with a sheet of
 Imagination Crafts rice paper.


Fresco Finish paints were lightly 
brayered over the cover.


I stamped some gold Imagination Starlight
 paint with a Seth Apter stamp, then I 
glued a torn piece of a gelli print and some
 gold thread to the front of the notebook.


The next thing I did was to brayer the 
paints onto a piece of white card and then
 I stamped the Crafty Individuals image
 with black Archival ink.


I coloured the image with pencils, cut it out 
and glued it to the cover, and then
embellished the cover with lace, buttons,
 rub ons and some word stickers."


Thank you Hazel for a beautiful
design.

A combination of Crafty Individuals
and Seth Apter stamps......WoW!
Who would have thought it......
possible? ........ probable?


The January Sale continues - don't
forget to take a look at the
offer.........!!


'Till tomorrow

Mickie xx