Showing posts with label Embossing folders. Show all posts

Wednesday, 15 March 2017

Rainbow


Rainbow


Hi there!

A new week and a new theme
How exciting is that?  Anything
to take our minds off the wind
and the rain

So to start the Rainbow off
here's Jane Castle with a beautiful 
flower heart


"Today I'd like to share with you a Mother's Day 
card that I made using a Kaleidacolor rainbow ink pad 
to colour all my flowers, leaves and die cuts.


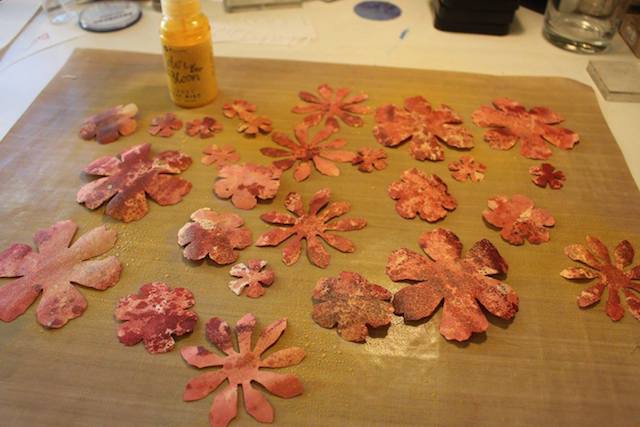
Using my Caribbean Sea ink pad I began to
colour various different types of paper and card

This was done by swiping the ink pad across
each piece but always going in the same direction.


For this I used old dictionary pages, watercolour paper, 
300gsm white card, Grunge paper and 
T.H. Ideaology Kraft Resist. 

For some I had the raised pads separate and 
for others I slid the pads together

Next I selected various flower stamps I thought I might like to use, 
a list will be added at the bottom of the page.


The flowers were either stamped in black ink and then 
heat embossed with clear powder 
or stamped in VersaMark and heat embossed 
with white powder. 

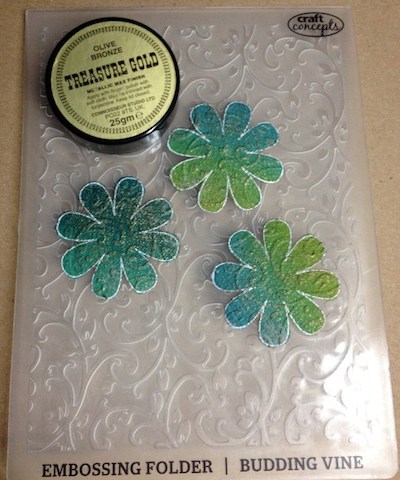
These were cut out by hand and a few were then passed 
through an embossing folder and the detail hi-lighted 
using some Treasure Gold Wax.


Next I made a paper stencil of the heart shape 
I wanted to form on my card with my flowers 
and using this lightly inked through to 
give an outline to follow. 

The leaves were then stamped using the 
Caribbean Sea ink pad and a trailing leaf stamp from PaperArtsy.


The cut out leaves were shaped over a pokey tool 
and stuck onto the card with Pinflair glue


Then it was a case of layering the flowers and 
trying out the design before attaching anything permently. 

For the centres I used a mix of brads, buttons 
and pearl beads. 

A few loops of matching ribbon were also added


The word wonderful was stamped in black onto an off-cut 
and then mounted onto a darker coloured scrap. 

The letters MUM were cut using Memory Box 
Parker Upper case die and more of the off-cuts. 

The final touch was a small heart shaped button 
in the bottom righthand corner.


I love the richness of the colour palette from 
this ink pad and the coverage is very good 
on even the most absorbant of surfaces. 

The added bonus of being able to separate the 
different colours means not only can you use 
one colour for stamping a small image or sentiment
 but also they don't bleed into each other."


Items Used

Kaleidacolor Caribbean Sea Ink Pad
PaperArtsy Flora and Fauna 6
Lavinia Zen Flower 2
Jofy 12
Studio 490 - Live and Make Art
Kaisercraft CS912 Flowers
Treasure Gold Wax in Olive Bronze
White and Clear Embossing Powder
Memory Box Parker Upper Case Die
Buttons and Brads
Craft Concepts Budding Vine Embossing Folder


Thank you Jane.  A lovely card for someone you love
and with Mother's Day coming up (in the UK) really
special indeed.


'Till tomorrow

Mickie xx


Wednesday, 28 December 2016

Wax, Paper & Acetate

Wax, Paper & Acetate


Hi there!

Fancy a little break from the
festivities?  A moment for yourself?

Here's a project from Craftyfield:


Acetate is a sure way of introducing something different
 in your card making and there are plenty of ways to play
 with the transparent aspect of it but 
today I chose to use it as my card base.

 To cut the base card I folded my A4 sheet of acetate 
in 2 and placed the fold within the cutting line of the square die. 
To hold it in place I use Removable tape.

I wanted to emboss the sides of the card and used 
a narrow embossing mat with a wall texture embossing folder 

I cut this one from a large size embossing mat 
and I have found useful to have small mats in 
different shapes to do partial embossing such as this


Another fun technique with embossing folders 
is using them with Wax paper.
 I embossed a wood texture in the wax paper. 
The photo is showing that I am 
wrapping the paper inside a folded A4 sheet of standard paper. 
This is because wax paper is very thin and will tear if embossed on its own. 
If you wish, you can use a single piece of cardstock instead 
and save it for another project

Next I created a sandwich with from bottom up:
The card for the project
The wax paper
A spare piece of cardstock

I wrapped the sandwich in greaseproof paper 
(or baking sheets) to protect my iron. 

Since I only wanted the design on the edges, 
I used a scrap piece of paper as a mask,
 identifiable in the photo by the green blob. 

I then ironed the sandwich using a cotton setting but NO STEAM. 
It only takes 30 seconds for the wax to melt onto the paper

With the mask still in place I applied 
Distress inks over the melted wax design.
I used a piece of plastic packaging as additional 
protection chosen because it is see-through.


With the borders inked, I proceeded to the stamping 
of the Dandelions, not with ink but with Judikins Micro Glaze 
which is a paraffin wax (i.e petroleum jelly). 

This will resist any waterbased mediums applied later.

I used my finger to apply the wax, be sure to go lightly to catch only the top of the stamp for a reasonably defined design

 I sprayed water on my cardstock and started sprinkling 
Brushos in black and blue around the Dandelions heads. 
I kept adding powder and water until I was happy the 
Dandelions were “revealed”


Next I assembled the card. For a perfect finish I needed 
3 additional pieces of cardstock, 
all the same size as the decorated panel. 
This way there is no glue showing and 
of course there is somewhere to write the message!


Clockwise I glued the decorated panel with 
double sided tape to avoid any glue 
spoiling the front of the card.

The second piece is easy to place by gluing it 
on the back of the decorated panel (not shown).

For the third piece (the message panel), I
 used removable tape to temporarily 
adhere on top of my second piece. 
I applied the glue 
(I used liquid just to give myself a bit more working time), 
closed the card on top of the panel. 
When the glue has dried open the card and 
remove the temporary adhesive by 
rubbing with your fingers or an eraser

Finally the fourth and last panel is glued to the back. 
It can be left bare for additional writing space or decorated as well.

A closer look at the Dandelions


Materials:

Hmmm.......... I had wondered what an iron was for! Haha!
Thank you Craftyfield that is a super card
with just the right amount of crispness for a
cold winter's day

See you all tomorrow folks...

Mickie xx


Friday, 16 December 2016

Happy Christmas

Happy Christmas


Hallo Everyone!


Here's a versatile wreath you can keep
from one year to the next or make as
a gift.  Brought to us by

Louise Thomson


Well it really isn’t long until Christmas will be upon us
 and so I wanted to share a project that
 could be used as a card or a decoration. 


Start by smooshing a selection of distress inks
 across a non -stick craft mat. 
I used ripe persimmon, fired brick and seedless preserves. 
Spritz this all over with water.


Press a sheet of white 12”x12”paper in to the ink
 and repeat a few times as desired to get a 
good coverage and colour on your paper.


Use the tattered florals die to cut as many flowers 
from your sheet as possible. 
With a bit of jiggery pokery you should be able to get quite a few!

Spritz the flowers with colour bloom to give them a lovely gold shimmer.


Use alchemy wax applied with your finger to add more gold highlights.


Place each floral component in the palm of your hand
and run the back of your thumbnail along each petal 
to give them a slight curve. 
Layer them together in twos or threes, 
fixing them with 3D foam mount pads


Arrange the flowers in to a wreath and stick down. 


Coat a piece of white card in antique linen distress ink 
and add highlights using tattered rose. 
Run the card through a die cutting machine 
with a woodgrain effect embossing folder 
then add a layer of ground espresso ink 
to highlight the texture. 

On a rectangle of white card, stamp and emboss 
a Chirstmas greeting using gold embossing powder. 
Ink up with more antique linen distress ink
 then stamp the vine around the edge in 
antique linen to give subtle detailing.

 Layer the components together and finish
 with a dot of gold stickles glitter in the centre of each flower.


Happy Christmas!


Materials used;
Distress inks– ripe persimmon, fired brick, seedless preserves

A lovely wreath Louise and the flowers
and sentiment would also make a lovely card.  

Thank you very much

That's me off to make my wreath
See you all tomorrow

Mickie xx