Showing posts with label Cotton Bag. Show all posts

Friday, 23 March 2018

Easter Egg

Easter Egg


Hello Everyone!

How are you all?  Hope you
are enjoying fine springlike
weather - it is snowing here
as I write!  Don't know about
Easter; it's beginning to 
look a lot like Christmas......

Claire Jackson is here with
a beautiful reminder of the
season..........


"Today I’m sharing an idea for an 
Easter or spring time gift. 

I started with a plain cotton bag and
 masked off a central square with tape 
and a homemade mask of a 
hare in the middle.

 I then painted the sky and grass
 with fabric paint.


When the paint was completely dry 
I stamped a variety of PaperArtsy flowers
 in Archival Ink and coloured them with 
more fabric paint. 


I added a little shading to the hare 
and stamped a border.


If you’re like me you have umpteen reusable
 bags in different places so that you 
never get caught out when you’re shopping."


This is just beautiful Claire
thank you very much for sharing

If you'd like to decorate a bag
then do take a look here
They're currently on offer.....


I have a lot of bags too, unfortunately
they don't seem to make it out to
the car very often................!!

'Till tomorrow

Mickie xx


Wednesday, 31 May 2017

Fabricated


Fabricated


Hallo Everyone!

I'm quite excited to have
Karen Gist here today with
another of her fabulous
creations so without further
ado, over to you Karen:

"Hi, I have chosen to decorate the Cotton
 Carrier Bag for this project. 
What a fantastic bag this is!!! 
Its made of sturdy cotton, 
is a good size and has a zip...I love it!!!!

To start - stamp the sunflower from the 
PaperArtsy set ELB24 on some scrap paper
and cut in half.

 Enlarge it by using a photocopier or your 
scanner software and print out. 

Now trace the image onto your bag. 
I chose the sunflower but you could 
use any stamped image this way.


Paint your image. 

You can see by my photo that these 
Starlight Paints are super shimmery! 
They have a lovely consistency for fabric too.


Punch shapes into some fairly stiff card
 to use as a stencil. 

I used a Woodware scalloped circle but you 
could use any shape you fancy.

Dab paint through the circles randomly
 over the rest of the bag.


Add some other circles by dipping a bottle top
 into the paint. 

Heat set all the paint using an iron then doodle 
around all the shapes using waterproof pens. 
(I used Uniballs for this)


Sew some ribbon and braid across the top of the bag 
and add buttons to the small circles and
 large buttons to the handles. 

Tie a length of ribbon to the zip pull and you are done!


Supplies used:

Ribbons & Buttons


Karen your bag is just
right for the summer.
Thank you very much for
a lovely project


I'm going to have to make one 
of these - I can just hear people
asking me where I bought it

Hmmmm..... pocket money opportunity?.....

'Till tomorrow

Mickie xx


Friday, 10 March 2017

Bag It

Bag It


Hallo everyone!

I have decided that one cannot
have too many of these bags.
They seem to make even the
most mundane items look as
though a special purchase
has been made


Here's Hazel Harler with her
gorgeous bag 

"This is my decorated bag using the So Soft fabric paints


I started by putting a piece of corrugated card 
inside the bag, this was to give me a firm surface 
to work on and stop the paint from going through
 to the other side of the bag. 

Sorry about the photo, I didn't realise that the 
shutters on my camera hadn't opened properly.


I used a sponge the add the paint.


 I mounted some small Gelli plates onto 
acrylic blocks and used them like stamps 
to add the colour,

 I must admit that I like this and wonder 
if I should have stopped there.


Then used a sponge to stencil the paint onto the bag.


I stencilled some flowers.


I used some indian ink markers to give 
the flowers a bit more definition

I also added some white dots here and there"


Thank you Hazel, that
really is a versatile design


I'm thinking that you could stop
at any of the stages and still
have a stunning bag.  I would
go so far as to say that you could
make a series of bags and stop
the decoration of each one at
the end of the different stages

That'll be the birthdays sorted for this year then....

'Till tomorrow

Mickie xx


Wednesday, 8 March 2017

Bag It


Bag It


Hallo Everyone!

How're you today?  Well
I hope and having a great
week.  

Not sure I'm full of the 
joys of spring but today's
project brought to us by
Craftyfield might have
a lot to do with it!


"Since last year's introduction of the plastic 
bag charge in the UK I make sure I always have
 a bag with me, preferably one that is light 
and that I can fold and shove in my handbag. 


A crafting opportunity... 

As this is my first time using So Soft paint, 
I decided to put it through its paces and 
test several ways of using it: 
as a wash (like watercolour), to stencil with, and to stamp with.


This is the bag before transformation. 


To prepare it for colour, I have ironed it and
 inserted a rigid piece of cardboard with some paper
 on top to absorb any excess water or paint seeping 
on the wrong side.

 I also masked out the area of my painting.


The So Soft paints are quite pigmented so for my sky 
I have prepared a mix of Mediterranean Blue paint and water 
in a small container and brushed some water on 
what will be my sky.

 As I go down the fabric I add more water
 to the mix fading the blue to (almost) nothing.


 I have repeated the process with green for the grass 
and lastly in the middle with the Buttermilk.


 Next I used a small sponge to stencil circles
 with So Soft paint using a DIY stencil. 

These will be my flower heads.


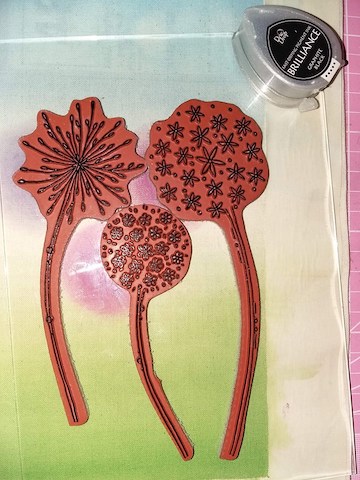
To stamp my flowers I used Brilliance ink in Graphite Black. 
I tested on a separate piece of fabric and found
 that Versafine and Archival stamped equally well,
 but not better than Brilliance, and I find 
easier to wash Brilliance off from the stamps... 

To make sure the ink was wet enough 
I topped it up with the re-inker before starting.


 Here I'm using 2 of the smaller flowers from the 
stamp set as a filler.

 A small piece of plastic packaging serves as a 
palette(bottom right) and I have spread paint thinly on it.


Now for the stencilling.... Again I'm using my DIY stencil, 
the distressed diamonds have been die-cut with 
the Mixed Media Thinlits set.

 I mixed Buttermilk and Dark Burgundy paints 
to get the pink I was after.


And finally a close up taken in natural light. 


I still have the reverse unpainted so I can have more crafty fun!

I liked the So Soft paint very much, as it is easy to use
compared to traditional fabric paints and they are
 indeed soft, which might not seem like a big thing 
for a bag but, as I said, this one will spend its life folded
 in my handbag so cracked paint is out of the question!"


Supplies: 
Cotton bag natural:
So Soft paints:
Paper Artsy EKC02:
Brilliance Dew Drop inkpad in Graphite black:
Brilliance ink reinker in Graphite black: 


Thank you Craftyfield for your beautiful bag
Love the depth of shading you have achieved

These paints really do work well, although I never
thought of adding water to them and using as a wash.  
That was a masterstroke.


'Till tomorrow

Mickie xx