Showing posts with label Copics. Show all posts

Saturday, 30 April 2016

Woodware - Dawn Heald


Helloooo,

Happy Weekend everyone,
Can't believe it is here again, where
are the weeks going....
May tomorrow, that's scary.

This week we are featuring the
fabulous Woodware stamps.

Today is Dawn's turn,

This is what Dawn has to say.... 

Hi crafty friends,
I've made some bookmarks this week,
 thought they would go with the recipe
 book made a few weeks ago. I've used
 the same stamp but in a difference
 way by cutting up the elements. This
 is what I love about Woodware stamps,
 each stamp can be used multiple ways
 and they really are quality clear stamps and
 affordable. So do check them out.


To make the main bookmark pieces.


 On
 A4 card, use distress inks to colour all over.
Then take the Liquid Pearls and squeeze
 some on a brayer and roll onto the inked card. 
Repeat all over card with both colours. Then
 brayer over this with a light layer of
 white gesso. Let dry then repeat with
 Liquid Pearls as before. Let dry.
Cut into strips to make bookmarks.


Next use the Sequin Waste Mask and
 the orange from Neon Ink set to
 stencil parts of the bookmarks.


Then using the little Happy wording from
 Flowers In A Row stamp set, stamp with
 red Stazon ink across the bookmarks. Edge
 the bookmarks with green pen.


Mount the bookmarks onto a larger
 pieces of Orange card.

Next using the Woodware Baking
 Sampler Stamp,
 stamp the whole image once and then just
 the word part another five times.

 
Colour in with alcohol pens. Then
 cut out each section.


Stick the coloured images to the bookmarks.


 Then finish with dots of white gesso and the
 wrong end of a paint brush around
 the bookmarks.


Wow, thank you Dawn, these
are so colourful!  I think these would
make a lovely gift!

If you want to have a go,
this is what Dawn used -


Distress Inks - Squeezed Lemonade, Twisted
 Citron, Marigold.
Liquid Pearls - Daffodil, Key Lime 

That's all for today,
I'll be back with......

Challenge Day!

Jane x

Friday, 29 April 2016

Woodware - Jane Collman


Good Morning all,

It's Friday, nearly the weekend already
and our second post featuring 
Woodware stamps.

Today it is me again.

I'm sorry, I couldn't help it, 
I picked the Dragonfly stamp.
You know me and dragonflies!!
This has got to be one of my all time
favourite stamps....I've used it many 
times and in many ways.  It is great
got using hot glue.....but that is coming
in another post haha!!


I started off by stamping....


Copics for colouring....


Cut out the extra bits you need....


Layer up some contrasting card.


Add some shadow to your dragonfly....


Colour the flowers....
(I kept them pale as I wanted the dragonfly
to stand out)


Colour, using same pens, around the 
outside edge of image.


Add the cut out wings using hot glue,
this keeps the required shape and cools
quickly!


To finish add a little sparkle to 
the wings...


This is a reasonably quick and easy card,
with the extra dimension, looks really
pretty!!

This is what I used -


I'll be back tomorrow with more
Woodware!

Jane x

Saturday, 30 January 2016

Triplets - Dawn Heald


Happy Weekend,

It's Saturday again and I hope you have 
a nice weekend planned!
Not sure what we are expecting weatherwise
but I'm sure its bound to involve
some of the wet stuff!

This is our last post of the week and
today Dawn is here to show you 
what she has been doing....


Dawn says.....
Hello how's everyone doing? For our topic
 this week I decided to make a set of
 ATC's (Artist Trading Cards) as it's been
 ages since I last made any. I also had
 a play with some of the new Liquid Pearls in stock.


To make a background, squeeze some 
Liquid Pearls onto a craft mat and use a 
brayer to apply to white card. Repeat for
 each colour in turn, building up layers.
Finish with a light layer of white gesso 
applied with a brayer.


Cut black card into three pieces measuring
 3.5" × 2.5"


When background is dry cut off a section
 to be used for the ATC's.


Add some stencilling and Stamping
 to build up flat layers.


Cut into three pieces slightly smaller
 than the black pieces of card and glue
 each to the black card.


Stamp, colour and cut out three owls.
Attach owls with foam pads.

Print or stamp twit twoo and stick under  owls.
Add some white paint dots around cards.


The liquid pearls does make
 a great paint and the sheen on it is lovely.
 The white paint layer brings it together well. 
Hope you like!

Yes we do like Dawn, thank you!
What do you think?
I'd never thought of using Liquid Pearls
like that.


Products Dawn used -
White Card

So that is another week gone,
I'll be back with the Weekly Challenge
tomorrow! 
Now, what shall we have this time?

Jane x


Saturday, 24 October 2015

Halloween Week - Dawn Heald


Happy Weekend everyone,

What are you all up to I wonder??
Getting ready for Half Term?
Can't believe that has come around 
so soon!

Is it tonight the clocks go back??
Yay an extra hour in bed!

Ok, our last post of the week is from
Dawn.  This is an amazing card
for you!!

Dawn says....

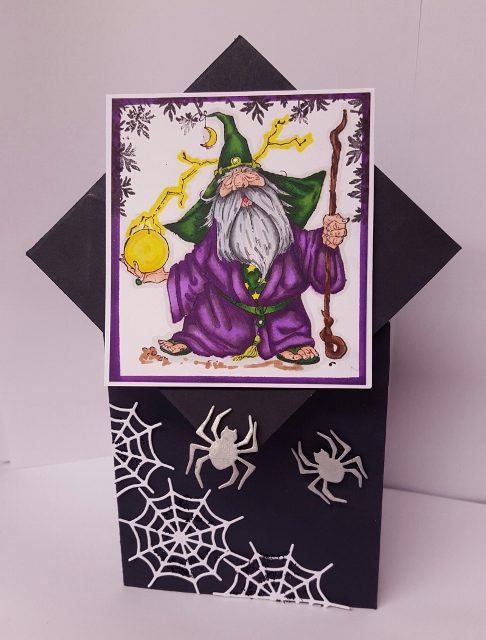
I've made a diamond top fold card. 
These are simpler to make than at first look.
 Once you've made one it's easy going. 
I've included a photo of how to and tried
 to explain best I can. So do have a go.
 It's one of my favourites to make
 and little equipment needed.
You can mark with pencil lines but just
 scoring lines from measurements
 is sufficient.


Take A4 piece of card. (21cm across)
Position with short edge at
 top in portrait position.


Across top and bottom short edge 
measure 10.5cm and join up lines
 with ruler and scorer.
From top measure down 10.5cm on 
each long edge. Join up marks

From the last mark made on both long 
edges.  Measure down 7.6cm and mark.
Next, go to your score lines where they 
meet like a cross shape and from this 
point measure down the centre line and 
mark 3.5cm.
Next place one end of your ruler on
 the 7.5cm mark and swing it up to the
 3.5cm mark and score line between
 the two marks. 
The picture shows the way to fold. But 
basically the cross shape  is mountain folds
 and the slanted V shape are valley folds.


 To make card you then push up from 
the bottom and fold the top over 
this as you push.


Stamp and colour Wiz stamp. Die cut 
spiders and Web and attaching card.
 Add some black glitter on webs to finish.


Wow, love this, it's a long time
since i made one of these shaped cards...
must do it again as it looks so nice!!

Products used -

Thank you Dawn,

I'll be back tomorrow with 
our new challenge!

See you then,

Jane x

Friday, 4 September 2015

Stamping Bella - Dawn Heald


Helloooo,

It's Friday and the weekend is nearly
here.  It's also the first Saturday of the month
tomorrow so that means it is Inspiration
 Day at the shop!

Tomorrow you will find 
Darcy Wilkinson and Helen Chilton
encouraging you to get messy with them!!

Do come and see what they are up to....
you will not be disappointed!

Ok, well today we gave our DT 
Stamping Bella
to play with.  These are a lovely range 
of stamps, there is something for everyone
and you can find them here.

Today we have Dawn to show you
what she has been up to -

Hi crafty friends, this week our topic of 
Stamping Bella is right up my street. I
 love sitting down and colouring losing time
 so quickly. And what I really like about
 Stamping Bella is the range of stamps.
 So do check them out and treat yourself, 
they stamp beautifully. My card
 is quite clean and simple for me. Hope you
 like it. Oh and I've used Copic Markers
 for this, first time I've used them and what
 a treat!


So to make this card - 
Cut a square of white smooth card and stamp,
 using black Memento ink, Stamping Bella -
  The Way You Move in the bottom right 
corner. Colour with markers.
 

For her hair
 I coloured with little dots to try out a
 curly frizzy style hair do.


Use two light grey pens at the end to colour
 around the image. Darker grey in 
shadow areas.


Stamp "Hello Friend" greeting from the Kaisercraft
 Shine Bright set in top left corner and 
small arrows in bottom right corner.
Then using the Neon Inks, stamp around the
 image with the two patterned circle stamps.
 Run black ink pad around square edge.
Finish with some black and clear gems.
 Fix to card blank.


Products used -

Radiant Neon Ink Pads - Warm ColoursCool Colours


Thank you Dawn, this may have been
your first time using Copics but you have 
certainly done very well with them!

Ok, I'll be back tomorrow so see you then!

Jane x

Friday, 7 August 2015

House Mouse - Jane Collman


Morning all,

Welcome to a new week on the blog, projects wise 
that is.  
I've given Neil the week off as we are featuring 
House Mouse
and that really isn't his 'thing' haha!!
So hopefully he will be back with us next week 
and I'm afraid you will have to put up with me instead!!

Well I love House Mouse and I'm so glad
we have got them back in the shop again and they
are perfect for a nice afternoon sitting colouring-in!!
What could be better??

So today I have picked a Christmassy stamp although
it could be used for birthdays etc.


Ok, so for this project we are going to use Copics.
Don't forget to use the right card and ink.
I do find Memento ink best as it dries quickly and doesn't
bleed with your alcohol markers.


Begin by colouring in the mouse, I have shown you the
colours that I have used. Start with the lighter colours and
add the darker, blending with your lighter shade.
There is not a lot of blending to do on the mouse! 


I decided to make my parcels red and green.
Again, start with the lighter shades and build up with the 
darker, in the shadows but then blend with the
 lighter colour.  On my classes I am often asked where
do I put the shade? On these stamps it is easy, you
find they have lots of little dots in certain
areas, that is where your shade is.  They have done it 
for you so all you have to do is colour those areas 
with your darker shades!


Keep going with your parcels, working on one 
at a time.


Finish colouring in your parcels, you will see there
are a couple of areas where I have gone over the lines!!
It happens......everyone does it!
This is when you use your blender pen to 'push' 
the offending bit of ink back into your parcel.
Darker colours are always a little harder and may take
a couple of goes leaving it to dry in between.


When you are done, it is time to start your
 background.


This is where your greys are so useful.
I really love the greys, I use them all the time, on
this project I used the W's, warm greys as my
red and green parcels were warm colours as 
opposed to cool...blues.
I've used the W4 next to the image and then 
blended it out using the lighter greys and
a blender pen if required.  


Mount on to red and green card before attaching to a base
card.  Finish by adding a little Stickles
to the snowy base and parcels to highlight them!


Finished!
Sit back and admire your colouring.

I haven't added a greeting to this card but it would 
be easy to add a stamp or peel-off of your choice.

If you want to have a go, this is what
you'll need.....

E0000,01,93,95,97,99
R21,22,24,27,29
G14,16,17
W00,0,4
BG10,11

Well that's all for today, 
I'll be back again tomorrow with another project.

Jane x