Showing posts with label Calico. Show all posts

Friday, 2 June 2017

Fabricated

Fabricated


Hi Everyone!

Hope everything is on
track for you - all going
smoothly here

In fact, I am even contemplating
digging out the sewing machine
Shall reserve this exercise for a
rainy day - hope I can still 
remember how to thread it.....
.........it's been a while.....

Craftyfield is joining us today
with a rather nice tutorial using
the lovely Starlight Textile Paints


"When I received the new Starlight Textile
 paints and a lenght of calico from 
the Craft Barn I settled down to test 
my new materials.

 In this first piece, I applied a mix of Starlight 
with a slightly wet sponge. 

I noticed that the darker Starlights were 
not as shiny as the Pearl but I 
guess it's necessary to give a good depth 
of colour.  Also, by using a sponge, 
I only applied a thin layer and the metal flakes
 in the paint are spread over a larger area 
for a more discreet look


In my second experiment, I wanted to combine 
the textile Starlights and So soft paints for a
 contrast between the shiny paints and
 traditional colours. 

I used the Gelli plate to layer the stencilled 
So soft paint in Dark burgundy and 
the Starlight in Petroleum which I applied 
all over the Gelli plate (over the already 
stencilled paint). 

The technique worked well enough but the 
paint was drying too quickly for a decent print on fabric. 
The distressed look is interesting but not for 
today's project however...


 I like my makes to be useful and my cushion 
covers badly needed a replacement 
so this is what I decided to make. 

I have no sewing skills so I try to simplify 
and use shortcuts at every opportunity. 

I worked out my cushion design to include 
a velcro closure as the easiest one to sew, 
although I'd have plumped for snaps closures
 if I'd had the tool to set them!

I thought I'd better make up the cushion first 
before decorating to make sure the art was centered.


The velcro closure.
I haven't decorated the back, 
although this could happen in the future... 
I'd love to try the new textile sprays 
with stencils next!


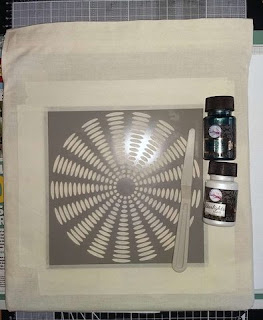
I placed the stencil and used masking tape 
all around to stick it down firmly.

 A pad of scrapbook papers is ensuring the 
fabric is held taut and prevents the paint from 
oozing to the back


I created an ombre look from the center out
 adding Pearl incrementally to the Petroleum 
with a palette knife. 

Unlike my previous tests the paint is a 
lot thicker which gives a lot more shine 
as well as a 3D look.


See how the ombre gradation emphasises the
 impression of a rotating wheel. 
In fact, my other half can't bear to look at it!


For a bonus project, do come by to my blog 
to see what I did with one of my test pieces !"

Supplies:
here's one already sewn up for you
or pick from a selection of fabric bags here

Super tutorial Craftyfield
I have to agree with your
other half - that stencil is
quite mesmerising just
looking at it on screen
..........!  What a fabulous
effect that is - thank you


I can see I shall have to invest
in that stencil...........

'Till tomorrow

Mickie xx


Thursday, 1 June 2017

Fabricated


Fabricated


Hallo There!

Lovely day again.  What's
the weather like where you are?
Whatever it is doing, it is always
sunny here on the Blog

Today is no exception - you
should get yourself some
refreshment and find a comfy
seat before you go any further

Angela Radford is here today
and oh my, has she got a
fabulous project to share...


 "Hi Angela back again! 
Sorry yet another lengthy tutorial but 
hope you enjoy watching as much as I 
enjoyed making it. 

To start with here is the collection of 
Starlights Textiles paints I used for this project:


Put a small amount of paint into a palette 
and spread it so that you don't have too 
much paint on your brush.


The fabric is the Calico that Sandy stocks 
and I used a full width by 45 cm but obviously 
this depends on what you decide to make when 
this stage is complete. 

Using Tim Holtz stencils apply the paint 
by dabbing gently through each one. 
I made about six or seven of each one
 I used, covering the whole length of fabric.


When you have finished the stencilling 
allow these to dry and iron on the wrong side. 

Complete instructions are on the jars. 

I used scissors to begin cutting them apart 
but actually ripped them as I wanted
 the frayed edges to show.


Now it's time to start attaching them 
to the backing. 

I used a batting fabric for this as I wanted 
a quilted effect but another piece of the Calico 
would work too.


And here is the finished piece. 
I've used several different stencils and 
different stitches too. 

This is definitely a grungy style 
with the frayed edges showing.


 I removed a small section at the end to use
 for the closure and then you need to sew the 
sides of the main fabric and lining.


 I like to box my corners when making a bag
 but this is up to you.


Here you can see the finished corner, nice and neat.


It's a good idea now to iron the seams flat 
before continuing. 

I would cover this with a piece of 
muslin before ironing.


 Place the lining inside the bag with the 
wrong sides together and pin.


Machine all the way round.


I cut a strip of the Calico to go all the way 
round the top of the bag and machined 
it in place on the inside and then 
folded it out to the front.


Tack this in place to cover the top edge 
and then machine all the way round.


Here is the flap ready to be attached at the back


Cut two lengths of fabric to the length and 
width you prefer and sew these inside out 
with interfacing attached and 
then turn the right way round.


And here you have the completed bag. 
I wanted this to be large enough to 
carry a 12x12 journal so it is quite big.


Here you can see the inside with the flap 
attached at the back and the handles securely
 sewn in place.


I left the flap open at the top as it can be used as a pocket.


I used velcro as the fastening for the closure
 but again this is just preference. 

So that's your lot my friends. 
Hope you enjoyed that and see you soon.
 Angela xXx"


Materials Used:

Lining Fabric
Batting
Velcro
Interfacing

Thank you Angela

What can I say?  I am absolutely
speechless - I need to go back
to school and repeat the
Use of English course I did
way back when........
Maybe this will cover it:
Wunderbar, die Tasche ist 
enfach super! 

Bis Morgen!   oh sorry....
Till tomorrow
Mickie xx


Thursday, 16 July 2015

Homespun Wreath - Rachel Snook


Morning all,
Kicking off a new week here on The Craft Barn Blog,
this week we will be featuring Homespun Wreath and the DT will be 
showing you what they have created.....

Ok, today we are starting with a project from our very own
Rachel.  Many of you will know her from the shop, not only
as sales but also as a tutor.  Rachel is going to join us on 
the DT bringing you two projects each month! 


Cover the wreath with 2" wide strips off burlap,fixing the start
and finish points using hot glue gun. 
Seal the edges with Matte Medium with sponge 
applicator in dabbing motion and leave to one side to dry.  
The medium should dry clear.


 Take the burlap squares and sponge these with Matte
Medium and leave to dry, do the same with the white calico.
  The medium stops the materials fraying.


Spray the calico with Biscotti Perfect Pearls when dry 
this will leave a  slight shimmer when materials are dry
die cut both the burlap and calico with Tim Holtz 
Tattered Florals


Decide how many flowers you would like and how 
you wish to place them on you wrapped wreath.  
Glue the flowers together with hot glue gun.


Thread the buttons with loose threads from the burlap 
                                         and knot on the back.


                                      Glue buttons in the flowers. 
  Decorate the wreath as desired.
With the remaining burlap I sealed down the side with some 
strips with glue.

 
I removed the long threads by pulling
them out.


I then folded the strip over and sealed the same 
with hot glue. Roll the strip making a loopy flower, these
would make a nice backing for a brooch but turned out too
deep for the look I wanted on my wreath.


Items used -
Burlap and Canvas packs
Sponge Paint Brushes

So that is our first wreath of this week.
What do you think?
You know we like to hear your comments!

I'll be back tomorrow with another project,

Jane x