Sunday 30 July 2017

Twelve Month Challenge Winner

Twelve Month Challenge Winner


Hi Everyone and apologies too!

Almost completely forgot to
announce the winner of the
Month Challenge..............!

Here I am though and thankfully
still within the month

There were nine entries this month
and well done for getting to grips
with the Gillyflower challenge

The winner was picked by the
Random Generator and I can
tell you it is ............................


No 9


Step forward Scrapmate and claim
your prize; please email me at
mickiecraftbarn@gmail.com


Commiserations to everyone else 
and I wish you better luck next
time


'Till tomorrow

Mickie xx

Saturday 29 July 2017

Woodn't it be Lovely?


Woodn't it be Lovely?


Saturday Greetings to you!

No, I'm not sure what they
are either but I feel it does
make Saturday sound a
little special!

In many ways it is sad that
weekends and weekdays 
just seem to run into each
other but oh, I could not
count the times when I've
been grateful for the shops
being open all weekend....

Proof if ever there was that
you cannot please all the
people all of the time!

We have Claire Jackson here
today to show us what she
has made of the Kaisercraft
Wooden Flourishes


" Hi!  I think they are very versatile. 
I’ve used them for altering books and boxes,
 making frames and card embellishments
 and with summer in full swing,
 I thought they would be great for making
 some co-ordinating jewellery.
 

First I sprayed some Color Bloom 2
 marigold ink into a glass pot to paint with. 

You can spray directly onto the wooden 
piece but it is a bit wasteful 
for such a small item. 

Make sure you give the bottle a good shake
 so that the mica is completely mixed in.

 I painted two layers on the bird cages 
to get a deeper colour. 

If you want a more pastel look,
 paint a white layer first in chalk acrylic
 paint which will give a partial resist.


Next I painted the swallows.
 Don’t forget to turn them so they face
 in different directions. 

I only added a second layer across 
the wings to create some shading.


Heat emboss the shapes by pressing 
one side onto a clear embossing ink pad 
and dipping it into clear embossing powder 
before melting it with a heat tool. 

I repeated this three times to 
build up a nice smooth finish.
 
If you are quick between layers you
 don’t need to re-ink as the embossing
 powder will stick to the warm layer below.


Try experimenting with different combinations
 of shapes and colours. 
You can paint two different colours
 onto one piece, but I would advise
 being a little more patient than I was
 and make sure the first colour is completely
 dry to minimise them bleeding together.


Finish off with gems and jewellery findings. 


They are a great idea for inexpensive presents 
or if you are holding a craft stall at a fair."


Materials used:

Kaisercraft wooden flourishes pack: bloom, antiques
Color Bloom 2 spray mist: dragonfly blue, fir needles, pot marigold
Clear emboss ink pad:
Detail embossing powder: clear


Well, I certainly did not see
that coming Claire!  Thank you
so much for yet another super idea!


So, that was the last project for
this week.  What did you think?
I really enjoyed seeing what was
inside the box and will look at
the contents more closely now

'Till tomorrow

Mickie xx


Friday 28 July 2017

Woodn't it be Lovely?


Woodn't it be Lovely


Hi there!

Are you enjoying this
theme as much as I am?
When I first saw these
wooden embellishments
I was somewhat bemused
but I am fast becoming
a convert to their versatility

In case you haven't quite
made up your mind take
a look at Hazel Harler's canvas:


 "Hi everybody, my latest project 
is an oriental canvas using
Kaisercraft wooden flourishes 
and Color Bloom sprays.

 I used a canvas board, 
Kaisercraft wooden flourishes
 and a piece of chipboard.


 I also used Kaisercraft stencils
 and blosson stamp - 
in the end I didn't use the bamboo stencill


I stencilled some modelling paste 
on the canvas board and 
when it was dry I gave 
it a coat of gesso. 

I also gave the chipboard and
 flourishes a coat of gesso.


 To colour the canvas I scribbled
 some Gelatos over it.


Then I used a baby wipe to spread the colour.


I turned the canvas upside down 
and sprayed some sunshine Color Bloom 
and let it run down the canvas, 
then added some dragonfly blue Color Bloom.

I then sprayed some iris Colour Bloom 
on the top and let it run down the canvas.


Then I sprayed some wild raspberry Color Bloom.


I stamped the main image onto tissue paper
and on the back painted the face white,
 I also stamped the blossom onto tissue paper 
and then used matte medium to glue them 
to the canvas and chipboard. 

The wooden flourishes were painted with
 iris Color Bloom.


 I glued the wooden flourishes and
 image to the canvas and then I used 
my finger to spread some white gold
 Starlight paint over the blooms
 and edges.


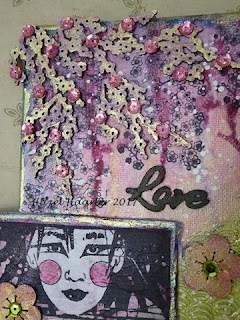
 A close up showing the gold 
Starlight paint and the sequins
 that I added


The finished canvas.


Supplies:


This is a lovely canvas Hazel 
Thank you for showing it
to us

Amazing what you can do
with these wooden flourishes

'Till tomorrow

Mickie xx


Thursday 27 July 2017

Woodn't it be Lovely?


Woodn't it be Lovely?


Hallo Everyone!

lHere we go with another
look at the those little wooden
embellishments from
Kaisercraft........oops!  I
think they call them flourishes!

Angela Radford is with us
today to show us another way
..............

"Hi everyone, Angela here to
show you what fun I have been
having with PaperArtsy stamps,
Color Bloom sprays and 
of course the Kaisercraft Flourishes

 started by stamping onto plain white
 card with perfect medium ink and heat 
embossing with clear powder then using the 
Colour Bloom sprays I added colour to 
the card.


I continued to spray a variety of colours 
onto the card and then allowed it to dry 
adding more heat embossed images too.


The next thing was to stamp the chosen
 images onto the card and then cut these out.


To prepare the card blank I folded the front
 section in half to create a Tri-fold type card. 
Then attached a coloured card to the 
front and inner sections.


For this background paper I simply sprayed 
the Colour Bloom onto my craft mat and 
pushed the card through it. 

Let this dry and then using the same ink
 I applied it through a Tim Holtz stencil.


 Once this was dry I cut it to the correct size and 
layered it onto the card. I also added some 
stamping using a Carabelle stamp called 
Circles and Text to add a little more interest 
to the background.


Here you can see what it looks like on the 
inside and the gprgeous shine from the ink.


 Now I stamped the sentiment and
 began adding the images.


 Here we are a little further on. 
The large flower was cut and trimmed 
with other sections added to it including
 the leaves.


Also prepared the Kaisercraft embellishments
 I planned to use by colouring them with
 the Colour Blooms.


 Once everything was ready I was able to finish 
mounting all the images and embellishments.

 Completed the design with the addition of
 Stickles Glitter Glue. 


Hope you enjoyed watching me 
make this card. 

Happy crafting, Angela xXx"


Supplies:


Thank you Angela, always a
pleasure watching your creations
come to life!

Well, I think I'm beginning to get
some idea on what to do with
the Kaisercraft Flourishes.  One
tray could go a long way.......

'Till Tomorrow

Mickie xx