Saturday 31 October 2015

Penny Black - Dawn Heald


Happy Halloween,

Morning everyone and hope you are 
all going to be doing something scary this
weekend!!
Don't over indulge in the sweeties though!!

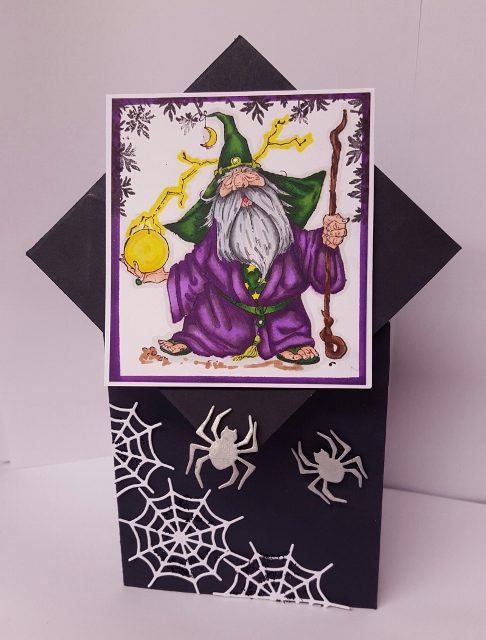
We are continuing our Penny Black
theme today and Dawn is here with us
to show you her lovely card!

Dawn says.....


Here's a card for this week.


I've made a simple card as this Penny Black 
stamp is so beautiful and versatile, think 
decoupage for the flowers etc. The butterfly
 and banner I cut out and used on its own. 
So to show this I focused on the colouring, 
using Autumnal colours and a little bit 
different to the normal way after seeing
 Gee Assam do this. A great artist.


Stamp image in brown Memento 
ink. Colour with alcohol pens. 
Layer onto coloured card with some 
ribbon sandwiched in and job done. 
However, look at the colouring. 
No blending at all.


Start with your lightest colour and let dry.
 Then with your next colour go all over
 your first layer but leave some showing 
and move through your colours
 to the darkest in the same way.

It does take time and thinking at first 
but is easy to do without worrying about 
 blending yet still producing
 a great finished look. 


This was my first attempt and I hope to
 improve with practice. Do have a try.

Enjoy x

Dawn, it is absolutely beautiful!
I would find it very hard not to blend these
pens but this really works!!


Products Dawn used -


Ok, well as you know it is the last 
day of October today so tomorrow
I'll be back with the next two
words for the Calendar Challenge!

See you then,

Jane x


Friday 30 October 2015

Penny Black - Neil Walker


Hi everyone,

Hope you are all well!

Another week nearly over and another month 
nearly over too!
Don't forget to get your October Calendar
Challenge projects in soon as November
starts on Sunday!!

This week we are featuring Penny Black.
A company that have been around forever,
I think some of my first stamps around
20 years ago were Penny Black!
Still got some too and they look like new.
But then I am a bit fussy about keeping
my stamps clean!

Neil is here today to show us
what he has been up to
making a lovely double page
layout.....


Stick the labels onto white card and cut out
 leaving a border.


Arrange your photos and labels onto your
 layout until happy. Glue in place.


Add some liquid glass along the edges and 
use a brush to pull it out a bit.


Sprinkle dry stickles over and leave to dry.
 Brush away the excess.


Take the Tando Creative word and paint it white.


Use the Tando Creative Snowflake mask
 and the white paint with Cut and Dry
 Foam to add some detail.


Die Cut the Penny Black tags, add ribbon and
 glue in place.


Add detail to the images with Liquid Pearls.


The finished layout....


Fabulous Neil, thank you.

I must do some more scrapbooking myself, 
always nice to look back on, our
memories are very important.

Here is what Neil used -


From stash -
Snowflake Stencil

I'll be back tomorrow with
another project, see you then.

Jane x


Tuesday 27 October 2015

Weekly Challenge Winner


Morning all,

Another week here on the blog and the last 
week of October, so don't forget to get
your October Calendar entries in 
this week!

So, it is Tuesday again and that 
means Mr Random Generator has 
been called in to do his stuff!!

Your challenge was a good luck
project for Sandy and Ian 
for their new venture!

Fabulous entries as always folks,
thank you!

So who has he picked......


....... no 9 .......


KIM


Congratulations Kim on being our winner 
this week.
Please contact me at
janecraftbarn@gmail.com
so that I can send you your prize voucher.

Thank you all so much for your lovely 
Good Luck cards and wishes!
We look forward to the online business
becoming bigger and better with
lots of new products to tempt us!
Haha!!

See you soon,

Jane x


Sunday 25 October 2015

Weekly Challenge


Hi everyone,

It's Sunday again and a new
challenge is calling....
well it has got to be.....hasn't it!

Yes.....

Halloween

What else could it have been?
So anything witchy, spooky,
pumpkiny anything you like that
'screams' Halloween!!

I can't wait to see what you are going 
to do with this one.
Perhaps there should be a bag of 
sweets as a prize?
Nah, only joking, it will be a £10
gift voucher!

So, as usual you have one week, the link 
will close at midnight on Sunday 
1st November.
You can enter as many times as you 
like, via the link or send your pictures to me at
janecraftbarn@gmail.com 

The winner will be announced on Tuesday
3rd November.

Gosh, this means you only have one
more week to get your October Calendar
project entered into the Challenge!
Where is this year going?

See you soon,

Jane x 


Saturday 24 October 2015

Halloween Week - Dawn Heald


Happy Weekend everyone,

What are you all up to I wonder??
Getting ready for Half Term?
Can't believe that has come around 
so soon!

Is it tonight the clocks go back??
Yay an extra hour in bed!

Ok, our last post of the week is from
Dawn.  This is an amazing card
for you!!

Dawn says....

I've made a diamond top fold card. 
These are simpler to make than at first look.
 Once you've made one it's easy going. 
I've included a photo of how to and tried
 to explain best I can. So do have a go.
 It's one of my favourites to make
 and little equipment needed.
You can mark with pencil lines but just
 scoring lines from measurements
 is sufficient.


Take A4 piece of card. (21cm across)
Position with short edge at
 top in portrait position.


Across top and bottom short edge 
measure 10.5cm and join up lines
 with ruler and scorer.
From top measure down 10.5cm on 
each long edge. Join up marks

From the last mark made on both long 
edges.  Measure down 7.6cm and mark.
Next, go to your score lines where they 
meet like a cross shape and from this 
point measure down the centre line and 
mark 3.5cm.
Next place one end of your ruler on
 the 7.5cm mark and swing it up to the
 3.5cm mark and score line between
 the two marks. 
The picture shows the way to fold. But 
basically the cross shape  is mountain folds
 and the slanted V shape are valley folds.


 To make card you then push up from 
the bottom and fold the top over 
this as you push.


Stamp and colour Wiz stamp. Die cut 
spiders and Web and attaching card.
 Add some black glitter on webs to finish.


Wow, love this, it's a long time
since i made one of these shaped cards...
must do it again as it looks so nice!!

Products used -

Thank you Dawn,

I'll be back tomorrow with 
our new challenge!

See you then,

Jane x

Friday 23 October 2015

Halloween Week - Kathy Byrne


Hellooooo,

Oh my goodness
what a treat we have for you today!
Kathy Byrne is here with us to 
show you one of her fabulous mini albums!
I have been doing her album 
classes this year and I am
absolutely loving them.
You really will love this......


This is how to make it -

Take a 12" x 12" piece of cardstock
and score at 6".  Rotate and score
at 3 3/4", 4", 7 3/4" and 8".


Cut 1 1/4" to 1 1/2" (depending on how 
deep you want your pocket) off top left side
 section. (Save this piece to create flap on 
lower right hand section)
Cut away sections shown in picture.

Score a 1/4" gusset on the bottom flap to 
create space for photo and journalling 
tags in the pocket.
Fold and sharply crease all score lines.

Fold album together before you start to 
decorate. You might have to cut a little 
off the top to make the cover flush with 
the body of the album.

From A4 cardstock cut two hinges 5 3/4"
x 1" and in the landscape position, 
score at 1/2".
Using wet glue, adhere the hinges to 
the edge of both sides of the left 
centre flap.  Fold over and adhere to the
opposite side creating a pocket with 
gusset.


Decorate the back of the pocket page 
at the base of the album before 
attaching the pocket.


Carefully apply a thin line of wet glue 
to three sided of the pocket and attach to
the page with the opening facing
in to the fold.


Decorate and embellish!!


Now you know why I have been joining in 
with these classes......the albums 
just get more and more amazing!!


Materials if you want to have a go -

12" x 12" Cardstock
A4 Cardstock in same colour
Halloween papers or 6 1/2" square pad
Cosmic Shimmer Dries Clear Glue
Ribbon

I do hope you try this, let us know 
with pics if you do!!

See you tomorrow,

Jane x


Thursday 22 October 2015

Halloween Week - Neil Walker


Good morning everyone,

Hope you are all good.

Autumn is here and don't the trees look
 lovely?  I had to go out to a shopping
centre yesterday with a trip along the 
'wonderful' M25. The sun was shining 
and the trees were in their Autumn colours 
and looked absolutely beautiful!
Wish I could have stopped to take some 
photos but that is a big no no!!
Probably would have got arrested!!

So, what does Autumn, October and 
longer evenings mean.....
Halloween
Yes it is almost that time of year and
we are going to bring you some 
Halloween projects to get you in
the mood!

Today we have Neil, with his
brilliant project....


 Paint the cat with Carbon Black Fluid 
Acrylic.


Ink the stamp with Versamark.


Press stamp onto figure. You won't get a clear
 image so don't expect too much!


Cover with clear UTEE and heat.


Highlight with Treasure Gold to bring out
 the texture.


Add suitable embellishment and your
 black cat is ready to take centre stage 
in your Halloween tableau.

Neil, you never stop amazing me
with your projects!
Would never have thought to stamp
a cat!! And it looks amazing!

This is what you will need if you
want to have a go...


Thank you Neil.

I'll be back tomorrow with 
another spooky project!

Jane x


Tuesday 20 October 2015

Weekly Challenge Winner


Morning all,

Welcome to a new week here on 
the blog and a new winner to be
announced!

Last week our challenge was Light
and we had 22 entries!
Thank you to all who entered, it is 
always interesting to see your 
entries.  They are always so inspiring 
and so different.

So over to Mr Random Generator
who has made his choice....

.....and the winner is.....


...no 16... 

Clare


Congratulations Clare, please contact me on
janecraftbarn@gmail.com
so that I can send you your prize!

Thanks again to everyone who 
entered.

See you soon,

Jane x