Hi Everyone!
Hope everything is on
track for you - all going
smoothly here
In fact, I am even contemplating
digging out the sewing machine
Shall reserve this exercise for a
rainy day - hope I can still
remember how to thread it.....
.........it's been a while.....
Craftyfield is joining us today
with a rather nice tutorial using
the lovely Starlight Textile Paints
"When I received the new Starlight Textile
paints and a lenght of calico from
the Craft Barn I settled down to test
my new materials.
In this first piece, I applied a mix of Starlight
with a slightly wet sponge.
I noticed that the darker Starlights were
not as shiny as the Pearl but I
guess it's necessary to give a good depth
of colour. Also, by using a sponge,
I only applied a thin layer and the metal flakes
in the paint are spread over a larger area
for a more discreet look
In my second experiment, I wanted to combine
the textile Starlights and So soft paints for a
contrast between the shiny paints and
traditional colours.
I used the Gelli plate to layer the stencilled
So soft paint in Dark burgundy and
the Starlight in Petroleum which I applied
all over the Gelli plate (over the already
stencilled paint).
The technique worked well enough but the
paint was drying too quickly for a decent print on fabric.
The distressed look is interesting but not for
today's project however...
I like my makes to be useful and my cushion
covers badly needed a replacement
so this is what I decided to make.
I have no sewing skills so I try to simplify
and use shortcuts at every opportunity.
I worked out my cushion design to include
a velcro closure as the easiest one to sew,
although I'd have plumped for snaps closures
if I'd had the tool to set them!
I thought I'd better make up the cushion first
before decorating to make sure the art was centered.
The velcro closure.
I haven't decorated the back,
I haven't decorated the back,
although this could happen in the future...
I'd love to try the new textile sprays
with stencils next!
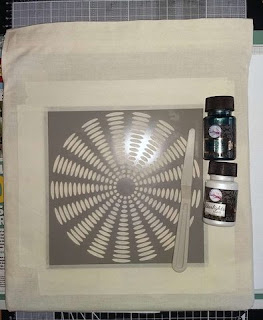
I placed the stencil and used masking tape
all around to stick it down firmly.
A pad of scrapbook papers is ensuring the
fabric is held taut and prevents the paint from
oozing to the back
I created an ombre look from the center out
adding Pearl incrementally to the Petroleum
with a palette knife.
Unlike my previous tests the paint is a
lot thicker which gives a lot more shine
as well as a 3D look.
See how the ombre gradation emphasises the
impression of a rotating wheel.
In fact, my other half can't bear to look at it!
For a bonus project, do come by to my blog
to see what I did with one of my test pieces !"
Supplies:
Sunburst Stencil
Starlight Textile paints
Palette knife
And if you don't fancy sewing your own cushion cover,
here's one already sewn up for you
or pick from a selection of fabric bags here
or pick from a selection of fabric bags here
Super tutorial Craftyfield
I have to agree with your
other half - that stencil is
quite mesmerising just
looking at it on screen
..........! What a fabulous
effect that is - thank you
I can see I shall have to invest
in that stencil...........
'Till tomorrow
Mickie xx


So Love that stencil. Happy crafting, Angela x
ReplyDelete