Acetate
Hi There!
Well, here we are at the
end of the week with the
last Tutorial in this strand.
Have you had a good week?
Achieved everything you
set out to do?
Had the week from hell?
Settle back and have a
relaxing weekend - that'll
make you feel good again......!!
Craftyfield is here today
with another of her Quirky
Birds. Remember the Ooops!
Bird? Well here he is in a
different guise .......
"Of course I knew that enamel accents are
perfect to make 3D dots or marks,
but, since they are paints, I wanted to
try them with a brush.
Here, I colour matched some die-cut flowers
from Crunchy waxed paper.
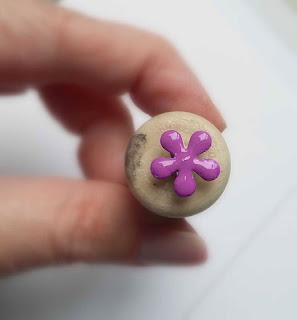
Still creating embellishments, I tried the
Enamel Accents on brads for that glossy 3D finish.
They are opaque enough to completely cover
the original colour and beautifully glossy.
What you can see behind the brad is
my professional tool............
a cork which I use to hold brads for
painting, embossing etc...
I remove the brads from the cork with tweezers
and plant them in a piece of styrofoam to dry out.
I then cut out all the cardstock and acetate pieces
using a variety of dies and my guillotine.
Now for the focal image.
Acetate is a difficult stamping surface
but it does offer several opportunities...
It can be worked on both sides!
I decided to use Brilliance ink and emboss
with clear powder to give me a raised impression.
This will make it easy to contain the colour later.
This acetate is heat resistant so, as long
as the heat gun is not too close and you stop
as soon as the powder is melted, the sheet will not warp.
Another advantage of acetate is that obtaining a
mirror image is just a matter of flipping the sheet!
I did consider in fact giving my bird a fellow by doing just that.
Next time...
I wanted the grass to be dimensional
so I am painting it on the "front".
As I go about painting my scene I will flip
the acetate for the best effect or easiest way.
Here I have applied some green Enamel
at the bottom and spread it with a plastic card.
Then, with the edge of the card, I dragged
the colour upwards, creating blades of grass.
Flipping back to the stamped image
I applied a wash of yellow to the bird with
a wet brush.
Back to the grass side, I added some flowers
by just touching the nib of the Cactus Flower bottle
to the acetate.
With the green I added a few more blades
to get some over the flowers.
With the yellow I added the bird's plumage.
For the eyes I used white acrylic
paint on the embossed side.
I took a second picture with a different angle
as it is difficult to photograph acetate,
especially with the shadows created!
These little bottles are a lot of fun to use
in all sorts of ways (I also tried them with
stencils but I wouldn't recommend it as stencilling
does use a lot of paint) and I hope I have inspired
you to explore this medium in more
creative ways than just dots!"
Supplies:
Thank you Craftyfield - for
ending our super inspiring
week with another take on Bird 3.
Using the cork to hold the brad
is a brilliant idea too!
I'm off to sort through my
extensive cork collection for a proper
cork (if that makes sense!)?
'Till tomorrow
Mickie xx


I have given you my best excuse to open a bottle... I hope you all appreciate!!!
ReplyDeleteGreat projects, love those birds too xXx
ReplyDeleteNever thought of using the accents on brads ----- brilliant idea, thanks X
ReplyDeleteBest thing I have found so far, alcohol inks are difficult to apply on a brad and have a tendency to rub off.
DeleteFab idea for using the enamel accents xx
ReplyDeleteThis is soooooo cool! xxx
ReplyDeleteGreat step by step for your fab quirky bird card. Love those enamel flower brads in close-up too.
ReplyDeleteAlison x
This card so clever is a delight!!! and I so love this quirky bird, I'm not sure to resist longer... :) Thank you Christine xxx
ReplyDelete