Friday, 3 March 2017

Street Art


Street Art


Hi there!

Hope your week is on track.

I'm supposed to be doing some
art homework today..........who
would have thought that at this
stage in my life I would be back
to homework!  Haha!

Anyway, here is Jane Castle with
a very nice arty page in her new
journal.......


 "I made myself a promise this year to start 
an Art Journal and a Scrap Book. Well the year is 
trundling  along at a pace so I felt I'd better do something 
about one at least so here is my very first page 
of my very first art journal!


I began by applying various layers of Fresco paints 
with a brayer in Wisteria, Blush, Hint of Mint and Stone.


Then once I was happy with the combination added 
some Grunge Paste through a TCW stencil.
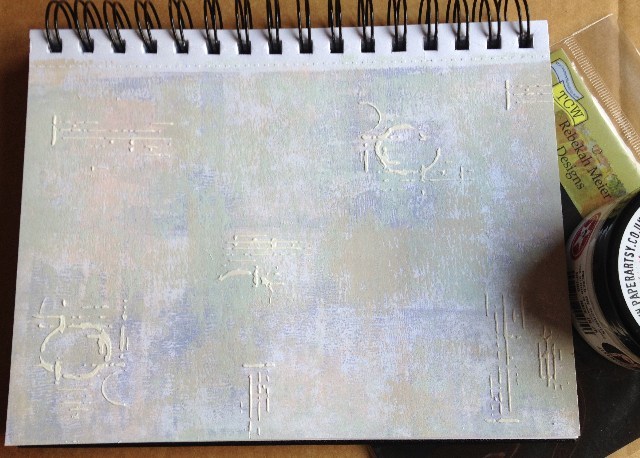

This was left to completely dry before applying some 
DI in Weathered Wood to the grunge paste with my finger.


The quote from a PaperArtsy stamp set was then added 
using Denim Adirondack ink. 

I felt this was a very apt quote! 

The dots were stamped in DI Peeled Paint.

Next onto the main stamped images, 
for this I used a selection from Eclectica ETS01. 

As I only wanted the stem part of one stamp I masked 
the unwanted part with a post-it note before inking.
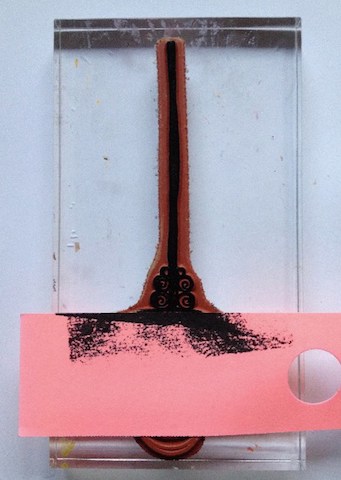

This was removed before stamping onto my page. 
The circle stamp which I chose for my 'Flower Head' 
was marked on the back of the stamp to hi-light the point 
where the 'Stem' and 'Flower' would meet. 

The 3 main images were heat embossed with clear EP.


The circles were then added to the edges and 
using a fine nibbed black pen I added some connecting 
lines and swirls.

Now for a splash of colour......... 
using Claret, Pumpkin Soup, Chartreuse and Autumn Fire 
all transluscent Fresco paints 
and a very fine paint brush I began to fill in various 
sections/segments. 

I finished with a few dots of Metallic Glaze 
on some of the tiny dots.


This was left for a couple of hours to thoroughly dry 
before adding some glossy accents to one section of 
yellow on each of the 3 main images. 

When I went back to take the final pictures I was amazed 
that the Glossy Accents had started to crack ---- 
now I don't know if that was because it's an old bottle 
perhaps 5yrs maybe more 
or that my craft room is outside and it may have 
got too cold for it overnight? 

If you know what caused the cracking please leave 
a message below as I am intrigued"

Material List

PaperArtsy Stamp Sets ETS01, ESN03, EEV06
TCW Mini Raven Mosaic Stencil
PaperArtsy Grunge Paste
Versafine Onyx Black ink


Thank you Jane for sharing your
new journal with us.  We will look
forward to seeing more of it.......

Have been pondering on your dilemma
with the Glossy Accents - I have some of
equal vintage and it is fine so over to you
followers, any ideas?

'Till tomorrow

Mickie xx


Thursday, 2 March 2017

Street Art


Street Art

Hi there!

Loving the theme this week
today we have Claire Jackson
with a timely canvas 

"The street art theme lends itself to something 
a bit more grungy and masculine and the
Seth Apter stamps are perfect for this style. 

You could use this technique for a decorative canvas 
but I thought it would make a good clock background. 

Prime a 20x20cm canvas with snowflake paint 
and punch a hole in the centre


Use texture/embossing paste through a brick wall stencil. 

I put it in three main areas and left the centre clear.


Paint the canvas in chalk and buff paint. 
Make sure it’s completely dry before the next step


Place the stencil back in place and tape down. 
Use a stencil brush to stipple paint onto the raised areas. 
I used autumn fire, blood orange, claret and
chocolate pudding to build up a brickwork effect.

Don’t forget to extend the paint onto the sides of the canvas.


Gently rub a sponge with walnut stain and 
black soot Distress Ink over the brickwork 
so that it catches on the edges


Stamp the words onto tissue paper in yellow paint, 
outline with a black permanent pen 
and paint white paint on the back. 

Stamp other images in black ink and add 
paint to the back of the tissue. 

Tear around the images to create a soft edge.


Decide where the tissue images are to go 
and paint collage medium on the canvas. 
Stick the images on and add a layer of
 collage medium on top. 
Gently rub with a finger so that the
medium sinks in and the tissue becomes transparent.

Add more stamping in paint and darken the 
edges further with Distress Ink.

 I added in a little green to lift the colours. 


When it’s all dry add the clock mechanism."


Materials used:
Thank you Claire for a
great project - one for
the boys!  Tomboys even!
Who says the menfolk
are difficult to create for?

Send them here, we'll
show them how it's done!!

'till tomorrow

Mickie


Wednesday, 1 March 2017

Street Art


Street Art


Hallo Everyone!

Well it is March 1st today -
time continues to fly by 
at an alarming rate........
......that means we are all
busy people............enjoy!

Angela Radford is with us
today to start the new theme
with a fantastic card for
the star in your life......

"Hi all, I'm back to show you what I've been up to 
with these gorgeous Seth Apter stamps. 

To start the Masterboard for this project I began 
by brayering paint onto an A3 sheet of card.


You can see from this photo that you must be prepared 
to make some mess so make sure you have your 
workplace well protected.....or is it just me that's messy!?


I continued to apply the paint until satisfied with the coverage. 
I used a set designed by PaperArtsy for Seth Apter. 
I also mixed some of these colours to increase the range available


 Next I started stamping. 
It's important when stamping with acrylics to 
spread the paint evenly across the palette otherwise 
it will be too thick and you will not get a clear image


More stamping fun and here we are with the completed Masterboard.


 When I do projects like this I hate wasting the paint 
and I found myself with too much of the Mahogany 
on my palette so thought I would stamp it 
onto a clean sheet of card........
well this just changed my original idea for this card!


So to put all this together I began by creating a 
Z-fold card.


Cut all the pieces to size including some 
deep red card for matting and we're ready to go!


Started layering the pieces together, not bad for some waste paint!


 I completed this by adding some red brad stars 
from my stash and the TIME AFTER TIME stamp image 
from the same Seth Apter set. 

The sentiment is by Tim Holtz stamped with Mahogany distress ink. 


Hope you enjoyed watching me make this card. 

Happy crafting, Angela"


Yes, we did enjoy you making this card Angela
Just love it when you show us your change of
mind and the thought process behind it - just
goes to show there is no need to waste a thing

'Till tomorrow

Mickie xx