
Sunday, 29 September 2013


Saturday Savers - Ho Ho Ho - Neil
Hi,
A lovely upcycling project from Neil for you today. Christmas is coming up but not too close yet,
so you still have time to make a few of those. Great fun, and if like us, you keep the bags you are given, then you have plenty to work with.
If you'd rather make your own, you can always use one of our recycled craft carrier bag
A very quick and simple recycling from me today.
I'm sure I'm not the only one who can't bear to throw out gift bags.
I have them all packed away ready to re use. However, I have been known to give it back to to original giver on occasion so now I try to add a little extra to them, just in case!
I've had this beautiful white bag for a while now and thought it would be perfect to change to a Christmas bag

I began by stamping an ATC using Tim's ATC stamp. Simply coloured with Distress Ink and matted onto card.

I worked out where it was going and marked it before using Grunge Paste and Tando Creative's snowflake mask to add some texture.

That was not Christmassy enough so I added some Dry Stickles

Then, a spritz of Dylusions to add some extra colour and one lovely Christmas bag, ready for a gift.


I think that this a great and easy way of jazzing up a bag. If your bag is patterned you can still do the same kind of thing. I just often use some Gesso or paint to tone down the pattern.
Neil used:
Stamps - Tim Holtz Holiday Collections
Archival ink - Cobalt
Tando Creative - Snowflake Mask
Dylusions - London Blue
See you tomorrow
Izzy
Friday, 27 September 2013
Ho Ho Ho - Jane
Hi,
Clean and simple and die-cutting today for yet an impressive Christmas display on this card.
Jane made a gorgeous wreath out of different coloured die-cuts.
Definitely I could see myself doing, good for children too to make that special card for their teachers.


Clean and simple and die-cutting today for yet an impressive Christmas display on this card.
Jane made a gorgeous wreath out of different coloured die-cuts.
Definitely I could see myself doing, good for children too to make that special card for their teachers.

Using two circle dies, cut out a ring as a base for your wreath. I used one of the greens so it wouldn't show through

Using two slightly different shades of green, diecut chosen leaves for your wreath

Start glueing them to the ring as shown.

When completed it should look like this

I used a white card, a red layer cut slightly smaller and another piece of white card, again slightly smaller

Add wreath to layered card.

To decorate I made a red bow with four loops either side and no Christmas Card is complete without a little bling, so a few gems to finish

Jane used:
Marianne D Die - LR0126
Spellbinders - Circles
Ribbon - Red Organza
See you tomorrow
Izzy
Ho Ho Ho - Karen
Hi,
A little bit of "wow" today with this is gorgeous sample Karen made for us. I could really see this on my Christmas table. Truly beautiful.
Can't wait to read what you will say about it.
Karen used the Tando Creative 3D sleigh and PaperArtsy Fresco Finish paints


A little bit of "wow" today with this is gorgeous sample Karen made for us. I could really see this on my Christmas table. Truly beautiful.
Can't wait to read what you will say about it.
Karen used the Tando Creative 3D sleigh and PaperArtsy Fresco Finish paints
I have made up the 3D Tando Creative Sleigh to kick start my Christmasing. Its a good size at 9" long by 7" high and is very sturdy. Also very easy to put together when you have decorated it! (Instructions come with it)
Great for those teensy presents to go in, strong enough for nuts and pretty enough to use as a table decoration.

I chose to use PaperArsty Paints in Snowflake and Ice Blue for the colour scheme. First I painted all the outsides in Snowflake then spread some DecoArt Modelling Paste through a Tando Mask- Dotted Star. I also added some Tando Creative Snowflakes. When it was dry I went over with the Snowflake again this time dabbing a little Ice Blue around as well. The insides were then painted with Ice Blue with a little Snowflake dabbed around. For the runners I painted with Snowflake, added PaperArtsy Crackle then Ice Blue. When the pieces were dry I added little spots of Stickles in Crystal to the raised star shape. I always leave these to dry overnight!!!
Some Treasure Silver was rubbed all around the edges and over the other raised bits then buffed with a cloth before putting the Sleigh together.


PaperArtsy Fresco Finish Paints - Ice Blue and Snowflake
Stickles Glitter Glue - Crystal
See you tomorrow

Wednesday, 25 September 2013
Ho Ho Ho - Sylvie
Hello,
Two biiiiigs cards and tags today. Those are over 20 cm / 8" tall.
Love the clean lines and brights colours one those. That reindeer is so cute.
Sylvie used the following Woodware stamps


For the purple card, add a border (TH die) at the top

Two biiiiigs cards and tags today. Those are over 20 cm / 8" tall.
Love the clean lines and brights colours one those. That reindeer is so cute.
Sylvie used the following Woodware stamps


Cut white cardstock to desired sizes.
Cut a circle in spare card and use it as stencil
Place it at the top of the card, and add colour with a brayer
Stamp "christmas swirl" with black Archival ink.
Stamp the reindeer and the snowman on white cardstock using black Archival ink.
Cut them out
Stamp each image again and cut out the heart. Colour them with Gelatos and add a touch of glitter.
Colour part of each image with Distress ink and a wet brush

Glue the snowman and reindeer on the tag, overlapping the coloured circle
Add a touch of Glitter glue on the cut out and coloured hearts and glue them on with 3D squares
Add a touch of Glitter glue on the cut out and coloured hearts and glue them on with 3D squares
Stamp a few snowflakes and text on the tag

For the purple card, add a border (TH die) at the top
For the blue card, cut the top in a tag shape, and add a red ribbon
Add a glittered doily to the tag.
Add a glittered doily to the tag.
On both cards, apply some Glossy Accents and add some Shaved Ice glitter as shown on the pictures.


Sylvie used
Stickles Glitter Glue : Christmas red , Glam Pink.
Tim Holtz Alterations - On the Edge Die- Iron Gate
Dovecraft : white doilies
Stickles dry fine glitters : diamond
Tando creative Mini range : hearts
Woodware clear stamps : Christmas Swirl, Patch Reindeer, Patch Snowman
Distress ink pads : picked rapsberry, Spun Sugar, Shaded lilac et Salty ocean, Tumbled Glass
Archival ink pads : jet black
See you soon,
Izzy
Tuesday, 24 September 2013
Ho Ho Ho - Gio
Hi,
Gio's turn today with some lovely decorations made with the Crafty Individuals Christmas stamps.
She took her xmas tree out on the balcony with 30º outside to take the pictures :)
It also shows you how to use non Christmas stamp into christmassy projects.


Gio's turn today with some lovely decorations made with the Crafty Individuals Christmas stamps.
She took her xmas tree out on the balcony with 30º outside to take the pictures :)
It also shows you how to use non Christmas stamp into christmassy projects.


For the garland:
I stamped on a piece of heavy cardstock the image from CI-378-'A Royal Bird' with Jet Black Archival ink several times. I cut the centre out, leaving the flowers. I stamped some birds from the same stamp and I cut them out. I covered the images with tacky glue and I poured on them some Vintage and Sparkle glitter (Bathing beauty metallic and Gemstone metallic). I tapped the excess and I set aside to dry. When dry I coloured the flowers with the watercolours Derwent blocks using a waterbrush.
Using some jump rings and a chain I linked the elements together.
For the decorations:
I stamped on a piece of heavy cardstock the image from CI-378 with Jet Black Archival ink several times.
I cut the centre out. I covered the ring with tacky glue and I poured on it some Vintage and Sparkle glitter (Bathing Beauty metallic and Gemstone metallic).
I stamped the dog and the cupcake from the stamps CI-381 and CI-374 on a piece of cardstock. I coloured them with watercolours Derwent blocks using a waterbrush.
I glued them to the rings on the back. I added the chain and some glass beads as embellishments.

Gio used
Ranger Archival Ink pad: Jet Black
Anitas Tacky Glue - 120ml
CI-378 'A Royal Bird'
CI-381 - 'Anything & Everything'
CI-374 - 'Hello Cupcake'
See you tomorrow
Izzy
Sunday, 22 September 2013
Letter Z winner and Wall of fame
Hi everyone,
First of all, congratulations on submitting so many pages with a difficult letter. Not many words to choose from in most dictionaries you are using.
We got quite a few zig-zags, zinnias and zebras... and some words I had never heard of LOL.
So well done :)
Caught my daughter Melissa before she ran for school this morning and asked her to pick a number...

So our winner this week is...
ANNIKA!
Congratulations!
Please get in touch with me to confirm your email address and I will send you the voucher code

-----------
Now for the wall-of-famers
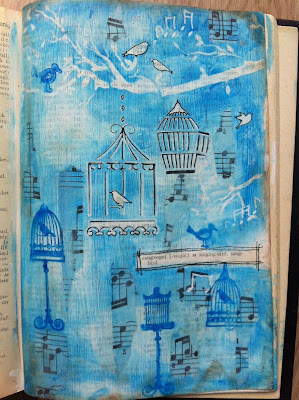
First we had a ZERO page by TwinkleToes 2Day's
A gorgeous Zeppelin page by Ella
Look at this background!

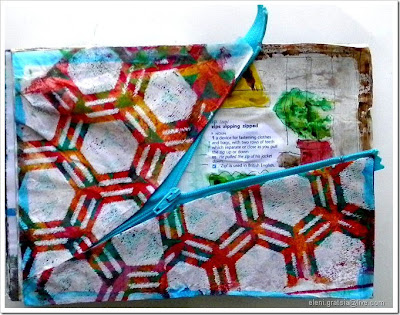
Then onto the zips...
we had this one by Eleni
and this one by Cathy-Lynn

Congratulations to all of you.
If you are listed above and don't have a badge/logo to add to your blog, please get in touch, and I will send you one ASAP.
Once again, thank you all for your participations in our challenges.
See you tomorrow
Izzy
Izzy
Subscribe to:
Posts (Atom)