Showing posts with label GelliArts. Show all posts

Friday, 10 March 2017

Bag It

Bag It


Hallo everyone!

I have decided that one cannot
have too many of these bags.
They seem to make even the
most mundane items look as
though a special purchase
has been made


Here's Hazel Harler with her
gorgeous bag 

"This is my decorated bag using the So Soft fabric paints


I started by putting a piece of corrugated card 
inside the bag, this was to give me a firm surface 
to work on and stop the paint from going through
 to the other side of the bag. 

Sorry about the photo, I didn't realise that the 
shutters on my camera hadn't opened properly.


I used a sponge the add the paint.


 I mounted some small Gelli plates onto 
acrylic blocks and used them like stamps 
to add the colour,

 I must admit that I like this and wonder 
if I should have stopped there.


Then used a sponge to stencil the paint onto the bag.


I stencilled some flowers.


I used some indian ink markers to give 
the flowers a bit more definition

I also added some white dots here and there"


Thank you Hazel, that
really is a versatile design


I'm thinking that you could stop
at any of the stages and still
have a stunning bag.  I would
go so far as to say that you could
make a series of bags and stop
the decoration of each one at
the end of the different stages

That'll be the birthdays sorted for this year then....

'Till tomorrow

Mickie xx


Thursday, 16 June 2016

Starlight Paints - Caren Sharp


Helloooo,

How are we all, enjoying all
this lovely sunshine??
Ha ha probably if you are living in
a nice sunny country....certainly
not England!!
Still, we can but hope....


I'm here today with an extra post which
should have been with our projects
showing the lovely Starlight Paints,
unfortunately between Caren and I
we couldn't get her pictures working
but they are here now!!

So, this is from Caren Sharp, a very
talented lady, this is her first project
for us and hopefully I can persuade her 
to do more for us in the future!!
(Especially as we now know how to get
her photos to me!!)

Here is how Caren decorated this lovely
book....


Caren says - Gather your products together.


I used my Gelli Plate and 3 colours of  
Starlight Paints...


Be aware - the paints dry very quickly!


When dry, stamp the robot and paint...


Use the multiliner pen to add any details
lost under the paint.


Dab silver paint onto scraps of textured card,
when dry, die cut mini gears and frame.


Arrange the gears onto the frame, glue and then
add to book.  Cover with coat of Matt sealer.

Finish with googly eyes!
Have fun x


This is a lovely project and the pictures 
don't do it justice.  The paints are 
perfect for these stamps!

This is what Caren used - 
Starlight Paints - Silver, Menthol, Orange
JOFY Stamp Set - 43 and 44
Maya Gold Paints - Blue, Chocolate

From stash -
Vintage Cabinet Card Die

Ok, that's me done for today,
I'll be back tomorrow with another project.

Jane x


Friday, 8 November 2013

Fast and Furious/crafting with kids - Izzy

Hi, 
If you are a parent (like me), or a grand-parent (not like me!),  you probably have your kids coming to you (usually with a 2 day warning) asking for a bunch of cards to give to their friends and teachers at school for Christmas. And by "a bunch", I mean for the whole class, the teacher, teacher's assistant, the headteacher/principal, the nice ladies at the office.... 
Sounds familiar? 
And if you have an arty kid like mine, she will want to "make" cards ... bless her she's been watching me make cards for all occasions since she was born, so I can't no when she says "but I want to *make* my cards"... 
ok, don't panic... here's a quick way which all children, regardless of their age will really enjoy. 

I started with Gelli Art backgrounds. Depending on the age of the children, you can make the background for them, or you can let him/her make their own. My 10 year old DD looooves making her own background with the Gelli plate. 
Or, you might have your own personal stash of backgrounds you have made and don't know what to do with it.. well, there you go... fast and furious Christmas cards. 
Should you not have a Gelli Arts plate, then you can get some of the gorgeous xmas papers/cards, they will work just the same.


  •  Make a few backgrounds with your Gelli plate (click here to read previous posts about this)
  • Cut your cards to size. These are little 9x9 cm cards
  • Using punches or dies, cut squares in different sizes and cut those in half to obtain triangles
  • Quick and easy way to make xmas trees... your child will love the cutting, collaging, gluing


 Use different colour backgrounds for boys and girls cards

 Now, depending on the age/abilities of your child there are several options from here. 
The youngest one will like to outline with (children safe, not Copic/Promakers) markers and colour with colouring pencils. 
Good exercise for concentration and dexterity 


 With a slightly older child, you can take this opportunity to show him/her how different a tree can look based on where the outline is... 
He will have fun in experimenting a bit and there is no harm in teaching him a thing or two whilst making it fun

 Now for the older child or the budding artist, you can move on shadows and depth. 
Those will take a bit longer so it will be a "make it special for your teacher" kinda thing. 
Parents will be proud, kiddo will be proud and the teacher will definitely appreciate the time and effort

Of course, they can add glitter, gems, pearl or stickers onto their cards, but I just wanted to show you the basics.
Hope these little tips will help you spend some festive quality time crafting with your children/grandchildren
Have fun!

What I used:
Gelli Arts plate and paints (Fresco Finish)
Woodware stamp set: Noel

See you tomorrow


Izzy


Saturday, 31 August 2013

Saturday Savers binding - Izzy

Hi, 
It's my turn (Izzy) for Saturday Savers and I really had to put my thinking cap on for this one.... I had to choose a binding technique that was not showcased this week AND something to upcycle that could be bound.
Then I remembered those beer mats I have had for several years now and thought that they would make the perfect mini album. Team this with yummy products and we are good to go.

The sizes I am going to give you are based on the size of my beer mats, but you will had to adapt it to any beer mat you have
1/  I used Kaisercraft papers, 5 beer mats and grunge paper
2/ I cut 4 pieces of white cardstock (I could have gone for any colour really) and I scored them
In this case, they are cut to 14 x 6.3 mm and scored to get 3/ 0.3 /3 cm
3/ I used a strong adhesive (double sided red tape) to adhere them to the beer mats as shown
4/ This is what you will get once it's glued. 
5/ I cut my papers to size (scored them in the middle too) and adhered them to your beer mat album
6/ Close up of the bound album
The front and back cover are left uncovered as they will be glued to the cover

TIP
If you want to make sure your album with hold, add some washi tape before gluing the papers
Peace of mind, better be safe than sorry


I then made the cover using Grunge Paper which has the advantage to be strong and easily altered (painted, stamps, punched etc). Probably my favourite for a mini album cover (or to make a passport cover as I had done here)
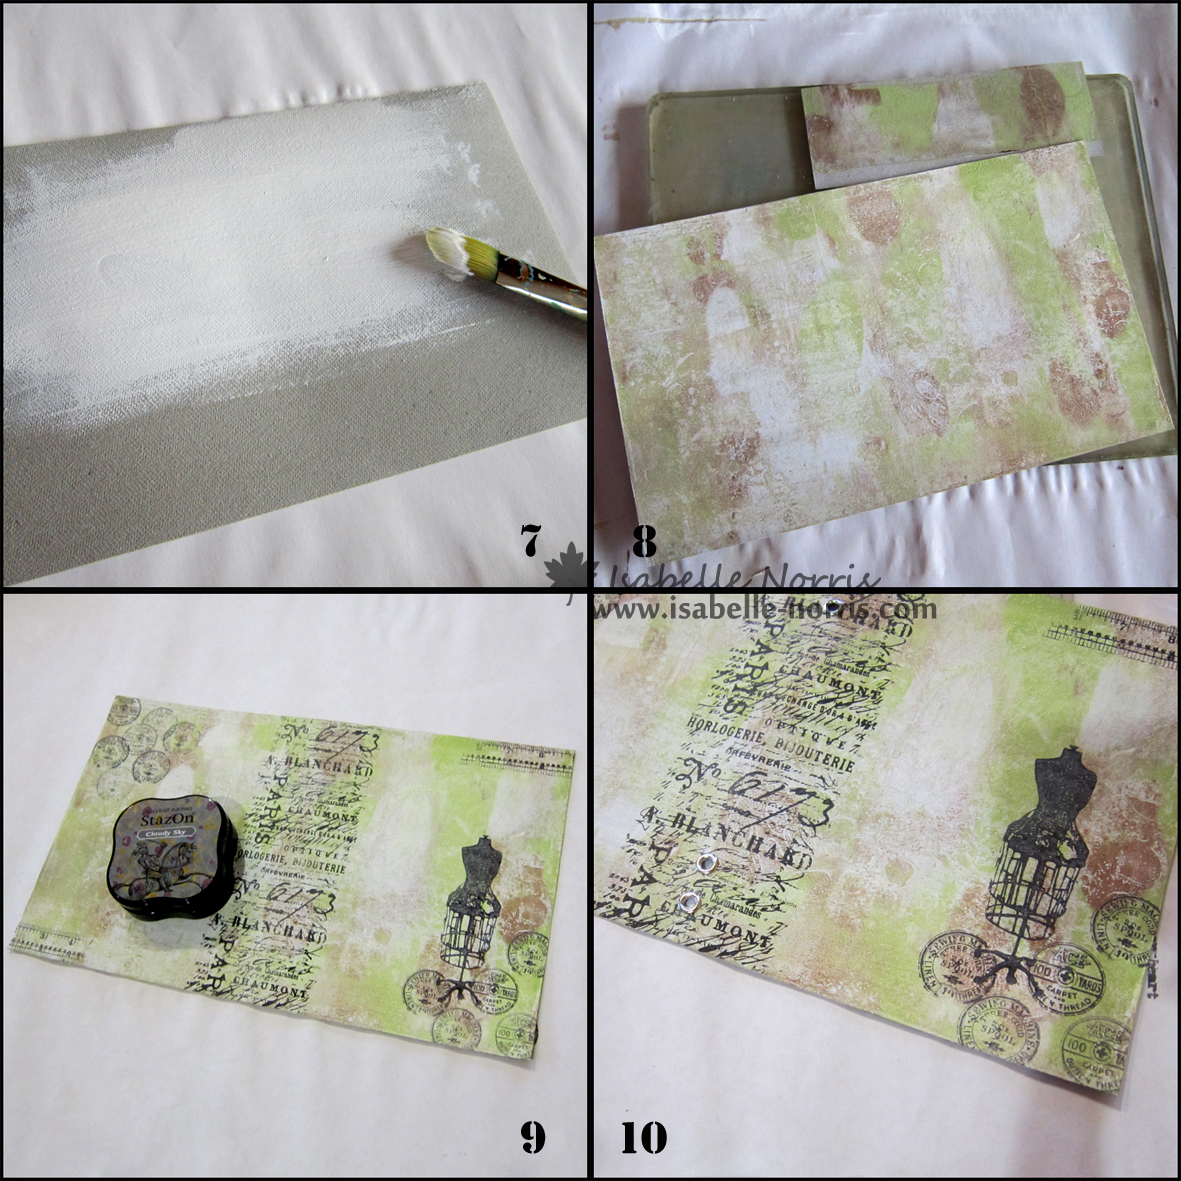
7/ Paint both sides of the cover with a layer of Gesso first and dry.  
8/ Use your Gelli Arts plate and a few masks/stencils along with PaperArtsy (or Americana) paints to make the cover. 
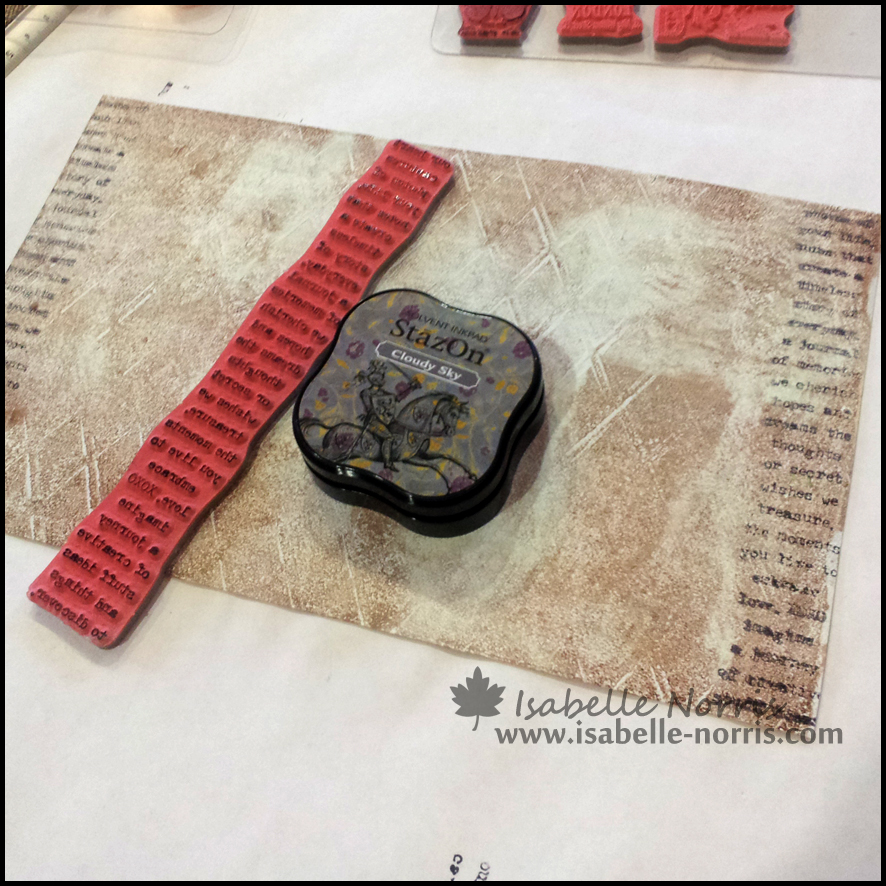
9/ Stamp using StazOn ink
10/ Punch two holes top and bottom and add eyelets for your ribbon 

This is what the inside cover looks like


Stamp the cover using StazOn ink (I went over the dress form with a permanent black pen to make it stand out) and add a layer of your favourite varnish/sealer.
Glue the cover on the beer mat album
Make sure you add the ribbon BEFORE you glue the cover to the beer mats
much easier :)

Front

back

inside

Embellish the spine with a few buttons and a metal charm


I used
Beer mats
Stamps - Tim Holtz: Stuff to Say and Attic Treasures
PaperArtsy Fresco Finish paints: Snowflake, Chocolate, Guacamole, Honey Dew
Gelli Art plate: 8 x 10"
Tando Creative mask: Harlequin
Imagination Crafts stencil: Bay Leaf
StazOn midi: Cloudy Sky


See you tomorrow

Wednesday, 28 August 2013

Binding week - Sylvie

Hi, 
Here's a first approach of binding a mini album with a book ring with Sylvie who made a lovely album with the Gelli Art plate and PaperArtsy paints and stamps. 
Here's some of the pictures, but there will be more on her blog


Use several white cardstocks to make different backgrounds. 
Use the Gelli Art plate, a brayer and a selection of paints (here Fresco Finish) 

Choose different masks to add patterns to your background. 
Try to layer them for different looks

I then cut 8 circles in cardboard and 16 circles from the GelliArt backgrounds I had made. 
Glue the backgrounds on the cardboard and punch a circle in each of them to add the ring later

Use masks and Grunge Paste to add texture. 
Once dry, use Distress inks to add touches of colour

On the other side, I stamped the PaperArtsy JOFY images with black Archival ink and painted them with Fresco Finish paints. 
I then covered them with a layer of Fresco Finish Metallic Glaze. 
I bound the circles with the ring to make a mini album and added ribbons. 
You can then add your favourite pictures and this will make a perfect little gift

I used :
PaperArtsy Fresco finish paints (Guacamole, Mermaid, Lilac, Snowflake, Sherbet, Claret, Hey Pesto, Autumn Fire,South Pacific, Zesty Zing)
PaperArtsy Jolly collection: stamps 10-11-12
Imagination Crafts stencils: Bay Leaf 
The Crafters Workshop templates: Cornflowers, Harlequin
Artemio Ribbons: Flowers, street, girl
Tando Masks: Distorted hive
Andy Skinner designs Masks: 12x3 burning
PaperArtsy Fresco Finish paints: Metallic glaze
Archival ink pads: Jet Black

See you tomorrow


Saturday, 17 August 2013

Saturday Savers - Izzy

Hi bloggers, 

It's my turn (Izzy) to make a sample for Saturday Savers this week with an upcycled box altered with the Gelli Arts plate. 
A while back my (musician) son asked me to "make a box" for his guitar picks. 
So I looked in my "blue box" (that's where I keep all the things I want to alter/upcycle) and found this little clear plastic box. Not sure where it came from... Ferrero Rocher comes to mind... but might not be. 
Anyway... perfect size... now for the upcycling. 

I could have used Alcohol inks but I wanted an opaque finish, then I thought PaperArtsy Fresco Finish.... which I knew would work well on non porous surfaces... and then.. why not the Gelli Arts plate. I have used it successfully on wood before, why not this plastic box?
Well, I can tell you that it turned out much better than I thought. 
Here's the process... 
Hope you like it :)

1/ The box came all clear. Yes, even the base was clear, but I had already started painting when I realised I had not taken a picture of the non-altered box. So imagine it without the white bottom. 
2/ I painted it with PaperArtsy Fresco Finish Snowflake paint. Two coats... for a real opaque coverage.
3/ Using the Sizzix die, I cut several hexagons. KEEP the off-cut, you will need it later.
I placed them on my Gelli Arts plate, and added the Fresco Finish paints in South Pacific, Beach Hut and Guacamole.
4/ Mixed the paint with a brayer and pressed the Harlequin mask on the paint.
Then I lifted the mask and the hexagons and pressed the box onto the plate. 
See that I missed a spot there in the middle? I could have hidden this, but I wanted to show it to you in case the same happens to you, and it's bound to happen. If it does, just pick up a bit of paint from your Gelli Arts plate, using a brush and "fill the gaps". If you dab with your brush, you will get an uneven / textured effect, which is what you want here. 
That was the bottom of the box. Not that it will show, but starting with the bottom of the box, if  you mess it up, it does not matter as much as the top ;) Great way to "test" and try and master the technique before you move onto the sides that will show!

1/ Here we go again... top of the box.
Hexagons on the clean plate>> brayer the paint on top>> apply the masks to add a pattern and remove them.
See how I put different masks? the Harlequin is for the top of the box and the Dots for the sides.
In one go, I then covered the whole box with same colours and pattern.
The corners on my box are round... it's ok, just "roll" the box onto the plate and it will get covered with paint very easily.
2/ Here's what the box looks like now (dried it with a heat tool. Watch out, the plastic stays warm for a bit...)
3/ Did you keep this off-cut as I suggested? Now is the time to use it. Place it on top of your white hexagons and stamp the music notes with black StazOn. Keep it in place and trace the hexagon with a black permanent pen
4/ Here's what the box now looks like

You can then stamp away... I added music words and notes using CI-366. 
First in black. Then going through my son's picks, the brown one was the only one that would not clash too much on here. So I added some brown music notes to match (Sepia Archival ink).
To finish, I glued a guitar pick on top using Glossy Accents.

Box and picks

Details of the top

and the sides


 I used:
PaperArtsy Fresco Finish paints: Beach Hut, Guacamole, South Pacific, Snowflake
Stamps: Crafty Individuals CI-366 and CI-309
StazOn ink
Archival ink: Sepia


FREE POSTAGE WEEKEND
From 6pm on Friday (16th Augustl) to 6pm on Monday (19th August) we have
free postage on all UK orders.  
For customers outside the UK shipping is free for orders over £30

See you tomorrow