Showing posts with label Tim Holtz Layered Stencil. Show all posts

Saturday, 9 December 2017

Christmas Animals


Christmas Animals


Hallo There!

.......and we've reached the
end of another busy week!
Time for you to put your 
feet up and relax with a cup
of something warm and
cheery before you have to
hit the treadmill once more
...................!

Here's Jane Castle with the
final Christmas Animal for
this week...:

"Hi Everyone, for my Christmas Animal 
I chose the Stag, such an elegant creature 
and one that has become more readily
 visible in our neck of the woods during 
the past 10 years.

To begin with I coloured some of the
 Creative Expressions Pop-ems deer using
 ink straight from the coffee bean ink pad.


These were then put to one side while I
 created a scene on my card blank.

The sentiment was stamped at the bottom
 righthand corner and the sky was coloured
 with DI and a blending tool.


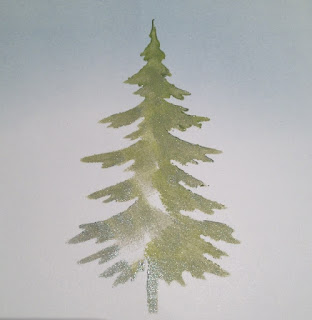
Next I placed 2 blobs of paint on my craft mat
 and gradually blended graduating colours to 
be sponged through my 
Tim Holtz Woodland Layering Stencil.


Adding slightly different shades as I went.


I love how the Zinc paint gives that
 subtle shimmer. 

Gradually the scene starts to build.


With christmas cards I like to make 
several in one sitting.

Then using the same sponge and paints 
I added some snowey hills to ground my trees


Using a Quickie Glue pen I added some 
glitter to the trees and the ground. 
Stickles could also be used for this.


All thats left is to add my Stag.


Although the coffee bean ink pad isn't a 
pearlescent one it still has a slight sparkle
 and texture.


Really liked using the Pop-ems,
 good selection of sizes and different poses. 

Plus once the deers have been used
 you are left with a pretty comprehensive 
stencil ------ bonus!!!"

Materials Used

Creative Expressions Pop-ems
Quickie Glue pen
Glitter


Super cards Jane
Thank you very much
You look to have had a
lot of fun making these


So, that was the week of
Christmas Animals.

Such fun showcasing another
side of Christmas icons

'Till tomorrow 

Mickie xx


Friday, 27 October 2017

Iconic

Iconic


Hallo Everyone!

Brrr! It's getting a bit
chilly here - how's the
temperature with you?
Don't get me wrong, 
after all it is getting on
for winter - I'll just
have to get another 
woolly out..........or
maybe............the
knitting needles! 

Here's Helen Chilton
who is using lovely
warm and bright colours!


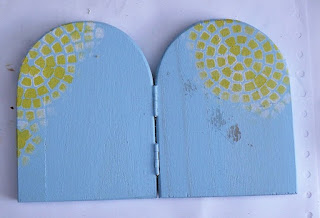
"Wooden icon - lovely and bright. 
The Zinsky stamps work really well on this.


Start by gessoing and then painting
 in Fresco Finish Blue Oyster.


I've then stencilled in white with the 
Tim Holtz mosaic design stencil.


You can then add another colour on top
 (in this case Zesty Zing) and the
 colour will stay true.


Stamp your designs in a very light colour
 - I used Archival Shadow Grey.


The white paint comes out again, 
this time to block in the images.


Then you can stamp again in black 
over the top....


... and paint the flowers in bright 
colours over the white.


Add shadow and white dots to make it 'pop'.


I wasn't quite happy with the stencilling 
so drew round some of the pattern in a
 fine black pen. It just gave it a
 bit more definition.


Finish with some text."


Products used:

Captain Peacock, Cherry Red, Bougainvillea, Tango,
 Blue Oyster, Snowflake
White paint pen

Sure to bring a smile to
anyone's face!  Thank you Helen


Love those Zinsky stamps
and the Zinnies too!  

So good to find some fun
in this very serious world

'Till Tomorrow

Mickie xx


Wednesday, 13 September 2017

Joseph's Coat

Joseph's Coat


Hi There!

Thought it might be fun to
re-visit an old technique ....
...... very old.......I remember
doing this in Primary School!

Here's Helen Chilton to start
us off..............


"Rub the Distress inks onto a panel of glossy card.


Stencil the mosaic pattern over the top 
with VersaMark...


... and then emboss in clear


Rub over a dark coloured inkpad - 
I used Black Soot.


Buff over with a cloth to remove ink 
from embossing.


 I don't think I let the ink 'cure' for long enough 
as it came out quite pale so I ....


....then rubbed over with Chipped Sapphire 
and left it for a bit longer.


Rub some Picked Raspberry and Carved Pumpkin 
onto a small piece of glossy.


Lay over and clear emboss the fish fossil


Rub over blue and black until black and blue(!) 
and then buff up.


I then added some definition with a black pen
 as it was annoying me!

Add more black pen to the background and
 layer up on card. I added some messy ribbon 
and fibres - I like a bit of a mess!"


Materials used:


Lovely bright start to the week
Helen, thank you very much.


Just when you think you have all
the layering stencils you will ever
need; somebody uses one you haven't
got!   Always the way

'Till tomorrow

Mickie xx


Wednesday, 6 September 2017

Holiday Album

Holiday Album


Hi There!

The time has come to get those
photos off the digital devices
and into something we can all
pass round and at the same
time show off our creativity!

Angela Radford is starting us
off with her altered book:

" Hi all Angela here to show you how I've 
started my new holiday album.
 I found this old book amongst my collection 
and decided it was just the thing.


This is one lovely old book.


I started by removing some of the pages 
and then glueing some together to 
strengthen them ready for use. 

This type of book has stitched pages 
which means it will not fall apart when 
the pages are removed


You may wish to cut away more or less pages
 depending on how dimensional 
your art work will be.


Now we can start to journal.
 I began with some Tim Holtz stencils 
and Grunge paste.


 I love this one as it reminds me of the sea. 
More stencilling.


At this stage I started to add some of my
 found and collected ephemera.


Then painted over this with Gesso.


Started adding colour using Distress Oxide reinkers. 
Just three drops at the top left.....


Spray with water and move the book around 
so that the inks spreads.


Everything looks a bit messy at this stage
 but trust me it gets better!


At this stage I replaced the stencils to add 
more colour using the Distress Inks.


Here I've added some text stamping and dots.


Outline smudge and blend around those
 images you want to stand out
 with a black alcohol pen.


And complete the pages by adding more images.


 My focal image was a beer mat that I found
 and I liked it so much just had to include it 
as it reminded me of our days by the sea. 

I hope to maybe show you some more pages 
in the future but that's all for now. 

Happy crafting, Angela xXx

Materials used:


Thank you Angela, I love the book
so far.........  Looking forward to 
more pages!

I love to use one thing to 
make another don't you?
As for ring pulls - I predict
these may well become a
crafting must have, so get
collecting Everyone!  

I find the ones you see in
the road are very good as
they get flattened by the
cards running over them
and don't add so much
bulk to your project......
or you could take a hammer
to the one you've just pulled 
off that can of fizz........!!

'Til tomorrow

Mickie xx