Friday 30 June 2017

Undercover


Undercover


Hallo There!

Whoop! Whoop!  It's Friday!!

Hope your day is going well
and you've time to take a moment
to sit back and relax with a nice
cool drink and see what
Helen Chilton has brought us


"I love using the Cover a Card stamps. 

In these two projects I'm going to show how 
to build up different stamps in layers.


Working on glossy card, cut a mask for
 the moon and stamp the Metal background 
in Broken China and Picked Raspberry 
Distress inkpads.


Turn card around, reink and stamp again.


While the ink's still wet, rub round the edges


Remove mask and lightly colour moon with
 Squeezed Lemonade, then stamp the 
Birds on Trees in black.


Then stamp and emboss a corner of the Spiders Web 
in Stampendous Ice Blue embossing enamel


Decorate with a few sequins and layer 
onto coloured card. 


Now for the second card:


Working on glossy card again, stamp part of 
Geologic in Broken China and Shabby Shutters.


Stamp part of the Stones stamp in
Hickory Smoke and black


Stamp part of the Tree Line stamp in black.


Next stamp over the tree with 
Distress Oxide Walnut Stain.


When that's dry, rub on some 
Distress Oxide Peeled Paint.


Rub in a bit of Distress inkpads Pumice Stone 
and Hickory Smoke to the stone wall


Then finish off as you wish.

These stamps are really very versatile 
and mix well together."


Stamps used:

IO Cover a Card: Metal, Birds on Trees, Spiders Web, Geologic, Stones, Tree Line

Other materials:

Distress inkpads: Broken China, Shabby Shutters, Hickory Smoke, Pumice Stone, Picked Rasberry, Squeezed Lemonade
Distress Oxides: Peeled Paint, Walnut Stain
Ranger Archival: Jet Black
Glossy cardstock
Stampendous embossing enamel: Ice Blue


Fabulous project Helen, thank you


I really enjoyed that didn't you?
It will be fun to make up a few
cards to have ready for when 
needed - Oh my!  That almost
sounds as though I'm being 
organised ...............!!

'Til tomorrow

Mickie xx  


Thursday 29 June 2017

Undercover


Undercover 


Hallo Everyone

We have another card for
you today - this time we
are by the sea wth
Louise Thomson

"Hi there!
I seem to have gone down a very 
'beachy' route recently without realising
 it - must be in need of a holiday!

Anyway, it is hard to resist the lovely beach
 themed stamps from Impression Obsession...


I stamped this tranquil scene using 
archival ink so that the detail would remain
 when using watercolours. 

It is coloured with inktense pencils which 
are another current favourite of mine.
 

The pencils work fine on their own 
but adding water to them really brings them to life.

 I ran the archival pad around the edge
 of the card to give it a border. 


I masked most of the picture and then sprayed 
with colour bloom for a bit of sheen, 
added more archival ink and some scribbley bits
 with the inktense pencils to give the whole thing 
a slightly antique look.

Next to mount it on to my background. 
It is my first time playing with a cover a card stamp 
so naturally there had to be a bit of experimentation
 before I committed to anything too serious


Take one - inked up with brushos, spritzed with water, 
with a paintbrush dragged across for good measure


 Take two - inked with pale blue VersaMagic pad - 
no good in this instance but I think it would 
have been fine if I had chosen a darker shade of blue


Take three - using Fresco paints applied with cut n dry foam.


Take four - Using distress oxides applied to wet paper. 

Plenty of options to choose from but I went 
with the Frescos this time as I liked the way
 the paint colours blended.


I inked it twice to cover this long thin card. 

If you want a more subtle join you can avoid 
inking all the way to the straight edge, 
however it didn't really matter to me as
 the join was going to be covered up. 

I also gave the card a border using more Fresco paint 
applied directly with a sponge.


I laid out a few scraps of paper from my stash which 
had nice textures to them.


Using an Impression Obsession die I cut a couple
 of nautical shapes and coated them in alchemy wax...


...and layered them all up together.


I added a couple more die cuts and a few 
enamel accents to finish it all off.


Naturally it only seemed right to make the 
card insert and envelope match as well - 
partially inking the cover a card stamp 
worked really well for this."


Materials list:

Archival ink- potting soil
Fresco paints- turquoise, antarctic, nougat
Distress oxides- faded jeans, broken china
Cut n dry foam and scraps of 
textured paper from stash


Thank you Louise - loved your
experimentation with the
different colouring mediums.
A great idea to make the
insert and the envelope to match


Think I will carry on the experimentation
this evening - I am particularly impressed
with the Oxides and the Brushos!

'Til tomorrow

Mickie xx

Wednesday 28 June 2017

Undercover


Undercover


Hi Everyone

Are you familiar with the
Cover-a-Card stamps? 
 
I guess we might just be
speaking to the converted
however, if you haven't seen
these before you might 
join the converted by the
end of the week.............

Today we have Jane Castle
with us:

"For my project today I decided to make 
a variation of a toddlers bithday card 
as I thought it might be fun to have 
something to hang on the wall of a 
nursery or playroom.


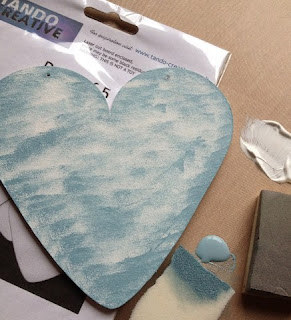
I began by giving my heart base a coat of
 Titanium White paint on both the front and back.

Then once dry made 2 holes at the top ready 
for hanging. 

Next I built up layers of blue and white paint
 using pieces of Cut & Dry foam.


Once I was happy with my background 
I stamped the Birthday Words in Versa-Mark ink 
and heat embossed with white embossing powder.


 I then cut a piece of white card the same 
shape as the heart and stamped Happy Birthday 
on it before attaching to the back. 
This was done so that the finished piece 
could then have a written message on.

The image was then die cut from various 
odds and ends of patterned card and felt.

 I was amazed at how well the tiny steel 
parts of this creature cut the felt, 
but really like the difference in texture 
to using all card. 

I built up the image first before attaching it
 to the heart as I wasn't quite sure 
of the positioning.

Next onto the 3 balloons --- these are from the 
Tando Mini series. 
They were coloured by dabbing ink straight from 
the ink pads and then heat embossed using 
clear embossing powder.


The ribbon was threaded through the holes before 
assembling the gator and balloons. 
His hands/paws were glued in position after 
attaching the balloon strings.


I have to say I had lots of fun putting 
this together and even now give a little smile
 when I look at the finished piece."


Items Used

Impression Obsession Die 422-N Patchwork Gator
Tando Creative Large Heart
Tando Creative Mini Balloons
Deco-Art Titanium White Acrylic Paint
PaperArtsy Fresco Chalk Lake Wanaka Paint
Stampendous Detail White & Detail Clear Embossing Powder
Brilliance Pearlescent Thyme Ink
Brilliance Rocket Red Ink
Versa-Magic Mango Madness Ink

From Craft-Room Stash:
Off cuts of patterned card
Off cuts of felt
Sewing thread for balloons
Length of ribbon


Thank you Jane - that is a
really nice idea; a card you
can hang on the wall.

Wouldn't mind receiving one
of those myself - it would make
me smile every time I looked
at it too!

'Til tomorrow

Mickie xx


Tuesday 27 June 2017

Twelve Month Challenge Winner

Twelve Month Challenge Winner


Hi Everyone!

Just a quickie to announce
the winner of this month's
Month Challenge.

Just nine of you too part this
month - Mr Random Generator
has done his thing - clicking,
whirring and juddering......
........................and with a
loud thumping noise .......
he has chosen 


No 9


Will Jane please step forward
to claim her prize!!

Congratulations Jane

mickiecraftbarn@gmail.com

is who you need to contact.

To everyone else, hearty commiserations
and thank you so much for taking part 

'Till tomorrow

Mickie xx