Saturday 29 April 2017

Quirky Birds


Quirky Birds

Hallo Everyone!

Another beautiful day on
planet Earth - it certainly
is a beautiful day in my
parallel universe......!

Today's project is just
tailor made for those of
us who have difficulty in
knowing what day of the
week we're in........!

Here is Craftyfield to show
us the way.....

"When I saw this bird, standing on one foot 
and looking sorry for himself, I knew 
this Joggles image would be my "Oops" stamp. 

You know "Oops" I forgot your birthday, 
"Oops" I heard you broke your leg... 

I thought a CAS design would be ideal and
 quick to make in a batch.
 I will finish the inside when I know 
what "Oops" I'm dealing with!


I stamped my bird with Distress Oxide, 
partly because I was trying the new inks and 
partly because this happened to be the most appropriate 
yellow for a no-line colouring.

[no-line colouring: when the stamped lines 
are invisible or near invisible after colouring]


I coloured Quirky no3 with watersoluble pencils, 
masked his legs with masking fluid and 
splattered yellows, brown and blue also with the pencils


I stencilled chicken wire behind the bird.


I used an old alphabet stamp set to 
create my sentiment.

I added finishing touches by die-cutting 
with a Stitched frame die.


Now I am all set for my next gaffe!"


Supplies: 
but Card-io makes a great one here


Thank you Craftyfield
I think this is the perfect
"belated/sorry" card I have seen 
in a long while


i think it is so apt I am
going to make a few
After all, I am bound to
have a good many
Oops! moments


'Till tomorrow

Mickie xx


Friday 28 April 2017

Quirky Birds


Quirky Birds


Hi There!

Just realised that we are
nearly in May!  Don't know
whether to be happy (we have
two Bank Holiday Weekends
in May in the UK), or
terrified at the speed in which
the year is hurtling by........

Here is Hazel Harler with
a calming thought............ haha!


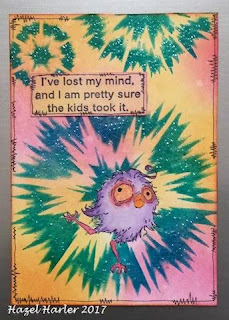
 "I love this little bird and decided to use it 
on a fridge magnet for my quirky bird project.


I started by cutting a 6" x 4" magnet from a magnetic sheet.

I covered it with white card and used 
my Hampton Art stamp positioner to stamp the images.


I don't always get a clear image when 
I use a stamp and I find this tool very useful 
as I can stamp the image more than once.


I masked the little bird and coloured the card 
with Distress ink and lightly sprayed it with water.


 I used a Sheena Douglas stencil with distress ink.


I decided to stencil some Distress crackle paint 
and removed the mask while it was still wet.


A close up of the crackle after it had dried.


 I coloured the bird with watercolour pencils. 

I decided to stamp the words on a piece of card
 as the ones that I stamped on the magnet 
didn't show up very well after the stencilling


My magnet on my fridge with a couple of my other magnets."


Great idea Hazel, thank you

We should all have one of these
on our fridge doors then every time
we pass it we will smile (maybe 
even laugh out loud) or just
agree with the sentiment......


'Till Tomorrow

Mickie xx


Thursday 27 April 2017

Quirky Birds


Quirky Birds


Hi There!

I'm here today with 
Claire Jackson
and no Month Challenge
in sight. haha!

Today Claire is going
to show us how to
get some uninterrupted
crafting time:

"Take a door hanger


and paint it with two layers of 
PaperArtsy snowflake paint, 
drying in between


Build up the background with 
opaque colours first.

 I used blue oyster and china and 
then lightened it with more snowflake


Add translucent colours over the top 
so that your base layer still shows through. 
I went with limelight and southern skies 
and blended with a little snowflake in the centre


Sponge snowflake paint through the 
arrows stencil and dry thoroughly


Replace the stencil so that it does 
not quite match up with the white arrows
 and sponge translucent colours over the top. 
This will give the effect of shadows and depth. 
Add some stamping in paint and when dry 
highlight some areas with a white pen


Add stamping in black and ensure it’s 
completely dry by heat setting it. 
Add more white highlights


Stamp the bird image several times on 
tissue paper and heat set. 

The great thing about tissue paper is that 
you can turn it over and reverse the images 
so that the bird is going in the 
opposite direction. 

Paint the back of the images in white.


Colour the images. 

I used a combination of permanent markers 
for vibrancy and pencil for shading.

 Tear around the images


Cover the hanger in a layer of gel medium 
a section at a time and add the tissue images. 

Cover the tissue with more gel medium and 
gently massage it into the tissue so that it 
becomes transparent


Print out the words, cut out, decorate the edges 
and adhere to the hanger. 

Add shading to the edge of the hanger. 
I used blueberry Gelato and blended 
it with a babywipe

Now there's no excuse for anyone getting 
covered in sparkle unexpectedly when 
they interrupt me in the craft room!"


snowflake, blue oyster, china, limelight, southern skies
Tim Holtz layered stencil: arrows
PaperArtsy stamps: Seth Apter 01
Versafine: onyx black
Tissue Paper
Collage Medium: matte
Faber-Castell Gelatos: blueberry
Gesso

From Stash:

Sharpie marker and white paint pen
Coloured pencils
Black and white gel pen


Love those quirky birds they're
such fun and thank you Claire
for showing us your really fun
door hanger


'Till tomorrow

Mickie xx


Wednesday 26 April 2017

Quirky Birds


Quirky Birds


Hallo Everyone!

It's the last topic for April.
We start the month with
All Fools Day and it seems
fitting to be ending it with a
laugh, a giggle or a smile
and these quirky little birds
from Joggles fit the bill
perfectly.

Karen Gist is with us today
with a super little wall
hanging:

"Using an old credit card spread some PaperArtsy 
Spanish Mulberry and Smurf across a 
Tando Creative Coaster.

Add some smudges using a scrunched up
paper towel and some white acrylic.


Stamp the Joggles Quirky Birdy #2, 
colour in with Derwent Inktense pencils 
and cut out.

Doodle a wiggly line around the edge 
of the coaster and colour in using the same 
colours as above.

Stamp the Funny Bones stamp onto 
tissue paper using Stazon and when dry carefully 
tear around it. 

Add to the coaster using matte medium.

Attach the bird and some wire and beads."


Materials used:


Oh that is such a fun piece
of Home decor Karen, thank you
so much for starting the week
with a bit of fun

Good to laugh out loud isn't 
it Everyone?  Makes the whole
world seem a brighter place....


'Til tomorrow

Mickie xx