Showing posts with label Hazel Harler. Show all posts

Wednesday, 28 March 2018

Mother's Day the Sequel

Mother's Day the Sequel


Hi There!

Yes, I'll admit.  I had a brainstorm
(before anyone goes all pc on me
that is a technical term) and for all
I had created some articles specifically
for Mother's Day; I omitted to post
them...............Duh!

You don't have to be crazy to
live my life but it does help.....

As you will see, each card lends
itself to more than one
occasion all that is required is
to change the greeting 

I have three such projects for you;
the first is from Hazel Harler
and it goes like this:


 "For the background I placed a stencil 
on some white card and sprinkled it with
 Cosmic Shimmer Pixie dust and then
 sprayed it with water. 

I dried the card with a heat gun and 
stamped the Paperartsy Hot Picks flower 
and coloured it with a felt tip pen. 

I then edged the card with a black pen and
 added the ribbon then adhered the 
decorated card to a card blank.


I stamped a butterfly onto card 
that I'd coloured with Pixie dust, cut it out 
and adhered it to the card and then
 finished with the sentiment and some sequins."

-0-

The next card is from Jane Castle and it
goes like this:

"Here is a fairly quick and easy card to help
 with any ideas if you are struggling with 
what to make.

"For my base card I used a linen textured card 
and cut a paper heart template to work my
 Gelatos off to form my outline.

Then using the blending tool worked around
 the heart before removing the template
and added buttons following the 
shape of the heart.  There's lots of
lovely buttons on the Craft Barn website
if you need to stock up


Some I added thread to for added interest. 

Then using the same 3 colours of Gelatos
 coloured a piece of card and added a die 
cut Mum, a couple of Tim Holtz die cut wild 
flowers at the bottom and finally some 
Ranger Liquid Pearls to enhance the 
shape on the outside."

-0-

and finally, here is a card from
Claire Jackson

My card uses water soluble pastels 
(Gelatos or Distress Crayons) and
 embossing folders.

First I scribbled on two pieces of card
 and blended the colours with a damp 
baby wipe.


Then I coloured an embossing folder using 
the lighter colour first. I did both sides 
and then spritzed lightly with water. 
I put my coloured card pieces back
 to back in the folder so that I could emboss
 both at the same time, ending up with 
one side embossed and one side debossed.

There was still some colour on the folder
 so I spritzed again and ran two 
pieces of white card through.


Using a different folder I embossed and
 die cut some flowers.
 I had enough pieces for two cards


Thank you Hazel, Jane and Claire
for a lovely set of cards


Some good techniques here too
and I really liked the tip from
Claire on using two pieces of
card in an embossing folder.

There's always something to 
be learned isn't there?

'Till tomorrow

Mickie xx


Sunday, 18 March 2018

Boxing Clever

Boxing Clever


Hallo There!

How are you?  Feeling chirpy?
Hope so, I have a really nice
project to show you today by
Hazel Harler.

She has brought Spring
with her. take a look at this:

"Hi everyone, I have a decorated papier
 mache box to share with you today.


I started by giving the box a coat
 of white gesso, then I stencilled some 
script using a Carabelle Studio stencil 
and some modelling paste.


 I crumpled some tissue paper and 
adhered it to the spine then I painted 
it with some plum Fresco paint. 

I painted the rest of the box with taupe, 
plum and captain peacock Fresco paints, 
I also added some plum splatters.


Using my finger I lightly added some
 Imagination Crafts white gold 
Starlight paint.

 I adhered some patterned tissue paper that
 I found in my stash to the sides of the 
box and stamped some Paperartsy leaves
 with apple green Starlight paint.


I decorated the box with a wooden 
leaf spray, Forever In Time burlap daisies 
and some pearls, I also tore some
 birds out of the tissue paper and 
adhered it to the box."

I will have to make this one Hazel
It is a good design and I love the
techniques and colours you have
used.  Thank you very much

I'm sure you will agree that this
is an awesome project

"Till tomorrow

Mickie xx


Wednesday, 28 February 2018

Random

Random


Hi There!

So we're coming up for
MOTHERING SUNDAY
which means that EASTER
won't be far behind and
there's always someone
with a BIRTHDAY or who
might need a THANK YOU
or a GET WELL SOON.
Greeting cards need
to be made.......

Hazel Harler has brought in
a beautifully simple card
to set you off for any occasion...


 "Hi all, I have a simple card to share
 with you today using just one small
stamp set, archival ink and
watercolour paints.


 I stamped and embossed the 
Woodware vase and flowers.

 I watercoloured the image then 
I masked of the flowers and vase and 
splattered some watercolour.

 I adhered the image onto some 
coordinating card and then onto a 
cream DL card blank."


Thank you Hazel for reminding us
that we don't need a huge amount
of stash to make a beautiful card


A set of these cards with
different coloured flowers
would make a useful gift too...

'Till tomorrow

Mickie xx


Saturday, 10 February 2018

Random


Random 


Hallo Everyone,

We have a tag for you
today - a rather nice
door hanger

I just say, when I first
saw these hangers I wondered
why..........?  However, once
I'd hung one on a door I
saw their significance in
adding a bright spot to an
otherwise mundane object
and am now working my 
way up to one for each
season and festivity not
to mention the ubiquitous 
KEEP OUT when the
occasion demands....

Hazel Harler has brought
us a beautiful door tag:


"Hi all, today I have a decorated 
door hanger to share with you.


 I painted a Tando door hanger with gesso
 and then coloured it with Gelatos. 

I spread some modelling paste
 over a Tim Holtz stencil.


 I added more colour, then I mixed some
 water with some cocoa Dreamweaver Metalic F/X 
and painted it over the whole hanger.


I decorated the hanger by adding some
 book pages, hesian and buttons,
 and dyed some white material with Distress ink,
 when it was dry I stamped the 
Paperartsy/Lin Brown tulip on the fabric.

I also stamped it three times 
onto white card and then
I coloured the tulips and cut them out. 

The leaves were stapled together
 and I 3D the flower."


Thank you Hazel I love all
the stages in the making
of this beautiful door hanger

Did I mention that Tando Creative
and PaperArtsy are in the SALE?

'Til tomorrow 

Mickie xx


Thursday, 25 January 2018

At Random

At Random


Hallo There!

It is always nice to meet up
with an old friend and today
is a bit of an exception as
not one, but two old friends!

The one is Hazel Harler and
the other is Crafty Individuals
who have got together to
make a beautiful project
 which could also double
as a very acceptable 
greeting card:


"Hi everyone, I have a decorated
 notebook to share with you today.

I covered a notebook with a sheet of
 Imagination Crafts rice paper.


Fresco Finish paints were lightly 
brayered over the cover.


I stamped some gold Imagination Starlight
 paint with a Seth Apter stamp, then I 
glued a torn piece of a gelli print and some
 gold thread to the front of the notebook.


The next thing I did was to brayer the 
paints onto a piece of white card and then
 I stamped the Crafty Individuals image
 with black Archival ink.


I coloured the image with pencils, cut it out 
and glued it to the cover, and then
embellished the cover with lace, buttons,
 rub ons and some word stickers."


Thank you Hazel for a beautiful
design.

A combination of Crafty Individuals
and Seth Apter stamps......WoW!
Who would have thought it......
possible? ........ probable?


The January Sale continues - don't
forget to take a look at the
offer.........!!


'Till tomorrow

Mickie xx


Saturday, 13 January 2018

At Random


At Random


Hi There!

It's the weekend again.  Comes
round so fast don't you agree?

Hazel Harler has reminded me
of a technique I had forgotten
and such a useful technique too!
Especially if you have a really
quick card to make...........!


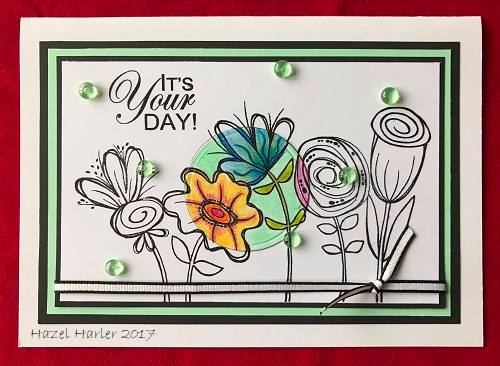
"My project today is a simple spotlight card.


I stamped the Woodware image twice and 
coloured three of the flowers on one image.


I matted the main image onto black and
 green card and and then onto a white card blank.


I die cut a circle from the coloured flowers 
and adhered it over the main image matching
 the lines exactly. 

I embellished the card with some dewdrops."


Thank you Hazel, it s beautiful,
So glad you reminded us of 
this super easy technique

All you need is one stamp, a
few bits of card and an ink pad

If you're thinking about making a 
spotlight card yourself, then have
a look in the SALE and see if there
isn't something there for you.........


'Till tomorrow

Mickie xx


Wednesday, 20 December 2017

Design Team Greetings

Design Team Greetings


Wishing you all a Wonderful Christmas 
and a very Happy, Healthy and Crafty New Year.
 xxx Hazel.

Friday, 24 November 2017

Mechanical Greetings


Mechanical Greetings

 
Hello Everyone!

We have another fun card
for you today.  Hazel Harler
is here to stun and amaze 
you with her take on this
theme:

 "Hi everyone, I've a Kinetic Swing Card
 to share with you today.


 I brayered some Fresco Finish paint
 over the inside of my card blank.


Then I stamped some snowflakes with
 a Jofy stamp and metalic glaze.


These are the paints, glaze and 
stamp that I used.


This photo shows the fold lines and cut out 
on the front of the card.


This photo shows the card folded and standing.


 This is the template and measurements
 for the card.


 I decided to colour the front of the card.


I used a mixture of Zinski and Jofy stamps 
to stamp inside the card and onto white card.


 I used felt tips to colour the images.


The snowmen were matted onto blue card 
before attaching it to the front and back 
of the square cut out, I also added some
 small punched snowflakes.


I cut out the baubles and glued them
 inside the card together with the sentiment.


The front of the finished card


The inside of the finnished card."


Thank you Hazel - a jolly card to 
cheer anybody's day.  Many thanks


Well Everyone, now you know as
much about kinetic cards as I do!  

Aren't they fun?


'Till tomorrow

Mickie xx