Showing posts with label Seth Aptor Stamps. Show all posts

Thursday, 19 October 2017

For the Boys


For the Boys

Hi Everyone!

Wouldn't be great if
making gifts for the
boys was just a question
of changing the colour
scheme? ........... 

Actually, I think we
would miss out on a lot
of the fun if we did that
although I did read 
somewhere that the male
brain is wired differently
for colour.  Really?
I'm not sure  .........

Louise Thomson has
an interesting question  .......


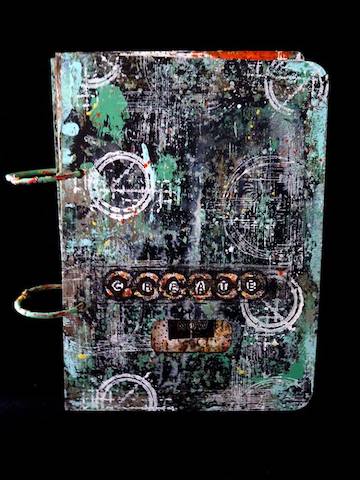
"Why do women get all 
the notebooks?! Sure, I love a tiny 
notebook probably as much as most 
crafters but that's not to say that 
there can't be masculine ones too. 

My Dad always keeps a notebook
 in the car to record his petrol 
and mileage. 

My brother has one that he records
 places he's cycled, and yet
 if you look in the shops, most 
notebooks are floral and feminine, 
or at best plain. 

Time to address the situation!


I started with an alterable Kraft notebook, 
fresco paint in Antarctic and some 
Seth Apter stamps. 

I gave the notebook a couple of coats
 of paint and left it to dry.


 I stamped one of the Seth Apter ESA05 set
 in cobalt archival ink onto some tissue paper
and glued to the spine.


 I used aquamarine archival ink 
for the main image


I partially re inked the stamp and stamped 
over the top in the darker blue. 

Using a fine liner I highlighted a few 
of the details. 

I also added some inking around 
the edge of the notebook.


To finish I added metal corners 'tarnished' 
with a little permanent black ink, 
coiled wire and a wooden kaisercraft key 
gilded in silver alchemy wax and attached
 with a little piece of wire."


Thank you Louise.  I think
you have provided a good
solution to the dilemma of
why are little notebooks
often so pretty pretty


I try to keep a stock of
these little notebooks to
hand as I find they do
make nice little presents
and are quite fun to
decorate to suit the
recipient

"Till tomorrow

Mickie xx

Thursday, 8 June 2017

One for the Boys


One for the Boys

Hallo Everyone!

Today we have Claire Jackson
with another Seth Apter inspired 
project for you.  Oooh, I can't wait
to see what she has made for us ....

"Settle down with a cuppa as this 
is quite a long post! 

I’ve gone into a fair bit of detail so that
 you can see how the layers build up, 
but really it is a very simple mono printing 
technique that I have used.


 I started with the Tando Kate Crane 7 Piece Planner 
made from really robust board. 


I covered alternate pages with black or white gesso, 
not worrying about mixing the colours or picking up
 blobs of paint on the way.


With the black gesso left on the craft mat 
I pressed a white page onto it to lift some of the paint. 

I lifted as much black paint as possible onto 
the white pages before a little spritz with water. 
You can see the difference in the patterns 
when the paint was wetter.

I repeated the process with the black pages; 
painting white gesso directly onto the craft mat 
and pressing the pages onto it.


I used PaperArtsy’s limited edition of Seth Apter paints,
 with addition of mermaid and snowflake.


I continued to build up layers by brushing paint 
directly onto the craft mat and then pressing the 
pages onto the paint strokes.


The covers and inside pages 3, 4, 7, 8, 11 
and 12 were layered with green patina, 
mermaid and mudsplat...


...while the remaining pages 1, 2, 5, 6, 9 and 
10 were layered with smoked paprika and key lime. 

I didn't worry if some of the other colours were 
picked up too from the dried paint on the mat.


Steps 6 and 7 were repeated until 
I was happy with the layers and the craft mat 
looked like this...!


I used Seth Apter stamps from 
PaperArtsy and Impression Obsession.


The white pages were stamped with 
black archival ink and the black pages 
were stamped in white snowflake paint


The green patina pages were also given a
 spatter with key lime and smoked paprika.


The ‘now’ wording was stamped on tissue paper
 and painted with white snowflake on the reverse. 
I added it to page 2 with gel medium so that 
it can be seen through the aperture in the front cover.


The ‘create’ wording was also stamped on tissue. 
First I painted over the letters on the reverse 
in white, then daubed some key lime and 
smoked paprika behind the circles, 
before painting over the circles with white again. 


I took care to leave the edges unpainted so 
they became transparent when adhered 
with gel medium."


Materials used:

Tando Creative: Kate Crane 7 piece planner kit
White gesso:
Black gesso:
PaperArtsy fresco finish chalk paint: Seth Apter set 2, snowflake, mermaid
 Impression Obsession Seth Apter stamps

Super project Claire thank you.
I really like the idea of alternate
pages of black and white gesso

I had been wondering what I would do
with my Kate Crane Planner Kit........

'Till tomorrow

Mickie xx

Wednesday, 7 June 2017

One for the Boys

One for the Boys


Hi!  How's it going?
Ready for Father's Day;
Summer Solstice; 
Barbecue's on the Beach?

Can't help with the last
two but here's Jane Castle
with an idea that can be
adapted for the the first....


"Having looked at a couple of Seth Apter 
videos of late I really like his handmade 
embellishments where he winds
different wires, yarns and threads around 
an object. so I decided to make one for the 
centre piece on my tag for this project.

After cutting my tag and reinforcement rings 
I gathered various bits and pieces together 
that I thought might be handy.


The tag was cut from some Mixed Media card 
and the rings were cut from some leftover 
thin leather. 

I attached some scrim tape to the tag and then 
started to add paint with a brayer and a brush.


The scrim tape is easy to shape 
once it's off the reel and 
it has a sticky backing. 

To begin with I used Mud Splat, 
Chutney and Seaweed as my base colours. 

Next I used some Tikka and Vanilla 
before colouring some Grunge Paste with 
a little Seaweed and Mud Splat. 
This was then added through a TCW stencil.


I then random stamped the large grid stamp 
from I.O. Seth Apter Pattern Play in Archival Sepia.

Now for a small injection of colour---- 
2 small frayed pieces of hessian were then 
coloured with a mix of Stone and Space Cadet paint.


2 Inches were painted with Vanilla and 
then stamped with a stamp from the same set 
in Archival Watering Can.

A small heart and cog were given 
3 coats of copper embossing powder 
before stamping with the lined stamp 
whilst still hot. 

The stamp was well inked with black Archival 
before inserting into the hot embossing enamel.


A thin piece of the wood venier was then 
bound with various layers of cotton thread, wire, 
fancy knitting yarn and bakers twine.

 Part of a broken earring was then attached to the top.


The leather rings were then glued in place and
some old hairy string tied to the top.

This is a very 'touchy, feely' tag and I'm pleased 
I've given this type of embellishment a go-----

I am now thinking that a dried poppy seed pod
 would also look good bound on the stem in this way!!"


Item List
Mixed Media Card
Fresco Chalk Acrylic Paints
Grunge Paste
Inches
I.O. Seth Apter - Pattern Play
TCW Mini Raven Mosaic Stencil
Tando Mini Heart
Cosmic Shimmers Ancient Copper Metallic Embossing Powder
Scraps of Leather and Hessian
Scrim Tape
Crafting Wire
Archival Inks


Thank you Jane - the possibilities
go on an on....

This design could be used on
a greeting card - think Father's Day
or even on a canvas or some
other wall hanging

Hmmm.........will go away and
think about that one.....

'Til tomorrow

Mickie xx


Thursday, 27 April 2017

Quirky Birds


Quirky Birds


Hi There!

I'm here today with 
Claire Jackson
and no Month Challenge
in sight. haha!

Today Claire is going
to show us how to
get some uninterrupted
crafting time:

"Take a door hanger


and paint it with two layers of 
PaperArtsy snowflake paint, 
drying in between


Build up the background with 
opaque colours first.

 I used blue oyster and china and 
then lightened it with more snowflake


Add translucent colours over the top 
so that your base layer still shows through. 
I went with limelight and southern skies 
and blended with a little snowflake in the centre


Sponge snowflake paint through the 
arrows stencil and dry thoroughly


Replace the stencil so that it does 
not quite match up with the white arrows
 and sponge translucent colours over the top. 
This will give the effect of shadows and depth. 
Add some stamping in paint and when dry 
highlight some areas with a white pen


Add stamping in black and ensure it’s 
completely dry by heat setting it. 
Add more white highlights


Stamp the bird image several times on 
tissue paper and heat set. 

The great thing about tissue paper is that 
you can turn it over and reverse the images 
so that the bird is going in the 
opposite direction. 

Paint the back of the images in white.


Colour the images. 

I used a combination of permanent markers 
for vibrancy and pencil for shading.

 Tear around the images


Cover the hanger in a layer of gel medium 
a section at a time and add the tissue images. 

Cover the tissue with more gel medium and 
gently massage it into the tissue so that it 
becomes transparent


Print out the words, cut out, decorate the edges 
and adhere to the hanger. 

Add shading to the edge of the hanger. 
I used blueberry Gelato and blended 
it with a babywipe

Now there's no excuse for anyone getting 
covered in sparkle unexpectedly when 
they interrupt me in the craft room!"


snowflake, blue oyster, china, limelight, southern skies
Tim Holtz layered stencil: arrows
PaperArtsy stamps: Seth Apter 01
Versafine: onyx black
Tissue Paper
Collage Medium: matte
Faber-Castell Gelatos: blueberry
Gesso

From Stash:

Sharpie marker and white paint pen
Coloured pencils
Black and white gel pen


Love those quirky birds they're
such fun and thank you Claire
for showing us your really fun
door hanger


'Till tomorrow

Mickie xx