Thursday 28 December 2017

Design Team Greetings

Design Team Greetings


Well all that's left for me to say is a
 Big Thank You to everyone 
for supporting The Craft Barn Blog each week,
 without you we wouldn't be here! 

I'd like to wish you all a wonderful Christmas, 
hope you get some of the crafting goodies 
on your 'Wish List' and hope to see you 
back here in 2018 for a Peaceful New Year 
full of exciting new crafting techniques
 and ideas. 

Jane xx

Wednesday 27 December 2017

Design Team Greetings


Design Team Greetings


Merry Christmas  and
a Happy New Year
to you all

Louise xxx

Monday 25 December 2017

Design Team Greetings


Design Team Greetings


Many thanks to all the blog readers 
who have followed the challenges and projects
 over the year.
 
A special thank you to those who stuck 
with the Twelve Month poem challenge. 
I have loved looking at your blogs 
and seeing how you have interpreted the verses.

A big thank you to Mickie for all of
 her hard work managing the blog and
 of course to Sandy for giving me this fabulous
 opportunity to be part of the DT.

Whether or not you celebrate Christmas,
 I’d like to wish you all 
Peace and happiness for the year to come.
Claire xx


Sunday 24 December 2017

Design Team Greetings


Design Team Greetings


I look back on this year as DT Member
for the Craft Barn, and I can only say that
 I thoroughly enjoyed it! 
It has been challenging at times, 
but this helps me grow as a crafter
 and this is what I need. 

I want to wish a Happy Christmas to you all,
 our loyal followers, occasional readers, 
those who enter our challenges and of course
 my fellow DT Members, our DT coordinator Mickie, 
and Sandy who keeps adding lovely stash to the store...

xxx Craftyfield

Saturday 23 December 2017

Design Team Greetings


Design Team Greetings


Wishing you all a very Happy Christmas
and Peace, Love, Health and Happiness in 2018

Mickie xx

Friday 22 December 2017

Thursday 21 December 2017

Design Team Greetings

Design Team Greetings


Hope you all have a brilliant Christmas 
and a very Happy and Creative New Year. 
Big Hugs, Angela xXx


Wednesday 20 December 2017

Design Team Greetings

Design Team Greetings


Wishing you all a Wonderful Christmas 
and a very Happy, Healthy and Crafty New Year.
 xxx Hazel.

Tuesday 19 December 2017

The Christmas Table

The Christmas Table


Hi there!

Expect you've been too busy
to notice that the final item in
The Christmas Table wasn't
there on Saturday.......mea culpa
so, here it is today and well
worth waiting for I can assure
you!

So over to Louise Thomson to
show us how to finish our table:

"It's nearly Christmas!!! 
My favourite time of crafting :)

Today I'm sharing a technique that 
you can use for a Christmas table
 centrepiece, or to make lovely gifts.


I started by cutting lots of shapes from
Bazill card using Sizzix tiny tattered 
florals and winter greens dies.


On the flowers I tapped my clear
 embossing ink pad, then
 sprinkled with gold embossing 
powder and heated to give them
 a varied texture and colour.


I fixed the flowers together in groups
 of two or three using gold brads.

Next I spritzed some of the greenery 
with colour bloom shimmer spray.


To the holly I added a good coating of
 glossy accents and left them to dry 
draped over various things on my desk
 so they would have a bit of shape.


Finally I added dots of liquid pearl
 to the branches with berries.


With all the greenery prepared and set aside,
 I cut further die cuts from a gorgeous
 Impression Obsession die. 
laid  the die cut over a large church candle 
and wrapped this in a piece of 
greaseproof paper.


I needed three hands to photograph the
 next bit, so you'll have to take my word for it! 
I used my heart gun to gently heat the surface
 of the candle (through the greaseproof) until 
I started to see the colour on the die cut 
change. It does a similar thing to embossing
 powder, you'll see a corner start to change
 and darken then it sort of spreads across
 the whole image.
 Once the whole image was a solid colour 
again it was done. 


I learnt the hard way... 
DON'T TAKE THE GREASEPROOF 
PAPER OFF YET! 
count to ten slowly giving the wax
 time to set a little, then remove it.
 You should find the die cut has
 embedded itself beautifully on to
 the candle.

I repeated this in the other side
 of the candle too.

I ran a couple of strips of double sided 
tape along the bottom of the candle 
and started to adhere the greenery.


With all the greens stuck down, 
I added the flowers back in.


Here's a close up of the
base of the candle:"


Materials:


Thank you Louise, this would
look lovely on anyone's table


Our Christmas Table is now
complete - leave you to cook
the turkey/goose/nut roast
or whatever else is the tradition
in your house - but don't
forget the sprouts!  


'Till tomorrow

Mickie xx


Sunday 17 December 2017

The Song Challenge

The Song Challenge


Happy Sunday!

Here I am with the last
Song Challenge!  Silly me,
thought I'd already set up
this post...............!

Nonetheless, here it is.....
.....and the final song is

Driving Home for Christmas
by Chris Rhea

Well, I think it is by this
artist but others may have
sung it.........!

The lyrics go:

I'm driving home for Christmas
Oh, I can't wait to see those faces
I'm driving home for Christmas, yeah
Well I'm moving down that line
And it's been so long
But I will be there
I sing this song
To pass the time away
Driving in my car
Driving home for Christmas

It's gonna take some time
But I'll get there
Top to toe in tailbacks
Oh, I got red lights all around
But soon there'll be a freeway, yeah
Get my feet on holy ground

So I sing for you
Though you can't hear me
When I get through
And feel you near me
(Driving in my car)
I'm driving home for Christmas
Driving home for Christmas
With a thousand memories

I take look at the driver next to me
He's just the same
Just the same

Top to toe in tailbacks
Oh, I got red lights all around
I'm driving home for Christmas, yeah
Get my feet on holy ground
So I sing for you
Though you can't hear me
When I get through
Oh, and feel you near me
Driving in my car
Driving home for Christmas
With a thousand memories

I take look at the driver next to me
He's just the same
He's driving home, driving home
Driving home for Christmas


and here is Karen Gist's
last coaster of the year:


no traffic jams there!

So, it's Christmas
Travelling
Home
Tail backs or if you prefer
cars bumper to bumper
(been in some of those
lately - makes you glad
you have some good music
with you!)

You have until 30th December to
upload your project via the link.
If it's not working just email it
to me at mickiecraftbarn@gmail.com

Look forward to seeing your work

'Till tomorrow

Mickie xx


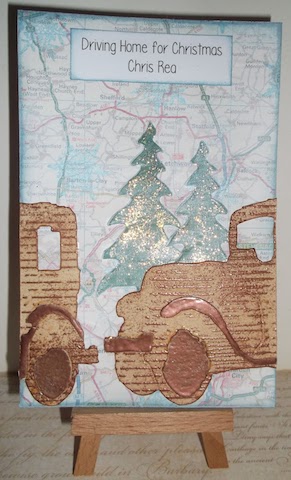
Here is a card from Maggie
who, like many of us at 
this time of year, got the
dates and the days confused
but sent me the link to her
blog.  The card sums up
for me all those endless car
journeys on crowded roads
that we inflict upon ourselves
be it Christmas time or any
other holiday................!


Friday 15 December 2017

The Christmas Table


The Christmas Table


Hallo Everyone!

It's getting a lot more like Christmas
isn't it?  Are you panicking or are
you on track?  Don't think I fall into
either category - I just take it as it
comes .............................. and like
the advert I pour another drink for
my guests if I need to make myself
a little crisis time!

We have Angela Radford with
us today and she is going to
share her place settings with us:

"Hi all, here today to show you how I've made
 some Christmas table settings. 

I started with a sheet of white card and
 several colours of Distress ink.


Smoosh it on and dry.


Using the Kay Carley snowflake stencil and 
Distress Matte Medium I applied this over 
the coloured card.
 Leave this to dry before finishing the Masterboard.


Used my Tim Holtz stamp positioner to stamp
 the ElenaZinski Elves.


Colour these and leave to dry.


Back to the Masterboard using the Kay Carley
 stencil and two colours of Distress Oxide in
 with a blending too.


Cut out the Elves. 
I went round the edges of these with a 
black ink and blending tool so that the 
white edges don't show.


 Cut the Masterboard to your chosen size, 
edge with matching colour, score and fold. 
then attach the Elves. 


I have printed the names on the computer,
 edged them and attached with a stapler but 
they could also be stamped on too. 

This should stop them falling out about who's
 sitting where Lol! or maybe not! 

Happy crafting, Angela xXx"


Products used:


These are great Angela, will bring
a smile to every face too!


Don't you just love these
place settings Everyone?
So quick to do too, with
Angela's brilliant Masterboard
technique

'Till tomorrow

Mickie xx