Sunday, 27 October 2013

ALPHA DICTIONARY CHALLENGE - LETTER N

Hi everyone, 
Week 22...... end of October... two more months to go and this wonderful Altered Dictionary adventure will end. I am still amazed at those who have kept going week after week since day one. Well done. 

We are started to work on the new challenge with the DT backstage, and I'm really excited about it as I'm sure you will love it as much, if not even more, as this current challenge. 
But, I'm not going to tell you more for the time being (I like teasing).

In the meantime, here's your new letter. 


LETTER N

Here are the samples from the DT

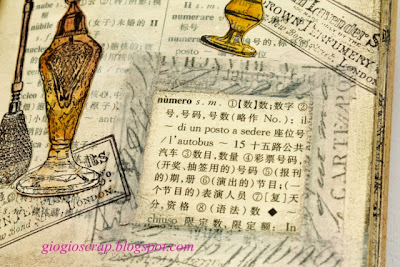
Gio chose number/numero


 and Karen went for the yummy Nectarine

Looking forward to seeing your pages. 

Have fun!

Izzy


Saturday, 26 October 2013

Saturday Savers Autumn Leaves - Jane

Hi, 
A different take on the Autumn leaves with different shades that could be autumnal or be used all year around. Jane used different pieces of cardboard to create a beautiful desk tidy.
She used decomache for this project, which is a quick and easy way to cover cardboard or wood. We have a large selection of papers to choose from (click here to find them) .


 We all have cardboard tubes and boxes to hand

 Because I am covering them with a fairly thin paper, I have painted them with white acrylic paint

 I thought I would use the lovely decomache papers to cover the rolls etc., tear the papers into small pieces

Cover the tubes using decomache glue 


When dry, you could leave them now but I decided to try out the crackle coat so..... apply two coats of the base coat, making sure the coats dry before adding next one.  
Then apply top coat, quite thickly if you want lots of crackle!!!  When dry rub over acrylic paint, working into cracks and then remove excess


 To decorate I have decorated with Summer Border diecut and ribbon.  

First Edition Deco Mache papers - Leaf Repeat, Purple Stripes
Pebeo Acrylic Paint - Iridescent Violet Blue
Mirri Card -Silver
Memory Box die - Summer Border

See you tomorrow

Izzy

Friday, 25 October 2013

Autumn leaves - Sylvie

Hi, 
A lovely little autumn box with Sylvie today. Sylvie used a mix of embossing powders, metal and gem to add shimmer to her project. Take your time to click on the pictures below to appreciate all the details. There's a lot going on there. 


From the Notable paper (by MME) cut rectangles to cover the top and the four sides of the box.
Distress the edges of the papers with the paper Distresser and ink them up with Distress ink Vintage Photo.
Stamp the fence from the Hobby Art Woodland scene set as well as the grass.
Stamp the mushroom and the mouse on a separate piece of card, colour them with Distress inks and cut them out. 
Stamp the Lavinia Vine at the top using Sepia Archival ink and add the gems.
On a separate piece of cardstock, stamp the Crafty Individuals ferns using Olympia Green and Toffee Versafine and emboss them with Antique Gold embossing powders.
Cut the ferns out, inks the edges with Distress inks and adhere them to the box using 3D foam pads.
Adhere the mouse and letter box using 3D foam pads.
Emboss a piece of metal to mat your sentiment/greeting. 
Also cut triangles out the embossed metal sheet to add to the side of the box.


DETAILS


Sylvie used :
My Minds Eyes Paper pads « Notable » 6x6
Hobby Art Clear stamps : Woodland Scenes
Distress ink pads: Vintage photo, Spice Marmalade, Mowed Lawn, Peeled Paint
Lavinia stamps: Vine, Weeping willow leaves
Crafty Individuals stamps: Trees and leaves CI-207 ferns and grasses
Versafine small ink pads: Toffee and Olympia green
Ancient Gold embossing powders : Antique gold
Frantage embossing enamel Powder: Aged Copper

See you tomorrow

Izzy

Thursday, 24 October 2013

Autumn leaves - Karen

Hello,
Another card today with Karen this time who used the Tando Creative with the Pebeo Acrylic in autumn shades. She also used Sparkle Medium on her background to add a touch of shimmer.


I love Autumn and nothing is more fun to me than crunching the leaves underfoot! 
For my project I have used the tall leaves by Tando Creative. I dabbed them with a mix of Pebeo High Viscosity paints until I was happy that they looked the right colours. While they were drying I got to the background. I used a piece of coffee card, stamped the Cover-a-Card Woodgrain stamp in Brilliance Gold before adding some Sparkle Medium through two Tando Masks. When it was all dry I assembled the pieces as shown, adding a bit of matching ribbon and a copper brad from my stash. The background has been mounted onto green card as has the PC generated quote, which I love!

Here is a close up to show off the sheen this card has...

Karen used:
Tando Creative - Tall Leaves (set of 4)
Impression Obsession Cover-a-Card - Woodgrain
Pebeo Studio Acrylics - Green Yellow, Yellow Ochre, Primary Magenta and Cadmium Yellow
Imagination Craft Sparkle Medium - Bright Red
Brilliance Dewdrop Ink - Galaxy Gold
Cardstock - Coffee and Mint

See you tomorrow

Izzy


Wednesday, 23 October 2013

Autumn leaves - Gio

Hello bloggers, 
Scrapbooking today with Gio and a colourful autumnal page using Cosmic Shimmer mister and masks by Tando Creative.


 I cut a 30X30 square from the Pebeo Cotton Pop Art canvas pad - A3
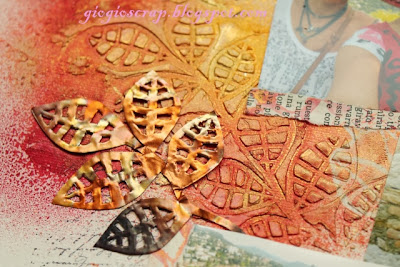
I laid down the Tando Creative Masks: Leaves mask and I covered it with a small amount of PaperArtsy Grunge Paste spreading it with a palette knife. When dry I laid the same mask on the canvas on the right and I sprayed several colours of Cosmic Shimmer Misters. I dried them with a heat gun to have brighter colours. I trace down the mask leaves on a piece of Metal sheet and I cut out the branch. 
Since it was real copper I heated it with a flame until it changed colour. 
I brushed some Treasure Gold: Brass on the raised area. 
I stamped randomly the scripts using the CI-214 stamp and Ranger Archival Ink pad: Jet Black.

I cut the title out of some paper leftovers. 
I glued the pictures, the title  and the metal embellishment to the LO. I added a little journaling using Stampendous Small Typewriter Alphabet  and Ranger Archival Ink pad: Jet Black.

Gio used:
Metal sheet - real copper
CI-214 - script 
Ranger Archival Ink pad: Jet Black 
Treasure Gold: Brass

See you tomorrow

Izzy


Tuesday, 22 October 2013

Autumn leaves - Neil

Hi, 
A lovely masculine project today: an autumnal card by Neil. Truly stunning colour combination on this, absolutely love this card. 
Neil used die Tim Holtz die cuts and stamps on his card.


Neil:
I began by grabbing a card blank from my pile and blended layers of Distress Ink over. Beginning with Wild Honey then adding Ripe Persimmon, Seedless Preserves and Gathered Twigs to get that lovely seasonal depth of colour. I splashed a few drops of water to leach out some colour.

My gentleman was stamped onto card and I used the same colours to colour him roughly (when I say same colours I actually mean that I used the same foam pad I'd used to do the background and just "scribbled" over him!) I used water and a brush to soften the colours and lighten areas. He was added to the card and shadowed in with charcoal. 

 I cut a selection of the Autumn Gatherings in various colour papers and blended some Distress Ink over them before sticking in place. I used a Distress Marker to add a little bit of extra detail.

I decided it was all a little too bland so I cut the card bit off and matted it onto dark card. I tore the two sides to add interest and used a dark A4 card to create an A5 card.
I haven't popped a sentiment on yet but there is plenty of room to do so so this is perfect for a masculine Birthday, Thank You or even just a Happy Autumn!

Neil used:
Distress Inks - Wild Honey, Ripe Persimmon, Seedless Preserves and Gathered Twigs
Distress marker - Peeled Paint

See you tomorrow

Izzy


Monday, 21 October 2013

Autumn leaves - Gay Peplow

Hi, 
Very seasonal theme this week: Autumn leaves which the DT interpreted in a lot of different ways as you will see throughout the week. 
Today we start with guest designer Gay Peplow who use a Dreamweaver stencil: Maple Branch
These two cards will really show you two different ways to use a stencil. Looking at those two, would you have thought at first glance that they were made with the same stencil?


This card was sponged with distress inks through a Dreamweaver metal stencil and then highlighted by pencil around the design. 
I added the veins because it needed more depth, they may not be anatomically correct, I guess I should have checked! I claim artistic license!


Gay used 
Dreamweaver Stencil Maple Branch.


-------

 I spread ink over my craft mat with the Kaleidacolor ink pad and spritzed with water. With a long piece of white card I dragged it through the ink several times building colour as I went until the card was lightly covered with the colours. I dried thoroughly with my heat gun.
This card uses the same stencil as before but I inked through it with VersaMark ink directly with the ink pad onto my strip of coloured card and embossed with gold embossing powder.  I stamped with the text stamp and added colour straight from the ink pad until I was happy with the depth and spread of colour. The corrugated cardboard was again coloured by directly using the ink pad and spritzing with water. 
To add a little bling to my dark card I die cut the motif from gold holographic card and then sanded and inked that with StaZon and Copics. My strip of painted and coloured card was placed diagonally across the card and trimmed to fit, a little like a jigsaw, it was fun trying to make it all fit. The base was kraft card which if it didn't all fit on I was happy to leave with a gap, it all toned well with the gorgeous colours of the Creole ink pad.


Gay used 
Dreamweaver Stencil Maple Branch.
Kaleidacolor Creole ink pad
Crafty Individuals Stamp CI 214
Docrafts Papermania Square Card Blanks 50 Recycled 300gsm
StaZon Timber Brown


See you tomorrow


Friday, 18 October 2013

Halloween week - Neil

Hi, 
Neil's turn today with an altered Tando Creative coffin with cobweb. 
Love all the work on here: the colours, the stamping, the layering and the crackle. It all falls into place.... 
What do you think? Let us know in a comment below... 

I started off with the Tando Creative Layered Coffin with Cobweb. I've done a couple of preparation steps for you to make it easier if you want to create your own. 
The first job is to create a hinged lid so the coffin can be closed
Take one of the solid large pieces and the frame with the cobweb and place them side by side. Join them together using Tissue tape as shown. 

I use this tape because it is thin but strong, it doesn't bulk up the side so it's easy to close.


Close it carefully and put more tissue tape on the sides wrapping it all round. This gives you a good strong hinge.


Take one of the smaller inside sections and use texture paste to cover it. (I've used a Crackle Texture) Set aside to dry.  

Lastly, use one of the frames to create a template for stamping onto out of white card. Draw inside so you can see where to position your images.
Ok. Now we are ready to put everything together! (No photos for the following steps)

Take all the outer frame pieces and the top piece that you hinged and glue everything together. Paint everything black.
Choose your images for stamping. I used The Chemist plate from Tim Holtz.
Stamp the main image onto the card using the lines you drew in as a guide for placement. Mask it off and add the bottles to the bottom areas, masking off if needed to layer up. Mask the main image and stamp the background.
Colour with with Markers and I then used glossy accents to add shine to the "glass" elements. When you are happy glue it to the base and glue that to the rest of the coffin.
Stamp and cut out the sentiment "What's your Poison Sir?" onto card and cut out.
So, the inside of your coffin ends up like this 


Now to finish the outside.......
Take the smaller spider on a thread from the Tando Creative grab bag of spiders (really creepy these!) Paint it black and cover with a single layer of UTEE. Stick a gem onto it and cover everything with another layer of clear UTEE and you end up with this 

To finish the lid, use Black Soot Distress Ink to highlight the texture piece and glue that onto the main lid. Use glossy accents or clear UTEE to add shine to the black edges of the top. (I used UTEE but it is kind of fiddly so glossy accents would be easier)
Glue the spider to the top and you end up with this deliciously creppy, gorgeously textured piece. 

Tim Holtz - The Chemist stamps
Tim Holtz - Tissue Tape
Tim Holtz - Distress Markers
Clear UTEE and Versafine embossing ink

See you soon, 

Izzy

Tuesday, 15 October 2013

Halloween week - Helen Chilton

Hi, 
We don't have just one, but two guest designers this week, how cool is that? 
The talented Helen Chilton was kind enough to share the card and step by step taught in a recent class. Lucky are those who attended the class, love this card!


1/ Stamp and cut out shape

2/ Stick pull tab strip to back. 

3/ Stick top card to bottom card.

4/ Cut slit for strip. 

5/ Feed strip through slit. 

6/ Flip over. Bend strip back on itself 

7/ Cut slit to feed back through 

8/ Flip over to right side and pull strip through 


Helen used:
PaperArtsy Hot Picks: HW01, HW02, HW03
StazOn inkpad: Jet Black
PaperArtsy Fresco paints: Elephant; London Night; Smoked Paprika; Zesty Zing
Distress Stains: Seedless Preserves; Spiced Marmalade; Pumice Stone
Tando chipboard: Pair of Skeletons - 1 set between 2
Tando mask: Cobweb 2
Carta Bella All Hallow's Eve: Spooky Damask, Skeleton/Eerie Notes 
Coloured card for making cards - 6 xA4

See you tomorrow

Izzy