Sunday, 18 October 2015

Weekly Challenge


Good morning all,


A sad day today for us.....
if you can pop down to the shop to 
see us, we would love to see you!

After today, we will still be here on the 
blog and we will have lots of projects for 
you and challenges to keep 
you busy!!

So what will it be today?
Can't do Cover a Card because
I'm pretty sure you don't all have one.

Well my brain has been ticking over and over
trying to come up with something a bit different.
How about having the theme

Good Luck 

and we can make it Good Luck to 
Sandy and Ian 
for their new online business
which is going to be bigger and better!

Already we are talking about sourcing new
products for you!

So, this will be the Challenge for next week
a Good Luck theme.

I know I don't have to tell you the rules, 
as many entries as you like, entry via 
the link where possible or send your pics to 
janecraftbarn@gmail.com

You have one week and the link will close
at midnight on Sunday 25th October.
There is a £10 gift voucher up for grabs and 
the winner will be picked by random
generator and announced on Tuesday 
27th October.

Have fun,
enjoy the rest of your weekend! 

I'm back on Tuesday!

Jane x 


Saturday, 17 October 2015

Impression Obsession - Dawn Heald


Hellooooo,

Happy Weekend everyone!
Is it me or are the weekends getting
closer together??  No it's me 
getting old haha!!

Ok, so today is Dawn's turn to
show us what she has been up to 

This is what Dawn says..... 

Hi there, for this week's topic of layered
 backgrounds I've done three different 
techniques, using the same stamp to make 
my own background for an art journal page. 
The Impression Obsession Cover all stamps are 
brilliant to use, even with their large size
 I had no problem getting a good stamped 
image every time.


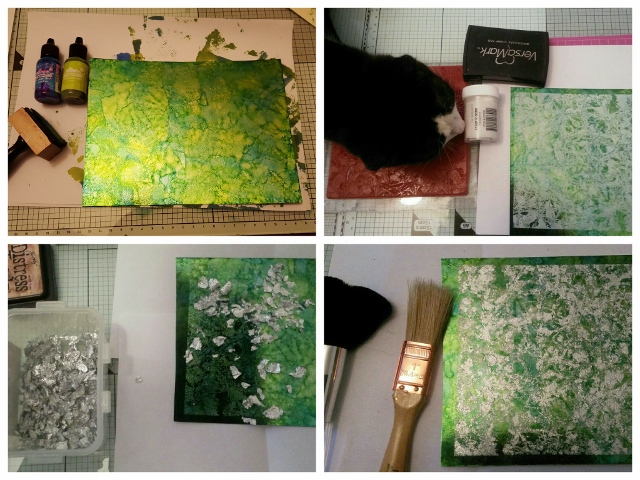
For my first background -


Using silver mirror card, I pounced over it with
 alcohol inks, let it dry. Then stamped with 
Versamark the metal background stamp
 and sprinkled over heat and bond embossing
 powder and heated. This makes it sticky. Then 
I applied gilding flakes over and brushed away
 excess. 


I'm really pleased with this as
 it was an experiment for me.


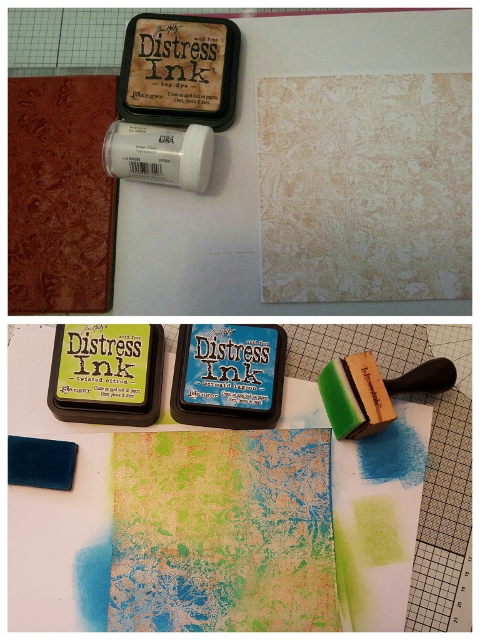
My next background was simple -


Ink up stamp with two distress inks spray
 with water lightly and stamp onto watercolour
 card. I did try with more water but as it 
blurred more this wasn't for this project.
I wanted the stamp pattern pronounced.


The last background again easy.

 A resist technique.
Stamp with tea eye distress ink, heat emboss
 with clear powder. Colour all over with 
Distress inks and rub over with kitchen roll.


All three backgrounds shown here.

Taking a journal page I covered with torn pieces
 of brown paper packaging. Stencilled Cogs 
with silver ink and randomly stamped with script stamp.


Glue stamped backgrounds to journal page. 
Stamp Balloon image and colour with 
water colour Pencils. Trim, edge with Distress ink. 

Make a panel using strips of card from trimming
 backgrounds. Glue wording to this strip. 
Wording from Kaisercraft paper pad, stamp
 and colour a couple small balloons cut 
out and glue to page to finish.


Those pages are so nice, love the 
first one with the gilding flakes!
And I love that finished album page,
wow, amazing!!


Products used -

Alcohol Ink - Citrus, Sailboat Blue
Distress Inks - Mermaid Lagoon, Twisted Citron,


From stash, Brown paper from Craft Barn parcels!

So that is another week gone,
I'll be back tomorrow with our
latest challenge!

Jane x


Friday, 16 October 2015

Impression Obsession - Neil Walker


Helloooo,


Welcome to a new week here on the blog,
the last week with our bricks and mortar 
shop!  Sad isn't it??
If you are around on Sunday, please pop 
in and see us, I think most of us will be there
for the last day.

Ok, this week we are going to focus on 
Impression Obsession - Cover a Card stamps
click here for details.

 Neil has been playing with 
some of the stamps to make some lovely
 papers for his Mini Album.

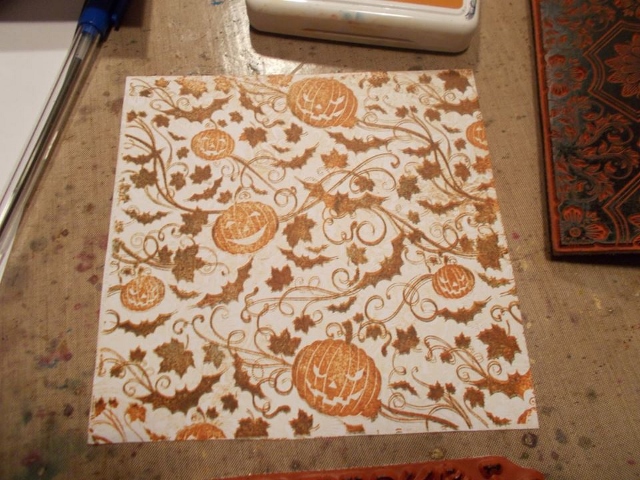
Just have a look at this ..... 


These stamps are perfect for creating layered
 background papers. 
Using your stamp almost like a printing plate.


Begin by sliding your ink pad (Orange Blossom)
 over the stamp (this gives you the look of a
 second generation stamped image on your
 first stamp) Lay your card onto the stamp
 and press down to transfer the ink. Repeat
 to get a further print which will be pretty faded.


Ink up the second stamp with the same ink
 (Orange Blossom) and pull a print over
 your second faded print from the first sheet.


Ink up the same image with Watering Can 
ink. Use a piece of paper towel to wipe 
off the ink from the pumpkins and re printer card.


You can see how the grey dulls down the
 background and allows the pumpkins
 to stand out.


Take another piece of white card and pull 
a print of your image in Dandelion. Re ink
 the stamp with Jet Black and re print, moving
 your card slightly off centre to create
 a shadow effect.


Ink up your stamp with Fern Green ink.


Wipe back some of the ink from the stamp
 with paper towel.


Taking the first card you printed, press your 
card onto the stamp as seen. Then press
 the corners of the card onto the stamp
 to fill the corners again.


The end result is a random distressed
 patterned card.


Ink up a strip of the second stamp with
 jet black. Wipe the edges of the stamp 
with paper towel and press your card to transfer.


Stamp the pumpkins in Cobalt. Stamp over 
with the second stamp in Watering Can.


Ink up the edges of the background stamp
 with Fern Green. Fade out the edges 
with paper towel and print.


By experimenting will colour combos
 and layering you will have a pile of 
gorgeous pattered card for you to use, 
you can die cut them, used them as backgrounds
 on cards too, or, like me, you could used
 them as the basis for a mini album giving
 you a co ordinated look to your project.


Lovely papers Neil and perfect for a mini album!

If you fancy having a go, this is what 
Neil used -

Impression Obsession - Cover a Card Stamp
- Ornate Floral
Impression Obsession - Cover a Card Stamp
- Halloween
A4 White Stamping Card
Archival Ink - Watering Can
Archival Ink - Dandelion
Archival Ink - Orange Blossom
Archival Ink - Jet Black
Archival Ink - Fern Green
Archival Ink - Cobalt 

So, tomorrow I'll be back
with a project from Dawn!

See you then,

Jane x