Morning all,
Welcome to day two of our paper folding
week. I do love papers and have to feel
them and sniff them!! Ha ha bet I'm not
the only one?? Come on ....you know you do too.
Today Rachel is here with us to show how she
has made two lovely tree decorations.
Christmas is only a month away now.....
note to self - Christmas Cards need making!!
Cut two 4" squares of patterned paper.
Fold into quarters. Along the fold lines,
cut in about 1" on each fold line.
Fold the corners using the cut folds to make
a cone shape and glue the edges together.
Repeat on all four corners.
Do the same with the other piece.
this forms your star shape!
Punch two circles of matching paper (I
used the blue scalloped circle Woodware punch).
Take some ribbon, folding it in half and
secure with double sided tape between the
two circles. Leave enough ribbon above the
circles so you can hang the star.
Glue the circle to the back of one of
the stars, this covers the hole!
Stick the other star to the other side of the
circle, off setting the points.
You can now leave it as it is or
decorate if required.
I added a small die cut Poinsettia
to mine using red glitter card.
Hang and enjoy!!
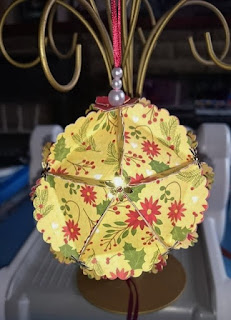
And for Rachel's second project -
Punch out twenty 2" scalloped circles.
Make a triangle template by measuring between
the scallops you will have two eight and one nine
scallops so the ninth scallop is folded an half.
As you can see this is a small template that
helps for folding and add a T at the top.
You just the need to raise the sides to form the triangle.
You need to do this for all twenty circles.
Divide the circles in two sets of five and one of ten.
This forms the bauble.
Glue together, start with the five, you need
to match the scallops up so that they align.
As you can see from the photo you do not
stack the fives to form the circle until the ribbon
is put through.
The ten are glued together into a line.
Take half a metre of matching ribbon and fold
in half. You will either use a piece of thin
wire or needle threader to thread through the
beads, you may find it easier to tread one end at a time.
Punch out a small flower or die cut if easier
one in the cardstock used and one in Mirri card.
Make a small hole in each and thread on the
ribbon below the beads a little glue may
be required to hold the flowers.
Take the ribbon and place on the first set of
five and then glue together.
This is the top of the bauble. Then take the
row of ten and as before matching the scallops
this makes the centre of the bauble. It may
help to line them up and hold with paperclips
help to line them up and hold with paperclips
until you are sure you have the correct fit.
When happy you can start to glue.
Then attach the bottom five ensuring that the
ribbon hangs through.
When you have your bauble glued, you need to
repeat with the flowers and beads to finish.
Punch out or die cut Mirri card little flowers and glue
one to each corner. Add a holographic
peel off dot or self adhesive dot to match.
What a gorgeous bauble to make for
your Christmas Tree.
Do you fancy trying these out?
Do you fancy trying these out?
This is what you will need ....
Poinsettia Die or embellishment of choice.
Woodware Blue 2"Scalloped Circle Punch
Flower Punch
I'll see you tomorrow with
another project!
Jane x
Flower Punch
I'll see you tomorrow with
another project!
Jane x


Wow what gorgeous projects! Quite fancy having a go at making some of those stars. And Jane, the smelling and stroking of paper are pretty much compulsory in my house!!!
ReplyDeleteYay I knew I wasn't the only one!!
DeleteFantastic DIY decorations! and a great way to use these papers I hoard...
ReplyDelete