Showing posts with label Air Dry Clay. Show all posts

Thursday, 17 November 2016

Snowflakes


Snowflakes

Hi there!

You need to get comfy and maybe
brew a nice cuppa too

This tutorial from Crafty Field
requires a little concentration - 
not, I hasten to add, because it is
difficult but because it is full
of brilliant ideas

Read on..


Batch making Christmas cards is a good idea 
if you want to make lots of cards in a minimum time.
 It also saves on supplies and I am a thrifty crafter, 
however, I don't like making lots and lots of similar cards, 
I get bored easily... Hence my idea... 

I bought Tando Mini Snowflakes 
thinking how I could use them in different ways. 


First I pushed each Snowflake through and obtained a stencil, 
which is actually the "waste" part. 

Using 2 shades of Color Bloom sprayed
 on a piece of watercolour paper.


 The Color Bloom sprays are very good 
to give a good definition as the spray is very fine 
and so dries quicker instead of spreading, 
especially underneath the stencil. 

However, as this makeshift stencil is a lot thicker 
than the usual plastic ones, I really needed to spray 
from above rather than from the side. 
Still I can live with blurry snowflakes...


 Secondly I did the opposite by spraying the 
Color Blooms over the Snowflake shapes themselves.


 In a twofer (2 for one) I now have a background 
and some coloured snowflakes!


 Once dried this is what they look like


 Next I thought of using my stencil as an embossing plate. 
It is important when doing this to create the appropriate sandwich, 
starting with what your machine recommends for embossing folders.
 From there add shims until you get enough pressure.


For an even more detailed embossing, I placed the Snowflakes 
on top of the holes where they used to be, but over the embossed card. 
[This mimics what an embossing folder does] 

In the photo, the Tan thing with Snowflake outlines is my embossing mat 
which has taken some of the "dust" from the laser cutting off the snowflakes.


 A bit of Treasure Gold to highlight the texture....


Finally as embellishment I tried molding additional snowflakes
 by pushing some paper clay through the stencil. 

This experiment wasn't entirely successful so 
I wouldn't recommend it unless you're as stubborn as I am! 

3 shapes made the cut (just) and I rubbed them with Treasure Gold. 


A sentiment die-cut from gold paper finishes the card.

There you have it Snowflakes 4 ways!

And now I can make a few more cards with the 
results of this experiment AND I still have all of the 
Snowflakes to play with. 

What a bargain was that!


 The finished card


Thank you Crafty Field 


I'm off to make a batch of cards.........


See you all again tomorrow

Mickie xx


Wednesday, 19 October 2016

Pumpkin Scarecrow & Halloween

Pumpkin Scarecrow & Halloween


This week we have lots to inspire you with
for your Halloween makes and we start
with a project from

Dawn Heald:


I grunged up the Tando Creative Cobweb, 
by painting on a layer each of 
Crackle Paste, 
white Snowflake paint and Starlights Pearl paint. 
Allow each layer dry before adding the next. 
Finally I dabbed on Gunmetal Stickles.


I made a background board for the Web to go on. 
I did this by cutting a square of thick cardboard recycling a delivery box. 
Next I glued on layers of torn book pages. 
When dried I sanded the edges, 
then added stencil patterns with Grunge Paste. 
I put Grunge Paste around the edges too.
When dry I painted a thin layer of 
Starlights Orange Oxidised and Antique Pink paints
all over the board, allowing the book page printing to
show through in places.
Then I rubbed Alchemy Wax Lavender over the Grunge Paste.


To go with the Web, I made a spider with hat from Air Dry Clay.    

I painted the spider with Black Gesso and his boots and hat with Liquid Pearls.  
Also dabbed some Liquid Pearls and Gunmetal Stickles to the Spider   
Embellishments.

To finish I glued the Web, Spider and Embellishments 
to the background board and added some 
Stickles Glitter Glue lines for pieces of Web 
and some black gems.


Products used 

Thank you Dawn, I love that cheeky spider.  
This would be a fun project to make with the 
children

See you all tomorrow
Mickie xx


Friday, 7 October 2016

Dimensional


Hallo everyone - me again!!  
How are you all? It really is the season of mists and mellow fruitfulness now isn't it?  Definitely need to make sure I have a jacket on when leaving the house of a morning.  


Today we welcome new DT member 

Claire Jackson 

with her delightful Birdcage project:


Here she is to tell us all about it:


1.Stamp the Hearfelt Creations bird cage four times.


2. Place the matching die over the stamped image and tape down to prevent it from    slipping. The die cuts very closely to the image for a very delicate result.


3. Colour the die cuts and don't forget to colour the back too. I used Promarkers so I picked a pale pink for the reverse so that it would not show if it seeped through to the front.


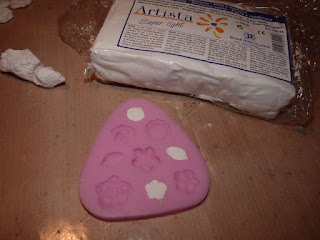
4. Using Artista super light air dry clay and silicone moulds make some flowers. You can take them out of the mould straight away and they are robust enough to handle and colour. Left for 24 hours they become papery and light.


5. I also made some other casts but in the end only used the owls.


6. Glue a selection of flowers and leaves to the top of a small round box (diameter 5.5cm). Colour with alcohol pens.


7. Fill the gaps with PVA glue and sprinkle Stampendous shabby white embossing enamel liberally over the lid. Shake off the excess and set with a heat tool.


8. Tape the bird cages to the edge of the box. Do alternate sides first. Then bend the tops to meet in the centre and secure with a glue dot. Finish by adding two owls, some flowers, glitter and a ribbon.