Showing posts with label Impression Obsession. Show all posts

Saturday, 17 March 2018

Boxing Clever


Boxing Clever


Hi There!

Are you beginning to think of
getting away for a long weekend
or maybe even holidaying in the
UK this year?  

Louise Thomson has been
thinking the same and has sent
us a project reminiscent of 
summer holidays .............

"I painted a wooden box, first with 
a couple of coats of gesso, then with
 some fresco finish paints. 


The edges are stamped with a
 Carabelle stamp. 

I painted in all the details, rather
 liking the idea that it could be 
a little Cornish fishing village with
 multi coloured cottages. 


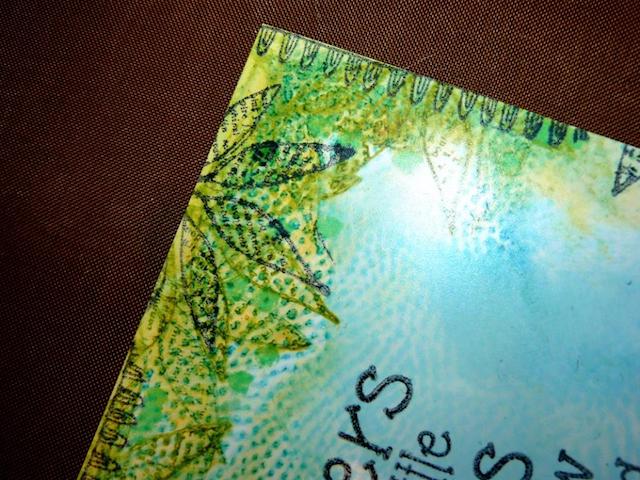
Some subtle detail was added to
 the top by sponging paint on to an 
Impression Obsession cover a card stamp
 and printing it over the lid (I'm afraid it 
doesn't show well in the photo).

 A little distress oxide ink was blended 
around the edges and I finished of
 with a couple of io die cut gulls."

Thank you Louise, a timely 
reminder of summer holidays
and trips to Cornwall.

Impression Stamps Cover-a-Card stamps
can be found here
and IO dies here
Carabelle Expressions stamps are here 

I can almost taste that Cornish clotted
cream .......... dreaming on.....

'Till tomorrow

Mickie xx


Tuesday, 19 December 2017

The Christmas Table

The Christmas Table


Hi there!

Expect you've been too busy
to notice that the final item in
The Christmas Table wasn't
there on Saturday.......mea culpa
so, here it is today and well
worth waiting for I can assure
you!

So over to Louise Thomson to
show us how to finish our table:

"It's nearly Christmas!!! 
My favourite time of crafting :)

Today I'm sharing a technique that 
you can use for a Christmas table
 centrepiece, or to make lovely gifts.


I started by cutting lots of shapes from
Bazill card using Sizzix tiny tattered 
florals and winter greens dies.


On the flowers I tapped my clear
 embossing ink pad, then
 sprinkled with gold embossing 
powder and heated to give them
 a varied texture and colour.


I fixed the flowers together in groups
 of two or three using gold brads.

Next I spritzed some of the greenery 
with colour bloom shimmer spray.


To the holly I added a good coating of
 glossy accents and left them to dry 
draped over various things on my desk
 so they would have a bit of shape.


Finally I added dots of liquid pearl
 to the branches with berries.


With all the greenery prepared and set aside,
 I cut further die cuts from a gorgeous
 Impression Obsession die. 
laid  the die cut over a large church candle 
and wrapped this in a piece of 
greaseproof paper.


I needed three hands to photograph the
 next bit, so you'll have to take my word for it! 
I used my heart gun to gently heat the surface
 of the candle (through the greaseproof) until 
I started to see the colour on the die cut 
change. It does a similar thing to embossing
 powder, you'll see a corner start to change
 and darken then it sort of spreads across
 the whole image.
 Once the whole image was a solid colour 
again it was done. 


I learnt the hard way... 
DON'T TAKE THE GREASEPROOF 
PAPER OFF YET! 
count to ten slowly giving the wax
 time to set a little, then remove it.
 You should find the die cut has
 embedded itself beautifully on to
 the candle.

I repeated this in the other side
 of the candle too.

I ran a couple of strips of double sided 
tape along the bottom of the candle 
and started to adhere the greenery.


With all the greens stuck down, 
I added the flowers back in.


Here's a close up of the
base of the candle:"


Materials:


Thank you Louise, this would
look lovely on anyone's table


Our Christmas Table is now
complete - leave you to cook
the turkey/goose/nut roast
or whatever else is the tradition
in your house - but don't
forget the sprouts!  


'Till tomorrow

Mickie xx


Friday, 13 October 2017

For the Girls

For the Girls


Hallo Everyone

Hope your week has gone well
and you are ready for the
weekend!  Hooray for Friday!

Here is the next instalment
of our current theme, which
I hope you are enjoying and
gaining inspiration from

Helen Chilton has a shrine 
for us today so sit back and
watch the magic unfold....


"I chose the Shadow Box Shrine 
for my Art-C project.

I've started by painting the pieces white 
and sprinkling with Pixie Powders.


Just rub it into the wet paint. I also used Teal Wash.


Then I scraped some Crackle Paint onto one side.


For the flowers, colour some thin card 
with Distress Oxides....


......and then cut out loads with the 
Impression Obsession dies.


Curl them up and wire them with a 
bead in the centre.


I thought the back needed a bit more oomph,
 so I stencilled it in black.


The twirly bits - all provided in the kit - 
have been painted with some of the 
Indian Pink Cosmic Shimmer Metallic Gilding Polish.


The base is painted white and coloured with
 Pixie Powder as before. I then doodled on it in 
black mainly to cover up the fact that I
 can't paint straight lines!


Add a few more loose flowers and 
stick it all together."


Products used:


That is a delightful gift Helen
thank you


You know Everyone, those
flowers are nowhere as fiddly
to make as they look - and
they are quite spectacular 
when wired into a bunch!  All
you need is the die and bits 
of paper from your stash to
get started.......

Just saying....

'Till tomorrow

Mickie xx


PS:  Helen will have us making trees 
at Inky Fingers on 18th October at the
Memorial Hall, Lingfield.  If you would 
like to come and join us please follow
this link   :

and if this is more your style:

Helen will be teaching this at Kit n Kaboodle
on 28th October.  Here's the link if you want
to be there.  Again the venue is The Memorial
Hall, Lingfield.

Mxx


Friday, 29 September 2017

Drunken Chalks

Drunken Chalks


Hi There!

Good to have you with us today
and every other day you can
make it too!  

Continuing our crafty inebriation
theme this week is Claire Jackson
and this is what she has to say on
the subject:

"As I’m always experimenting to see if
 I can get new effects using well loved products 
I was keen to find out if the Distress Oxides 
blend with alcohol...and they do on yupo at least. 

If you haven’t used yupo before it’s a non-porous 
synthetic paper.


 First stamp a background using 
broken china Distress Oxide ink onto Yupo.


Stamp leaves around the top and bottom. 
I used cracked pistachio and peeled paint.

Spray the yupo with isopropyl alcohol. 
I used an IPA aerosol spray for cleaning 
computer parts. 

Surgical spirit will work but it has some 
oil added which will leave a slightly greasy finish. 

You must follow the instructions on the spray 
and do this in a well ventilated room. 

Allow the colours to blend to create a soft image. 

Before all the alcohol evaporates use a baby 
wipe to blend the centre section.


Build up more stamping and spray again 
with the alcohol to let it blend. 

Blot it after a few seconds to give a 
slightly harder image. 

Add centres to the flowers using a 
cotton bud.


 With a cotton bud add dots of colour
 between the leaves.


Use black Memento ink to add a sentiment 
and stamping to the edges.


Add white highlights in paint pen. 

Before mounting it give it a spray 
with acrylic sealant. 

This will stop the inks continuing to migrate
 on the yupo and eventually becoming a faded blur."


Lovely card Claire, thank you.

Who would have thought that
such loveliness could come from
"drunken" chalks...........😉

'Till tomorrow

Mickie xx