Showing posts with label Dreamweaver. Show all posts

Saturday, 7 January 2017

3D Bloom and Texture

3D Bloom and Texture

Hi Everyone!

Hope you are all wrapped up
warm and cozy on this fine
chilly day!

We have Hazel Harler to talk
us through her stunning canvas
so get yourself a cheery cuppa
and prepare to be A-mazed....


"For my project I used a 6" square canvas board


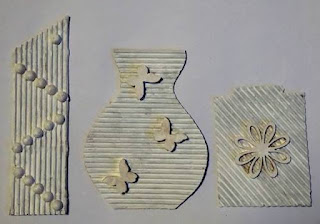
First I cut some vase shapes out of corrugated card 
having the ridges go different ways, 
then I glued some wooden shapes and pearls to them.


The vases then had a coat of gesso


I coloured the vases with acrylic paint.


 then sprayed gold foil Color Bloom on the blue vase, 
brimstone wings on the pink vase and 
dragonfly blue on the pale blue vase


 I used my finger to spread some Treasure Pewter over the vases


I stencilled some modelling paste through a Dreamweaver stencil 
and gave it a coat of gesso when the paste had dried.


 I watered down some acrylic paint , dabbed it on the canvas 
and sprayed with water letting it run down. 
I put the paint on one colour at a time drying it between colours


I thought it was a bit pale so I added some yellow 
paint and some red Gelatos I also splattered some frost Color Bloom


 I used my finger to spread Treasure Pewter 
over the modelling paste and went round the edge with black ink.


 I stamped some Paperartsy tulips.


 I coloured the flowers with pencils and cut them out
 I'd stamped extra flowers so that I could 3D the central petal. 
I glued all the pieces to the canvas."


Suplies used:

Thank you Hazel for your lovely canvas
giving us spring flowers and cheer


I'm thinking this will look lovely on my
mantel shelf and remind me that
spring really is just around the corner.......

'Till tomorrow

Mickie xx


Saturday, 26 November 2016

Wax Paper & Acetate

Wax Paper & Acetate


Hello

Today we have gorgeous project to inspire us
for those Cards we still have to make....

Here is Hazel Harler who is Caught in Crystal:


 I haven't done this technique for a few years so 
I thought it was time to have another go.


You will need a sheet of acetate, alcohol inks, glossy accents 
and crumpled tissue paper.
Other items that can be added are glitter, micro beads, 
mica powder, gilding flakes etc

I squeezed stickles and glossy accents over the acetate


Then I dripped in some alcohol ink


I covered the inked acetate with the tissue paper and pressed it down,
 if you are wearing rubber gloves you can do this with your fingers, 
I would suggest you use a ball of kitchen towel 
if you're not wearing gloves. 


Leave to dry preferably overnight.


This is a close up after it had dried


A few sheets of different colours.


 I've made a few cards with some of my acetate.


For this card I stamped the card blank with snowflakes using Fresco metalic glaze, the wooden snowmen were covered with Treasure Pewter wax


For this card I covered some black card with inca gold Alchemy wax and used a Stampendous stamp and die for the poinsettia. The acetate had some glitter added to it.


The acetate can also be die cut, I used a Sizzix die. The card was coloured with distress ink and I layered different handmade papers at the bottom. I added gilding flakes to the acetate


I covered the Tando snowmen with Frantage embossing enamel, I added mica powder to the acetate and the snowy mesh is from my stash.

For the next two cards I stencilled Imagination Crafts sparkle medium using Dreamweaver stencills. The sentiments on most of the cards are remnent rubs


I hope you can give this technique a try as you can get some beautiful results.

Items used:


Hazel this technique is awesome and the cards are beautiful.  
Thank you for sharing this with us

Mickie xx


Friday, 18 December 2015

Christmas Carol - Neil Walker


Hellooooo,

Today is our second post of the week
and we are featuring Christmas Carols.
Today, Neil is with us to show you his
beautiful card! 


Stamp out the large Peace from Woodware
 onto watercolour card using Jet Black Archival ink.


Use a selection of Distress Markers and
 water filled brushes to add colour. 
Put to one side to dry.


Take the card blank and use the Dreamweaver
 Heart Bouquet and Hickory Smoke Distress
 ink to add a design to the edges of the card.


Matt the finished Peace onto green card
 and attach to the card blank.


Use a fine pen to add the rest of the
 lyrics to the card.


A simple Christmas card complete.....


'Hark the Herald Angels Sing'

Thank you Neil,
I do like these Word Stamps and this one
has been coloured beautifully!

If you want to make one, this is what
you'll need.....

Smooth Stamping Card
300g Coloured Card - Forest
Woodware Watercolour Card
Woodware Stamp - Doodled Peace
Archival Ink - Jet Black
Distress Markers
Water Brush - Medium
Dreamweaver Stencil - Heart Bouquet
Distress Ink pad - Hickory Smoke
Doublesided Tape - 10 -15 mm

Wonder what 'Carol' Dawn is going
to do tomorrow?

Jane x