Showing posts with label Treasure Gold. Show all posts

Wednesday, 8 November 2017

Find It


Find It


Hi There!

You may wonder what you
are being asked to find.......
Worry not Find It is the name
of a die cut company, new to
us but some of you may be
familiar with them.

We thought we'd give them a
whirl this week and here is
Jane Castle to start us off:

"Well time is marching on at a pace
 and if you have not made all of your 
Christmas cards yet here's a 
fairly quick idea that can be 
changed with a different centre piece
 so as to not get boring in the making.

To begin with I did all of the die cutting
 using a fab set from Find-It Media 
called 'Christmas Card Set'.


This set is great value for money,
cuts and embosses beautifully and
 some elements can be used all year round. 

Below I've added a photo of a piece
 I cut, embossed and then stamped whilst
 the card was still in the die. 
This leaves a very fine clean edge all the way 
round rather than cutting after stamping.


Whoops, back to the job in hand!

Next I stamped the crate image from a 
Craft Emotions stamp set onto white card
 and kraft card. The kraft card was then
 cut so as to form the outside of the crate.


Both images were heat embossed with clear 
embossing powder. Colour was added using 
Distress Markers and Jelly Roll pens.

The card blank had DI in old paper added 
to the edges and then using the same ink 
stamped the zig-zag lines from Jofy 07. 
These were then brushed with Perfect Pearls.

A tag was stamped using Jofy 47 stamp set
 and this was attached to the crate with some
 ribbon before fixing to the card.


A little Treasure Gold was rubbed onto the 
die cut mounts after lightly sanding. 

The gorgeous holly die-cuts were then
 slightly shaped and curled as I prefer things 
not completely flat.


Stickles were added to the berries and 
Pewter Liquid Pearls added to the crate
 to enhance the nails.


It's a long while since I made any traditional 
red/green Christmas cards and they do have 
that magical feel to them, I wonder if it will catch on!!

Enjoy your Christmas card making X"


Items Used:


Many thanks Jane, a super
project to start us off

At the rate I'm going it doesn't
look like I shall be sending any
cards this year! Better get 
my skates on......

'Till tomorrow

Mickie xx

Thursday, 26 October 2017

Iconic

Iconic


Hallo Everyone!

Another fine day for
planning a project or
even making one.....

I came across an article
in an arty mag about
Icons and was attracted
by their strong colours
and images, which
inspired me to approach
the Design Team.........

Craftyfield was the first
to take on the challenge
and here she is:


When I think Diptychs or Triptychs I am 
reminded of Byzantine icons, painted on
 wood, with rich colours and a lot of gold...

I set out to emulate these icons, 
minus the religious connotations, in this project.


 First I prepared the wood with a light
 sanding and 2 coats of Gesso.


 I stamped an "old" image on the left
 and a contemporary image on the right, 
maybe these 2 are from the same family
 across the ages...

The right side has been sanded smoother
 for a less aged look.


 I used acrylic paints to colour the images.


I applied a coat of red acrylic paint (DecoArt)
 and some gilding wax through a stencil 
for the outside of the diptych.


 Next I applied some crackle paint on 
both front and back panels, although 
for some reason there wasn't a lot of 
crackle this side (the red side). 
Maybe I spent to long going back
 and forth with the brush?

I followed this with a raw umber glaze
 to show up the cracks, buffing with a 
dry cloth before the glaze had time 
to dry on top of the crackle layer.

This gives an aged look effortlessly.


I applied Treasure gold all around the panels,
 front and back and finished by stamping 
and embossing in gold a quote 
(also from HP1008). 

The wood wasn't smooth enough for a
 perfect stamping but since I was
 making an old icon I figured the writing
 might have rubbed off."


Thank you Craftyfield, a
great start to this week's
theme.  I love those rich,
bold colours too.....

Of course, if you felt like a
change of stamps, take a
look here or here

I think those hinged frames
would lend themselves to
this treatment too ..........

Hmmm, that's got me thinking
Haha!  Watch out world!!

'Till tomorrow

Mickie xx


Friday, 20 October 2017

For the Boys

For the Boys


Hallo Everyone!

All ready for half-term?
It does vary throughout the
country - however, in this
little corner of our green 
and pleasant land the
holiday starts after school
today - Yayyy!!!

Here's an idea from
Jane Castle to enjoy if
the weather causes everyone
to be housebound - or even
if the weather is good .......

"Hi everyone, thank you for stopping by. 
Today it's my turn to make a 'gift for the boys' 
and I began with an inexpensive 
wooden box, available from The Craft Barn,
 some paint, Seth Apter stamps
 and a few other bits.

 The finished box I'm thrilled with but 
there were times when I wasn't so sure!


I started by giving the inside a coat of 
Fresco Chalk paint in Mushroom, 
then when fully dry cut some dark red 
felt and lined the base and lid.


Then I painted the outside in Space Cadet


The 4 sides were then painted with a 
crackle medium and then once dry 
given a coat of the mushroom paint. 


The edges of the lid were lightly sanded
in places

I then applied some grunge paste through
 a stencil to the top of the lid.


When the paste was dry I made a wash
 of 1 part mushroom, 1 part space cadet 
and 1 part water to go over the top of the lid.

Whilst this was drying I stamped my image 
for the top and the opening part of the lid. 
For this I used Archival Watering Can and
 one of Seth Apter's new set of stamps ESA05
 and stamped onto a sheet of waxed
 tissue paper.


Once the ink was dry I brushed some water
 around the stamped image and tore the
 paper as this helps when appyling the tissue 
paper to the box.

I also stamped an edging to go around 
the base of the box using 2 of the stamps
 from the same set. 
(Great set of stamps--- so versatile)


These were then added to the box using
 a matt glaze but could also be attached
 with a collage medium.

I left these over night to allow them to 
fully dry before cutting through 
the tissue with a craft knife to 
allow the lid to open.


At this point I wasn't completely happy
 with the image on the top. I sat gazing at this 
for some time thinking of various options, 
one being to skim over the top with a thin layer
 of Grunge Paste and start again!

I added the border around the bottom of 
the box whilst I made my decission. 
I knew I still wanted to use the same stamp 
for the lid so I thought I'd try stamping 
another image but using Potting Soil ink
 this time.


When tearing the tissue paper this time 
I made sure it was smaller than the 
original one on the box.

I made a hole in the side of the lid to 
thread my string through and added some 
mushroom and space cadet paint to 
2 screw head brads.


Treasure Gold wax in Olive Bronze was added 
to the edges and now I not only like 
the finished pencil box -  
I don't want to part with it!


I plan to give it to a chap I work with 
who comes from an arty family, 
he makes wonderful things from metal
 and wood. 
He does some sketches of his ideas first
 but can never find his drawing pencils 
or charcoal.


So thought I would buy him some lead and charcoal 
pencils and pop them inside for his birthday.


Might have to make one for myself too!!"

Items Used

PaperArtsy Rubber Stamps
PaperArtsy Stencil

That is a super pencil box
Jane, Thank you.  Your
colleague will be a
happy chappie to receive
this - not so sure I would
put charcoal in it though
.....I know you said pencils
but I am lethal with charcoal
in any form..........!

Now a word to the wise Everyone
I know the Design Team all
chose to use this new set:


This new set is also available:


Indeed it might be worth checking
out all the Seth Apter stamp sets

"Till tomorrow

Mickie xx


Thursday, 20 April 2017

Oxidised

Oxidised


Hallo Everyone!

Hope you are having a 
good day - I'm rushing
about getting nowhere
so I feel at least one of
us should be having a
good time..............

Here is Jane Castle with
an ingenious way of
saying "thank you" ....

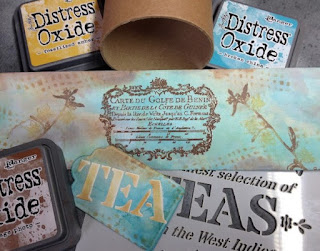
"For my project today using the new 
Distress Oxide ink pads I would like to share 
with you a present I've made for a 
very dear friend of ours.

 Every time he visits and has a cup of tea 
he makes very complimentary comments 
about our blend of tea 
( a mix of 3 different types we blend ourselves) 
so I felt it was time to give him a bag of his own 
but wanted it to be more than just a bag


As I tend not to throw anything away 
that 'might be useful' I raided my stash 
and found an empty cardboard inner 
from a ball of wool -- perfect!

I cut a piece of white card 7cm deep 
but longer than I needed to cover the tube. 
Then cut a tag from the some card using
 the middle size die from BoBunny 
nested tag dies. 

Both of these pieces of card were then coloured 
by swiping them through 2 colours 
of Distress Oxide ink that had been 
placed on the craft sheet and sprayed with water.


I continued doing this and adding more water 
to the card when needed until I achieved 
the effect I was after. 

I used my heat gun to dry between layers 
so as not to end up with a muddy colour. 
The lovely chalky effect builds up with the 
addition of spritzed water, leaving for a few seconds
 and then dabbing with some kitchen paper.

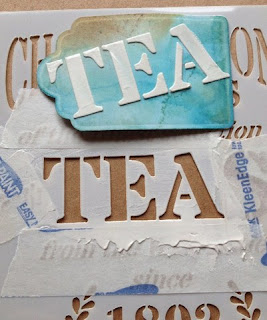
Once these were completely dry I masked 
off the stencil and added Grunge paste through 
the word tea onto the tag using the 
wonderful stencil by Scrapcosy from PaperArtsy. 


The centre of the card for covering the tube 
was stamped using the main image from 
PaperArtsy ESC03 in Vintage Photo and then 
heat embossed with clear EP.


Using the same stencil I then added some 
of the hessian effect to both pieces. 

Then using the sprig of flowers stamp from 
the same set I inked the stamp with Vintage Photo, 
wiped the flowers of ink with kitchen paper 
and then added some Fossilized Amber ink to the stamp 
using a sponge so as not to contaminate
 my new ink pad. This was then stamped onto 
the card each side of the main image.


The sprigs of flowers were spritzed with water 
and left for about 12secs before dabbing with kitchen paper.

The centre image was lightly rubbed with 
some Treasure Gold before trimming 
to the correct size. 

This was then attached to the cardboard tube 
with extra strong doublesided tape.


The Grunge Paste tea on the tag had the 
clean stencil replaced and was coloured 
using Fossilized Amber and Vintage Photo.

A cellophane bag was filled with the tea mix and tied 
at the top using the tag and some stripped down hairy string!

This was then placed inside the tube.


Well that makes a bag of tea look a little bit 
more interesting for a gift I think.
 Lets hope our friend likes it."

Items Used

(in Broken China, Vintage Photo and Fossilized Amber)
Nested Tag Dies
Treasure Gold in Renaissance
Extra Strong Double Sided Tape
Empty Shetland wool cardboard tube
Hairy String
And a Bag of Tea!


Well, that has improved my day
thank you so much Jane

That really is a lovely present
and I'm sure your friend will
be thrilled to bits with it

'Till tomorrow

Mickie xx