Showing posts with label Matt Medium. Show all posts

Saturday, 13 May 2017

Blossom Time

Blossom Time


Hi There!

Woohoo!  It's Friday
time to get ready for the weekend
Hope the weather is good for you
but if not, here's Hazel Harler
with a terrific idea to share

"Hi everybody. I make quite a lot of postcards
 and store them in a box but thought 
they would look better in an album.


 I found this photograph album in a charity shop - 
it's exactly the right size for my postcards, 
you could also cover a notebook or journal.


I started by pulling the album apart.


I cut the spine of as well


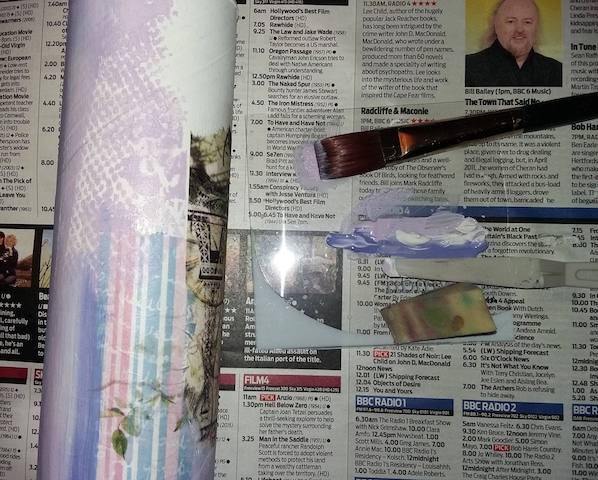
These are the paints I'm using.


I used a 12" x 12" sheet of paper as an 
A4 sheet wouldn't have been large enough 
to cover both covers. 

I used a brayer to build up layers of paint.


I stencilled some shapes and used an old 
credit card to make the lines


I used the prepared paper to cover the covers.


I stamped the Tracy Scott stamps onto 
tissue paper and book pages


I used matte medium to adhere the tissue paper images.


I fussy cut the book page flowers and adhered 
them over the tissue paper floweres


I gave the covers a coating of matte medium 
and when it had dried I coloured the images 
with some indian ink markers


I filled in some gaps with a postmark stamp, 
added some small metal paper clips, 
remnant rubs and some clippings stickers.


 A close up showing the paper clips.


 I enjoyed looking through my postcards 
and gluing them to the album pages.


 I spent ages putting the album together 
and threading the ribbon through the holes - 

I then decided that I didn't like the ribbon


I felt a lot happier after removing the ribbon
 and using bookrings with lots of different 
coloured ribbons tied to them.


Supplies:

Photograph album.
Fresco Finish paints.
Paper to cover the covers.
Brayer, stencils and and old store/credit card.
Paperartsy/Tracy Scott stamps.
Tissue paper and book pages.
Matte medium.
Indian ink markers, I used pitt pens.
Postmark stamp.
Small metal paperclips.
Tim Holtz remnent rubs and clipping stickers.
Bookrings.
Ribbon.

What a fun way to store your
postcards Hazel.  Thanks
so much for sharing

 Think it is time to scout the
Charity shops, of which this town
has very, very, many.........

'Till Tomorrow

Mickie xx


Thursday, 6 April 2017

Fanciful Plantation

Fanciful Plantation


Hi there!

Have a super quirky project
for you today - it is making
me smile all over my face......

Jane Castle is here to share
her take on this week's topic:

"Well what a wonderful title "Fanciful Plantation" 
it certainly got the creative juices flowing 
when I read it on the DT's list. 

Having made various cards of late I decided to 
go for something a little different this time!


The main part of the bag is made up from 
2 pieces of canvas measuring 20cm x 16cm each 
and then the handles and gusset are formed 
using 60% wool felt.

After cutting my canvas for the 2 sides of the bag 
I cut a piece of copier paper the same size and mapped 
out my design before spoiling any fabric 


I then proceeded to stamp the images onto the 
canvases using Archival inks.


Next came the fun part --- adding colour to the canvas. 
For this I used PaperArtsy Infusions, 
sprinkling a very small amount on at a time
 and spritzing with water. 

I gradually added very small amounts to areas 
and dabbing with kitchen paper when 
I had acheived the right colour blend. 

Once I was happy with the result I brushed the 
whole canvas with some matt medium. 

The 2 sides are slightly different 
but I think that adds to it's charm.


 I embellished the artwork with various beads 
before attaching the felt gusset. 

For this I cut a piece of felt 54cm x 6cm, 
rounded off the 2 bottom corners of the canvas 
and stitched the felt to one side


Before attaching the 2nd side I measured the
centre bottom of both the canvas and the felt 
so that everything was completely square. 

The opening around the top was lined with 
more felt and after this was machine stitched 
I added some hand embroidered blanket stitch 
using a matching embroidery thread.

The handles were made from 2 pieces of felt 
measuring 24cm x 5cm, folded in half 
lengthways and machine stitched. 

These were attached by hand as I was 
not sure whether my machine would have 
taken the 4 bulky layers.


The final touches ---- a wooden flower button 
sewn on the bag at the point where 
the handles join and a shrink plastic bird!


A hole was made in the plastic before 
it was shrunk so it could be attached with some thread.


The 2 sets of stamps used in this project are fab, 
everytime I get them out they make me smile 
and that's got to be good for you!"

 ITEMS USED:

PaperArtsy Infusions in Sage and Sunset Beach
Shrink Plastic
Archival Ink in Jet Black & Cornflower Blue
Artists Canvas
Wool Felt


Thank you Jane - love this bag


Now if you fancy a super quirky bag but
maybe don't have the needlework skills
to make this one; why not get a linen bag
from here and stamp on that?
Or, stamp the design on a piece of
canvas and attach that to a ready made
bag?  The possibilities are endless..........!

'Til tomorrow

Mickie xx


Saturday, 4 March 2017

Street Art


Street Art


Hi There!

Hope your week went well
and here is Hazel Harler to
set the tone for the weekend

Lots to take in with this canvas
to grab a cuppa, sit back and.......


" I used the lovely Paperartsy/Tracy Scott Gothic Blooms
 on my canvas


I used a brayer to lightly colour my 10" x 8" canvas board
 with Fresco Finish paints


The canvas was stencelled with modelling paste 
and Crafters Workshop stencils


 I again coloured the background with Fresco Finish paints, 
 sprayed water on and let it run down the canvas


then stamped and stencilled some acrylic paint.


The Seth Apter images were stamped onto tissue paper


 The flowers were stamped onto pink patterned paper and cut out


 I cut out the Seth Apter images and glued them to the canvas.


More colour was added with Gelatos


 I glued the flowers to the canvas with matte medium, 
I also covered the whole of the canvas with matte medium.


This is the finished canvas. 


By painting a layer of matte medium over the canvas 
I could add colour and shading with my indian ink markers. 
The matte medium allows the ink to be spread with the fingers,
 it also makes it easier to remove ink with baby wipes.

Here is a close up


 I think this technique might work with other permanent markers 

- I'll have to experiment."


Thank you Hazel - 
a really beautiful canvas


There's a lot of work here
but if taken step by step
 well worth doing
in colours to match your decor

I love a piece of artwork that
stands out in a room - it brings
a whole new ambience

Yes, I'll leave it there..........

'Til tomorrow

Mickie xx

Friday, 24 February 2017

Rice Paper


Rice Paper

Hi There!

We have Craftyfield with us 
today and she is going to talk
us through some up cycling 
to make a beautiful piece of home
decor - to be specific Bathroom
decor......................


 "I wanted to decorate this cylindrical box 
and give it a feminine feel so that 
I can display it proudly in my bathroom. 

A quick and easy way is to cover it 
with a printed Rice paper (Imagination Crafts).


 My "box" is a modest Pringles can so this 
works out as a very cheap storage option!

I first gesso'ed the can and chose 3 sheets of rice paper. 
In the end, I only used 2

 Using a wet paintbrush, draw around 
the bit of paper you want to use 
and after a few seconds tear the piece apart 
from the main sheet. 

This way the sides are feathered 
which is much more pleasing once collaged.


To glue the paper you can use any type 
of acrylic medium, matt or glossy, 
or even some of the newer Tim Holtz mediums 
such as "Crazing" or "Vintage" to add a little something...

I used a matt medium and applied it
 with the purpose built Collage brush.

Alongside the papers, I filled in with some paint and stencilling. 
I load my brush with several colours of paint at the same time 
to give a stripy look, echoing one of the Rice paper.s


I will be applying a matt varnish, 
I love using the DecoArt Soft touch for these projects, 
it has a matt aspect and, 
as the name implies, a soft feel to the touch.

This is a picture of the finished can, showing all 3 "sides" next to each other.


Had my can been a little bit smaller, I think I might have 
just used the paper as is, they are so beautiful, it doesn't 
seem right to tear them apart!"

Items used:

Collage Brush:
Fresco paints (Lavender, Dolly Mix and Cheesecake):
Stencil Carabelle Weft Fabric and Numbers:
Tim Holtz Layered Stencils (Wildflower and Flourish) :
Varnish Soft Touch:


Thank you Craftyfield a lovely way to
get affordable storage colour 
matched to your home and you could even
 use up any bits and pieces left over from
a previous project.

I love the up cycling aspect of this
project too.

'Till tomorrow

Mickie xx