Showing posts with label Cards. Show all posts

Friday, 15 November 2013

Say it big - Izzy


Hi, 
My turn (Izzy) today for the Say it Big sample. I chose the Woodware Huge NOEL stamp and tought I would use it with zentangles. I have not been zentangling for long (last time was for the challenge letter O) but I really like it and thought these stamps called to be zentangled. 


I started by stamping the Noel onto a Crafty Individuals silk card using Memento black ink and cut it out. 
I then added the zentangles doodles in black and pink inside the letters.
For the background, I used the Crafter's Workshop Tiny Circles template to apply Versamark and then embossed with Crystal embossing powder. It gives a white on white  (glittery clear actually) shiny background. 


I used one of the Tando Creative Mini reindeer in the centre. Inked it in white (Brilliance ink), embossed with the Crystal embossing powder and added a touch of black on the edges.


I adhered the Noel word to the background with 3D foam squares, added the reindeer in the centre and stamped the sentiment on the left. 
I finished with mounting the white background onto matching pink and then on a black card.


I used
Woodware stamp: Huge Noel
Tando Creative Mini reindeer
The Crafters Workshop template: Tiny Circles

See you tomorrow
Izzy


Friday, 8 November 2013

Fast and Furious/crafting with kids - Izzy

Hi, 
If you are a parent (like me), or a grand-parent (not like me!),  you probably have your kids coming to you (usually with a 2 day warning) asking for a bunch of cards to give to their friends and teachers at school for Christmas. And by "a bunch", I mean for the whole class, the teacher, teacher's assistant, the headteacher/principal, the nice ladies at the office.... 
Sounds familiar? 
And if you have an arty kid like mine, she will want to "make" cards ... bless her she's been watching me make cards for all occasions since she was born, so I can't no when she says "but I want to *make* my cards"... 
ok, don't panic... here's a quick way which all children, regardless of their age will really enjoy. 

I started with Gelli Art backgrounds. Depending on the age of the children, you can make the background for them, or you can let him/her make their own. My 10 year old DD looooves making her own background with the Gelli plate. 
Or, you might have your own personal stash of backgrounds you have made and don't know what to do with it.. well, there you go... fast and furious Christmas cards. 
Should you not have a Gelli Arts plate, then you can get some of the gorgeous xmas papers/cards, they will work just the same.


  •  Make a few backgrounds with your Gelli plate (click here to read previous posts about this)
  • Cut your cards to size. These are little 9x9 cm cards
  • Using punches or dies, cut squares in different sizes and cut those in half to obtain triangles
  • Quick and easy way to make xmas trees... your child will love the cutting, collaging, gluing


 Use different colour backgrounds for boys and girls cards

 Now, depending on the age/abilities of your child there are several options from here. 
The youngest one will like to outline with (children safe, not Copic/Promakers) markers and colour with colouring pencils. 
Good exercise for concentration and dexterity 


 With a slightly older child, you can take this opportunity to show him/her how different a tree can look based on where the outline is... 
He will have fun in experimenting a bit and there is no harm in teaching him a thing or two whilst making it fun

 Now for the older child or the budding artist, you can move on shadows and depth. 
Those will take a bit longer so it will be a "make it special for your teacher" kinda thing. 
Parents will be proud, kiddo will be proud and the teacher will definitely appreciate the time and effort

Of course, they can add glitter, gems, pearl or stickers onto their cards, but I just wanted to show you the basics.
Hope these little tips will help you spend some festive quality time crafting with your children/grandchildren
Have fun!

What I used:
Gelli Arts plate and paints (Fresco Finish)
Woodware stamp set: Noel

See you tomorrow


Izzy


Thursday, 24 October 2013

Autumn leaves - Karen

Hello,
Another card today with Karen this time who used the Tando Creative with the Pebeo Acrylic in autumn shades. She also used Sparkle Medium on her background to add a touch of shimmer.


I love Autumn and nothing is more fun to me than crunching the leaves underfoot! 
For my project I have used the tall leaves by Tando Creative. I dabbed them with a mix of Pebeo High Viscosity paints until I was happy that they looked the right colours. While they were drying I got to the background. I used a piece of coffee card, stamped the Cover-a-Card Woodgrain stamp in Brilliance Gold before adding some Sparkle Medium through two Tando Masks. When it was all dry I assembled the pieces as shown, adding a bit of matching ribbon and a copper brad from my stash. The background has been mounted onto green card as has the PC generated quote, which I love!

Here is a close up to show off the sheen this card has...

Karen used:
Tando Creative - Tall Leaves (set of 4)
Impression Obsession Cover-a-Card - Woodgrain
Pebeo Studio Acrylics - Green Yellow, Yellow Ochre, Primary Magenta and Cadmium Yellow
Imagination Craft Sparkle Medium - Bright Red
Brilliance Dewdrop Ink - Galaxy Gold
Cardstock - Coffee and Mint

See you tomorrow

Izzy

Tuesday, 22 October 2013

Autumn leaves - Neil

Hi, 
A lovely masculine project today: an autumnal card by Neil. Truly stunning colour combination on this, absolutely love this card. 
Neil used die Tim Holtz die cuts and stamps on his card.


Neil:
I began by grabbing a card blank from my pile and blended layers of Distress Ink over. Beginning with Wild Honey then adding Ripe Persimmon, Seedless Preserves and Gathered Twigs to get that lovely seasonal depth of colour. I splashed a few drops of water to leach out some colour.

My gentleman was stamped onto card and I used the same colours to colour him roughly (when I say same colours I actually mean that I used the same foam pad I'd used to do the background and just "scribbled" over him!) I used water and a brush to soften the colours and lighten areas. He was added to the card and shadowed in with charcoal. 

 I cut a selection of the Autumn Gatherings in various colour papers and blended some Distress Ink over them before sticking in place. I used a Distress Marker to add a little bit of extra detail.

I decided it was all a little too bland so I cut the card bit off and matted it onto dark card. I tore the two sides to add interest and used a dark A4 card to create an A5 card.
I haven't popped a sentiment on yet but there is plenty of room to do so so this is perfect for a masculine Birthday, Thank You or even just a Happy Autumn!

Neil used:
Distress Inks - Wild Honey, Ripe Persimmon, Seedless Preserves and Gathered Twigs
Distress marker - Peeled Paint

See you tomorrow

Izzy


Monday, 21 October 2013

Autumn leaves - Gay Peplow

Hi, 
Very seasonal theme this week: Autumn leaves which the DT interpreted in a lot of different ways as you will see throughout the week. 
Today we start with guest designer Gay Peplow who use a Dreamweaver stencil: Maple Branch
These two cards will really show you two different ways to use a stencil. Looking at those two, would you have thought at first glance that they were made with the same stencil?


This card was sponged with distress inks through a Dreamweaver metal stencil and then highlighted by pencil around the design. 
I added the veins because it needed more depth, they may not be anatomically correct, I guess I should have checked! I claim artistic license!


Gay used 
Dreamweaver Stencil Maple Branch.


-------

 I spread ink over my craft mat with the Kaleidacolor ink pad and spritzed with water. With a long piece of white card I dragged it through the ink several times building colour as I went until the card was lightly covered with the colours. I dried thoroughly with my heat gun.
This card uses the same stencil as before but I inked through it with VersaMark ink directly with the ink pad onto my strip of coloured card and embossed with gold embossing powder.  I stamped with the text stamp and added colour straight from the ink pad until I was happy with the depth and spread of colour. The corrugated cardboard was again coloured by directly using the ink pad and spritzing with water. 
To add a little bling to my dark card I die cut the motif from gold holographic card and then sanded and inked that with StaZon and Copics. My strip of painted and coloured card was placed diagonally across the card and trimmed to fit, a little like a jigsaw, it was fun trying to make it all fit. The base was kraft card which if it didn't all fit on I was happy to leave with a gap, it all toned well with the gorgeous colours of the Creole ink pad.


Gay used 
Dreamweaver Stencil Maple Branch.
Kaleidacolor Creole ink pad
Crafty Individuals Stamp CI 214
Docrafts Papermania Square Card Blanks 50 Recycled 300gsm
StaZon Timber Brown


See you tomorrow


Tuesday, 15 October 2013

Halloween week - Helen Chilton

Hi, 
We don't have just one, but two guest designers this week, how cool is that? 
The talented Helen Chilton was kind enough to share the card and step by step taught in a recent class. Lucky are those who attended the class, love this card!


1/ Stamp and cut out shape

2/ Stick pull tab strip to back. 

3/ Stick top card to bottom card.

4/ Cut slit for strip. 

5/ Feed strip through slit. 

6/ Flip over. Bend strip back on itself 

7/ Cut slit to feed back through 

8/ Flip over to right side and pull strip through 


Helen used:
PaperArtsy Hot Picks: HW01, HW02, HW03
StazOn inkpad: Jet Black
PaperArtsy Fresco paints: Elephant; London Night; Smoked Paprika; Zesty Zing
Distress Stains: Seedless Preserves; Spiced Marmalade; Pumice Stone
Tando chipboard: Pair of Skeletons - 1 set between 2
Tando mask: Cobweb 2
Carta Bella All Hallow's Eve: Spooky Damask, Skeleton/Eerie Notes 
Coloured card for making cards - 6 xA4

See you tomorrow

Izzy


Friday, 11 October 2013

Mystical week - Izzy

Hi everyone, 
Here's my take (Izzy) for this mystical week, which will be Halloweenish for me as those are the Lavinia stamps I own. Also used the Kaleidacolor inkpad with a few tips on how to use a brayer (for you newbies out there, or for those who struggle to achieve the desired gradient effect on their card). Enjoy!


Tip when using a brayer. 
1/ Roll the brayer over your stamp pad in one direction only, NOT back and forth or you will not ink all the brayer surface and will end up with a blank "line" when you apply the ink to your card. (sounds familiar?)
So you roll, lift and place it back on your starting point on the pad and roll again forward until the brayer is fully inked. 
2/ Once the brayer is well inked, roll it onto your card. ONE direction agai (roll, lift and place it back on your starting point)
Use scrap paper under your card, as you need to roll off the edges
3/ Repeat until your card is fully covered with ink with a gradient effect.
The brayer you use will make a big difference too. 
I highly recommend the Speedball Brayer, which is my top favourite.


Ink up a blank card (here I used Crafty Individual's silk card) using a brayer and the Kaleidacolor ink pad Melon Melody.

Stamp the Lavinia bats and cobwebs and stipple some black ink onto the rest of the card.
I used Memento here
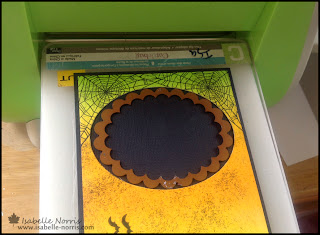
Use a die (I used Spellbinders) to cut an oval on the right side of the card.

Use the off-cut to stamp the Lavinia Willow the Witch and the stars 

Mount your card onto black cardstock, and run it through the Cuttlebug again, this time with a smaller scalloped oval die 

Stamp the Lavinia cat onto a spare white card and cut him/her out.
I like to think it's a "her" as she looks just like my cat Poppy.
Glue the cat at the front of the card
Add the Witch oval inside the card, so it shows through the window.


 Add the greeting of your choice with stamps, die-cuts or sitckers (or a Dymo machine)

et voilà 

I used:
Lavinia stamps: Willow the Witch, Bat, Cobweb, Witches cat and Star Cluster
Kaleidacolor ink pad: Melon Melody
Spellbinders Nestabilities: Classic Oval and Classic Scalloped ovals

See you tomorrow

Izzy

Friday, 27 September 2013

Ho Ho Ho - Jane

Hi, 
Clean and simple and die-cutting today for yet an impressive Christmas display on this card. 
Jane made a gorgeous wreath out of different coloured die-cuts. 
Definitely I could see myself doing, good for children too to make that special card for their teachers. 


Using two circle dies, cut out a ring as a base for your wreath.  I used one of the greens so it wouldn't show through 

Using two slightly different shades of green, diecut chosen leaves for your wreath 

Start glueing them to the ring as shown. 

When completed it should look like this 

I used a white card, a red layer cut slightly smaller and another piece of white card, again slightly smaller 

Add wreath to layered card.

To decorate I made a red bow with four loops either side and no Christmas Card is complete without a little bling, so a few gems to finish 

Jane used:
Marianne D Die - LR0126
Spellbinders - Circles
Ribbon - Red Organza
Gems - Clear coloured with Copic R29

See you tomorrow

Izzy


Wednesday, 25 September 2013

Ho Ho Ho - Sylvie

Hello, 
Two biiiiigs cards and tags today. Those are over 20 cm / 8" tall.
Love the clean lines and brights colours one those. That reindeer is so cute. 
Sylvie used the following Woodware stamps


Cut white cardstock to desired sizes. 
Cut a circle in spare card and use it as stencil
Place it at the top of the card, and add colour with a brayer
Stamp "christmas swirl" with black Archival ink. 
Stamp the reindeer and the snowman on white cardstock using black Archival ink. 
Cut them out
Stamp each image again and cut out the heart. Colour them with Gelatos and add a touch of glitter.
Colour part of each image with Distress ink and a wet brush


Glue the snowman and reindeer on the tag, overlapping the coloured circle
Add a touch of Glitter glue on the cut out and coloured hearts and glue them on with 3D squares
Stamp a few snowflakes and text on the tag


For the purple card, add a border (TH die) at the top


For the blue card, cut the top in a tag shape, and add a red ribbon
Add a glittered doily to the tag.
On both cards, apply some Glossy Accents and add some Shaved Ice glitter as shown on the pictures.

Sylvie used
Stickles Glitter Glue : Christmas red , Glam Pink.
Tim Holtz Alterations - On the Edge Die- Iron Gate
Dovecraft : white doilies
Stickles dry fine glitters : diamond
Tando creative Mini range : hearts
Distress ink pads : picked rapsberry, Spun Sugar, Shaded lilac  et Salty ocean, Tumbled Glass
Archival ink pads : jet black

See you soon, 

Izzy