Showing posts with label Blue Fern Studios. Show all posts

Tuesday, 9 January 2018

At Random


At Random


Hello Again!

Shaking things up a tad this
month - not necessarily sticking
to our usual days!  Have to keep
you on your toes..........Hehe!

Here is Claire Jackson with a
rather beautiful perfume bottle...:


"I stamped the Blue Fern Studios 
Bottled Sentiments stamp in 
Distress Oxide inks.

 I over-stamped in different colours using
 a stamping platform.
 
I then masked off the images and added 
the background, with a mixture of sponging 
and stamping, before adding the
 sentiment and layering it all up.


I made a little tag, from one of the other 
stamps in the set, using shrink plastic
 and glossy accents."

Thank you Claire - I love the
simplicity of the design and the
colours you have chosen.

That little bottle tag sets it
all off very well.  Just goes to
show you don't need mountains
of stash to start you off

Of course if a highly developed
stash mountain is your goal then
step into the SALE and see what
you can find............


'Till tomorrow

Mickie xx


Friday, 18 August 2017

On the Beach

On the Beach


Hi there!

Or perhaps I should should AHOY!?
Maybe not!  Save that for another time
haha!

Claire Jackson is here today and she
has brought a really nice card for us
using a very clever background technique


 "Man cannot discover new oceans unless 
he has the courage to lose sight of the shore ― 
André Gide

Using a stamp positioner, stamp the 
gradation stamp in faded jeans 
Distress Oxide ink on smooth stamping 
card approximately 6 1/2” square.


 Re-ink the lower part of the stamp in 
vintage photo and stamp again.


Re-ink parts of the top of the stamp in broken china...


... and stamp once more.


Use masking tape to position the seaside 
template and stencil ‘explore’ in broken china.


Next stencil the ship’s wheel in walnut stain.


Add the quotation, highlights and shading
 with a black fine line pen, a grey alcohol marker
 and a white gel pen.


Ink the seaside memories stamp in faded jeans. 
Without using a block press the stamp onto 
an 8 x 8” card blank so that the outside edges 
are covered. It doesn’t matter if the 
impressions overlap a little.


On a separate piece of card stencil the shells 
in vintage photo and broken china.


Cut out the shells and place them on a 
piece of foam.

 With an embossing tool press gently
 on the back of the card to shape them.


 Assemble all the pieces and mount them, 
adding a few sequins for a bit of sparkle."


Materials used:

Distress Oxides: broken china, faded jeans, vintage photo, walnut stain
Blue Fern Studio: seaside memories
Card blank: 8 x8” scalloped

Super card Claire.  Thank you
Love how you made the background
zing!

Have you all seen the Kaisercraft Stencils?
I think they are fabulous value for money
in one 12x12 stencil, you get four individual
6x6 stencils.  Now that can't be bad...........

'Till tomorrow

Mickie xx 

Friday, 11 August 2017

Better & Better

Better & Better


Hi there!

Are you on your holidays?
If so, you will be well chilled
if not, try this card today, it
is so relaxing to do.........

Here's Helen Chilton to show
you the way.....


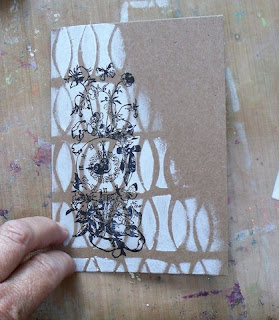
Step 1: Stencil in gesso onto part of your card.


Step 2: Then stamp the fancy clock over
 the top in black.


Step 3: Colour in with pencils - 
I used Derwent Coloursoft. 


I like the way the stencilling
 shows through.

Step 4: To make the stamped image pop,
 add highlights with a white pen.

 I tend to put the pen on the craft mat 
and then dip in a bamboo skewer/cocktail 
stick as you have more control 
over the flow of ink.


final pic"


Supplies:

Stamps used:
Pencils:
Stencil:
Gesso:

white paint pen
rub ons


A nice quick project -
thank you Helen

The white paint pen really
does make the image appear
three dimensional

'Till tomorrow

Mickie xx


Saturday, 27 May 2017

Vintage Chic

Vintage Chic


Hallo there!

D'you know John Masefield's
poem?  The one that starts
I must go down to the sea again
the lonely sea and the sky......

Feel a bit like that myself today..

Here's Louise Thomson
she has her eye on the
sea too ....

"I found a very plain piece of 12”x 12” paper 
and spread it with sand texture paste 
in a loose cross shape. 

(I later regretted not choosing paper with
 a bit more weight to it, but hey ho.) 

Down the middle I added a scrap of lace.


On to some tissue paper I stamped the 
Blue Fern seaside stamp using memento ink.

 I tore scraps of this out and added 
to my base paper.


I gave the whole thing a watered down 
coating of Fresco nougat paint. 


Starting in the centre of the texture paste 
I spritzed water on to the paper and then 
sprinkled Brushos over the top.

 In some areas I added extra water and 
then blew the paint with a straw to create
 extra runs and drips.


Once the Brushos were dry I used 
a sizzix layering stencil, 
more Nougat paint and some 
cut n dry foam to add in a lacy design.


On to a separate piece of card I stamped the

 Blue Fern seaside stamp twice. 
I lightly distressed the edges and added 
a little gold alchemy wax.

On to this I added my beachy photo, 
also with some wax and paint 
added around the edges. 


(In case anyone is interested, 
this beautiful beach is at 
Heartland Point in North Devon. 
Well worth a visit – we saw 
seals the day we went!) 

I also die cut some flowers from 
the Sizzix wildflowers die set.


I partially re inked the seaside stamp using 
Broken China Distress Oxide ink and 
then spritzed with water before stamping 
a few times around the edges of the project. 

I found you can get two or three good 
prints like this before needing to re ink.


I also added a few die cut birds 
using an Impression Obsession die. 
These were then painted over in Fresco paint 
and had a little of the Brushos blended in with them.


Finally I added a selection of bits and pieces 
from my ‘things-too-pretty-to-throw-away-and-
I’m-sure-I’ll-find-a-use-for-them-one-day’ drawer. 

This included a flower made out of more lace 
with a brad pressed through the middle, 
a ceramic button that I was kidding myself 
if I thought I would ever get around to 
stitching on to a cardy, and a little glass bottle
 that once contained tiny beads, now stuffed 
with a scrap of stamped card as a 
message in a bottle. 


With a little fine liner doodling around the edge,

 the whole page was complete"


Materials list:
12” x 12” paper (mine was too thin, I would recommend this one)
Distress oxides – Broken China
Fresco paints – Nougat


Such a lovely page
thank you Louise

I feel quite inspired now
to take a walk with my
trusty camera along the
the sea front (as we call
the prom in these parts)

I have the stamp, etc, etc.........
Just need a photo.......


'Till tomorrow

Mickie xx