Showing posts with label Saturday Savers. Show all posts

Saturday, 26 October 2013

Saturday Savers Autumn Leaves - Jane

Hi, 
A different take on the Autumn leaves with different shades that could be autumnal or be used all year around. Jane used different pieces of cardboard to create a beautiful desk tidy.
She used decomache for this project, which is a quick and easy way to cover cardboard or wood. We have a large selection of papers to choose from (click here to find them) .


 We all have cardboard tubes and boxes to hand

 Because I am covering them with a fairly thin paper, I have painted them with white acrylic paint

 I thought I would use the lovely decomache papers to cover the rolls etc., tear the papers into small pieces

Cover the tubes using decomache glue 


When dry, you could leave them now but I decided to try out the crackle coat so..... apply two coats of the base coat, making sure the coats dry before adding next one.  
Then apply top coat, quite thickly if you want lots of crackle!!!  When dry rub over acrylic paint, working into cracks and then remove excess


 To decorate I have decorated with Summer Border diecut and ribbon.  

First Edition Deco Mache papers - Leaf Repeat, Purple Stripes
Pebeo Acrylic Paint - Iridescent Violet Blue
Mirri Card -Silver
Memory Box die - Summer Border

See you tomorrow

Izzy

Sunday, 29 September 2013

Saturday Savers - Ho Ho Ho - Neil

Hi, 
A lovely upcycling project from Neil for you today. Christmas is coming up but not too close yet, 
so you still have time to make a few of those. Great fun, and if like us, you keep the bags you are given, then you have plenty to work with. 
If you'd rather make your own, you can always use one of our recycled craft carrier bag

A very quick and simple recycling from me today. 
I'm sure I'm not the only one who can't bear to throw out gift bags. 
I have them all packed away ready to re use. However, I have been known to give it back to to original giver on occasion so now I try to add a little extra to them, just in case!
I've had this beautiful white bag for a while now and thought it would be perfect to change to a Christmas bag

 I began by stamping an ATC using Tim's ATC stamp. Simply coloured with Distress Ink and matted onto card.


 I worked out where it was going and marked it before using Grunge Paste and Tando Creative's snowflake mask to add some texture.

 That was not Christmassy enough so I added some Dry Stickles

 Then, a spritz of Dylusions to add some extra colour and one lovely Christmas bag, ready for a gift.


I think that this a great and easy way of jazzing up a bag. If your bag is patterned you can still do the same kind of thing. I just often use some Gesso or paint to tone down the pattern.

Neil used:
Stamps - Tim Holtz Holiday Collections
Archival ink - Cobalt
Tando Creative - Snowflake Mask
Dylusions - London Blue

See you tomorrow

Izzy


Saturday, 14 September 2013

Saturday Savers - Vintage cute - Gio

Hi, 
A lovely little upcycling project by Gio today using an egg box and paints and turning into a lace storage box.
This is so adorable and would make a perfect gift for a crafty friend. 
Gio used Hobby Art Bird House for her cute image.


 I covered the egg-box with gesso, then I painted it using a paintbrush and a little sponge with Fresco Finish paints Sky and Nougat.
I distressed the borders using DecoArt Traditions Artist Acrylic: Quinacridone Gold taking a very little amount of paint at a time, leaving the paintbrush almost dry. I decorated the front with the Crafty Individuals mask: Beautiful border and some Dreamweaver embossing paste: Transluscent spreading it through the mask with a palette knife.When dry I distressed the raised areas with the DecoArt Traditions Artist Acrylic: Quinacridone Gold.  I stamped the egg box with a text stamp, from PaperArtsy - Lynne Perrella collection 003 plate and Archival ink Coffee.
I stamped the bird house twice  and some hearts using Hobby Art Clear Stamps: Bird house and Black jet Archival ink on a piece of Crafty Individuals White Silk Card - Regency Satin. I cut it out and coloured using several Distress inks and a Zig BrusH2O Waterbrush.

 For the inside of the lid: I tore a piece of old book page, I painted it with Fresco Finish paints Sky and Nougat. I made a border with the Crafty Individuals mask: Beautiful border and some Dreamweaver embossing paste: Transluscent spreading it through the mask with a palette knife. When dry, I highlighted the  texture with little DecoArt Traditions Artist Acrylic: Quinacridone Gold. I added it to the lid box. I added the stamped images to both sides of the egg-box lid.

Dreamweaver embossing paste: Transluscent 
Hobby Art Clear Stamps: Bird house
Crafty Individuals White Silk Card - Regency Satin 
DecoArt Traditions Artist Acrylic: Quinacridone Gold 

See you tomorrow

Saturday, 31 August 2013

Saturday Savers binding - Izzy

Hi, 
It's my turn (Izzy) for Saturday Savers and I really had to put my thinking cap on for this one.... I had to choose a binding technique that was not showcased this week AND something to upcycle that could be bound.
Then I remembered those beer mats I have had for several years now and thought that they would make the perfect mini album. Team this with yummy products and we are good to go.

The sizes I am going to give you are based on the size of my beer mats, but you will had to adapt it to any beer mat you have
1/  I used Kaisercraft papers, 5 beer mats and grunge paper
2/ I cut 4 pieces of white cardstock (I could have gone for any colour really) and I scored them
In this case, they are cut to 14 x 6.3 mm and scored to get 3/ 0.3 /3 cm
3/ I used a strong adhesive (double sided red tape) to adhere them to the beer mats as shown
4/ This is what you will get once it's glued. 
5/ I cut my papers to size (scored them in the middle too) and adhered them to your beer mat album
6/ Close up of the bound album
The front and back cover are left uncovered as they will be glued to the cover

TIP
If you want to make sure your album with hold, add some washi tape before gluing the papers
Peace of mind, better be safe than sorry


I then made the cover using Grunge Paper which has the advantage to be strong and easily altered (painted, stamps, punched etc). Probably my favourite for a mini album cover (or to make a passport cover as I had done here)
7/ Paint both sides of the cover with a layer of Gesso first and dry.  
8/ Use your Gelli Arts plate and a few masks/stencils along with PaperArtsy (or Americana) paints to make the cover. 
9/ Stamp using StazOn ink
10/ Punch two holes top and bottom and add eyelets for your ribbon 

This is what the inside cover looks like


Stamp the cover using StazOn ink (I went over the dress form with a permanent black pen to make it stand out) and add a layer of your favourite varnish/sealer.
Glue the cover on the beer mat album
Make sure you add the ribbon BEFORE you glue the cover to the beer mats
much easier :)

Front

back

inside

Embellish the spine with a few buttons and a metal charm


I used
Beer mats
Stamps - Tim Holtz: Stuff to Say and Attic Treasures
PaperArtsy Fresco Finish paints: Snowflake, Chocolate, Guacamole, Honey Dew
Gelli Art plate: 8 x 10"
Tando Creative mask: Harlequin
Imagination Crafts stencil: Bay Leaf
StazOn midi: Cloudy Sky


See you tomorrow

Saturday, 24 August 2013

Saturday Savers and lettering - Neil


I've used a chocolate box for my upcycle project.


  I began by covering the box with a layer of gesso and then with a layer of dark blue paint.
To add interest to the outside I coloured some Dreamweaver Pearlescent paste with the same paint and used a mask to add the texture. I love the way this gives a lovely shimmer while keeping a very similar colour.

 For the lettering I used Tim's Inside Out die and cut it out of both black and white card.
I coloured the white card with Distress Inks.

 I really like this alphabet, it seems fiddly to use but it isn't really! I've found the best way to use it is to spread a layer of Studio Matte Multi Medium onto the surface

 Add the whole black letters to this

 Then, separate the inner letter from the white card and adhere to the top of the black lettering and when everything is dry you won't see any of the excess medium.

 Inside the box has been decorated on the left by cutting a piece of black card (That I had used to clean off the excess paste from the previous masking) to size and gluing down and then adding the lettering.

 In the box section on the right I stamped the image onto a piece of card and added the word to the base. To finish I added some mesh to create the cage.


Neil used
Chocolate Box
Neelzexpressionz/Tando Creative Winged Pattern Mask
Distress Inks - Stormy Sky, Fired Brick and Walnut Stain

See you tomorrow


Saturday, 17 August 2013

Saturday Savers - Izzy

Hi bloggers, 

It's my turn (Izzy) to make a sample for Saturday Savers this week with an upcycled box altered with the Gelli Arts plate. 
A while back my (musician) son asked me to "make a box" for his guitar picks. 
So I looked in my "blue box" (that's where I keep all the things I want to alter/upcycle) and found this little clear plastic box. Not sure where it came from... Ferrero Rocher comes to mind... but might not be. 
Anyway... perfect size... now for the upcycling. 

I could have used Alcohol inks but I wanted an opaque finish, then I thought PaperArtsy Fresco Finish.... which I knew would work well on non porous surfaces... and then.. why not the Gelli Arts plate. I have used it successfully on wood before, why not this plastic box?
Well, I can tell you that it turned out much better than I thought. 
Here's the process... 
Hope you like it :)

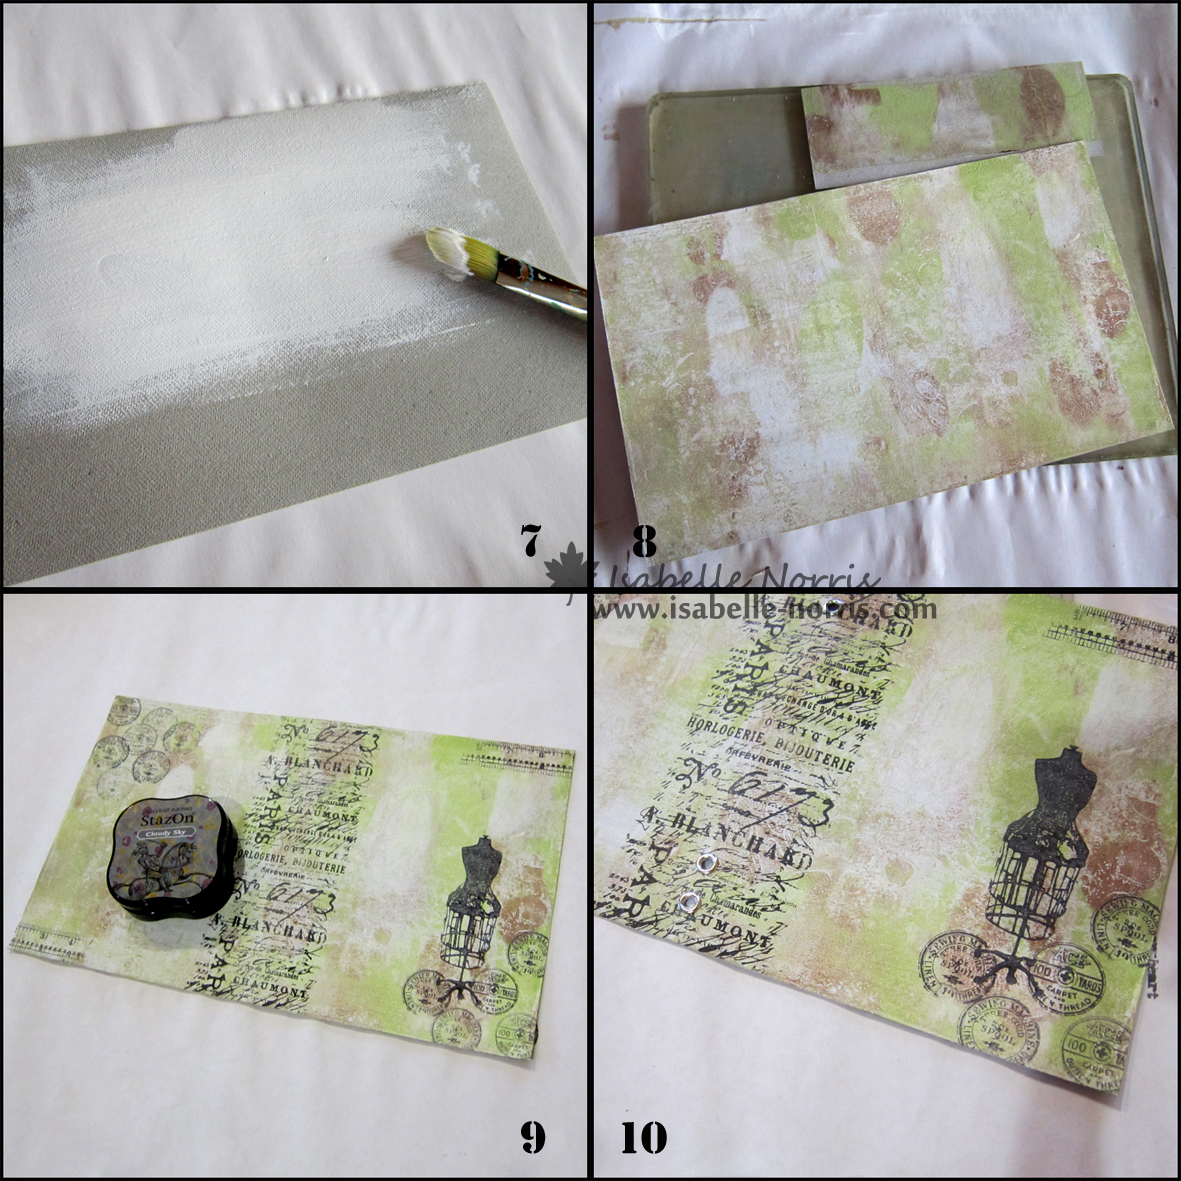
1/ The box came all clear. Yes, even the base was clear, but I had already started painting when I realised I had not taken a picture of the non-altered box. So imagine it without the white bottom. 
2/ I painted it with PaperArtsy Fresco Finish Snowflake paint. Two coats... for a real opaque coverage.
3/ Using the Sizzix die, I cut several hexagons. KEEP the off-cut, you will need it later.
I placed them on my Gelli Arts plate, and added the Fresco Finish paints in South Pacific, Beach Hut and Guacamole.
4/ Mixed the paint with a brayer and pressed the Harlequin mask on the paint.
Then I lifted the mask and the hexagons and pressed the box onto the plate. 
See that I missed a spot there in the middle? I could have hidden this, but I wanted to show it to you in case the same happens to you, and it's bound to happen. If it does, just pick up a bit of paint from your Gelli Arts plate, using a brush and "fill the gaps". If you dab with your brush, you will get an uneven / textured effect, which is what you want here. 
That was the bottom of the box. Not that it will show, but starting with the bottom of the box, if  you mess it up, it does not matter as much as the top ;) Great way to "test" and try and master the technique before you move onto the sides that will show!

1/ Here we go again... top of the box.
Hexagons on the clean plate>> brayer the paint on top>> apply the masks to add a pattern and remove them.
See how I put different masks? the Harlequin is for the top of the box and the Dots for the sides.
In one go, I then covered the whole box with same colours and pattern.
The corners on my box are round... it's ok, just "roll" the box onto the plate and it will get covered with paint very easily.
2/ Here's what the box looks like now (dried it with a heat tool. Watch out, the plastic stays warm for a bit...)
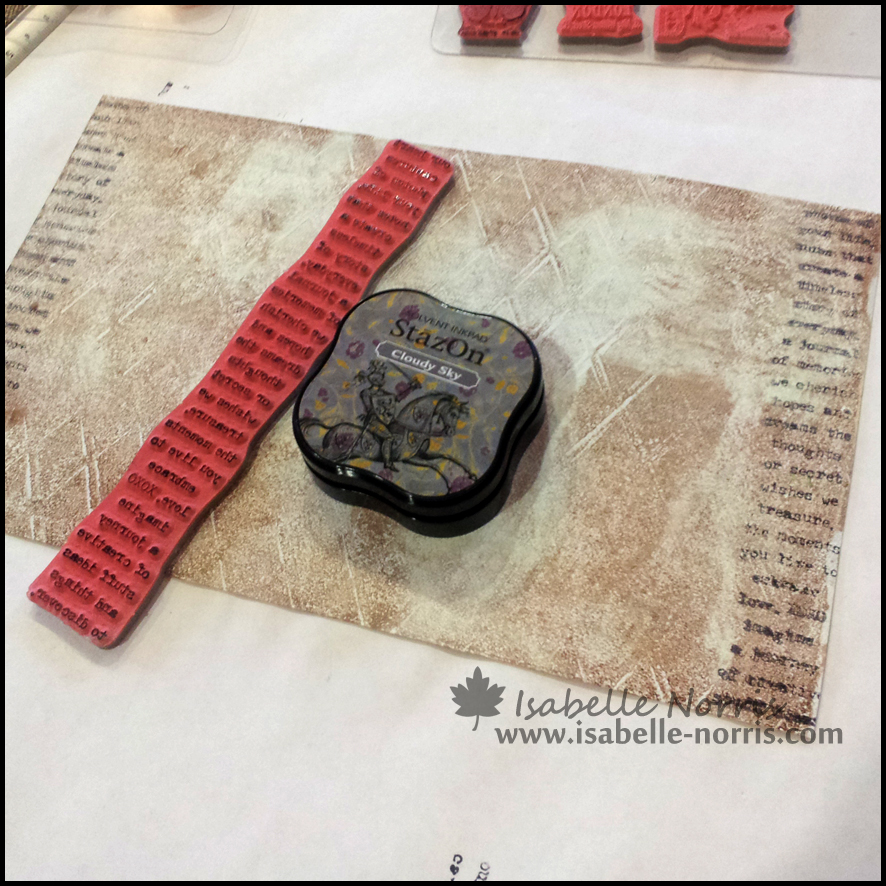
3/ Did you keep this off-cut as I suggested? Now is the time to use it. Place it on top of your white hexagons and stamp the music notes with black StazOn. Keep it in place and trace the hexagon with a black permanent pen
4/ Here's what the box now looks like

You can then stamp away... I added music words and notes using CI-366. 
First in black. Then going through my son's picks, the brown one was the only one that would not clash too much on here. So I added some brown music notes to match (Sepia Archival ink).
To finish, I glued a guitar pick on top using Glossy Accents.

Box and picks

Details of the top

and the sides


 I used:
PaperArtsy Fresco Finish paints: Beach Hut, Guacamole, South Pacific, Snowflake
Stamps: Crafty Individuals CI-366 and CI-309
StazOn ink
Archival ink: Sepia


FREE POSTAGE WEEKEND
From 6pm on Friday (16th Augustl) to 6pm on Monday (19th August) we have
free postage on all UK orders.  
For customers outside the UK shipping is free for orders over £30

See you tomorrow