Showing posts with label Martha Stewart Molds. Show all posts

Friday, 3 June 2016

Starlight Paints - Dawn Heald


Morning all,

Welcome to day 2 of 
Starlight Paints!
If you want to see all the colours'
check them out here.

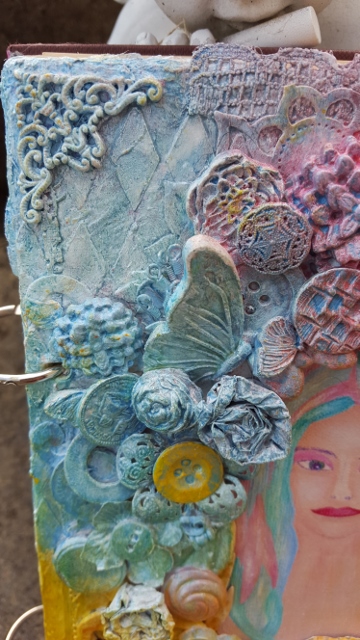
Today we have Dawn with her absolutely 
stunning journal cover..


Dawn says...
These paints are awesome they're pots
of metallic colours that can be used in
a variety of ways and blend lovely. I've
gone for straight forward painting with them
to make the front and reverse covers for my
MDF art journal. I'll certainly be getting
more colours in the future. I'd like to try
making my own mister sprays with them
and get in with a brayer too. Hope you
like this week's make from me. X Dawn


For the front cover I glued lots of different
 objects to the front. I used buttons,
 found objects, beads, paper clay moulded,
 old die cuts, tissue paper and grunge
 grunge paste through diamond stencil.
When it was all dry I Painted all over with 
a couple of coats of white gesso and let dry.


Then I went in with the luscious Starlight
 paints and painted different colours in
 patches all over the cover, blending
 the edges as I went. I let this dry then
 painted another with another layer of
 Starlight Paints. I finished it off with
 flat back pearls and gems painted with
 white Pearl Starlight paint. I did this
 so to match in the cherub made
 from clay. Painted with Starlights.


For the back cover. I glued odd pieces of 
die cuts and lace and doilies. Then used
 Decoart Media Texture Sand Paste with
 the butterfly stencil and then I used
 Decoart Media Modelling Paste with the
 Diamond stencil. I pressed some micro
 beads into the wet paste for more texture.
 When dry I simply painted two coats of
 Starlight Paints similar to the front.


There's not many steps to this it's more a
 time thing, and I enjoyed every bit.


So what do you think??
I think it is amazing!

Products used

Antique Pink, Pearl, Orange Oxidised, Bright Maroon,
 Topaz, Antique Gold
Imagination Crafts Stencils - Diamond, Butterfly


From stash - found items, odd die cuts, lace

You really must try these paints,
I've been playing with them
on an old glass decanter, I'll put some
pics on here soon....ran out of time!!

See you soon,

Jane x


Friday, 5 February 2016

Your Number is Up - Dawn Heald


Morning All,

Thank you for all your help yesterday,
I shall get back to the ladies and
see if they now know where they were 
going wrong!
You are such a clever lot!!

I'm a bit useless with computers,
I can just about muddle through on 
here but I'm very easily confused!
Ha ha, I can hear what you are saying!

So, today is National Numbers Day,
The DT were asked for something
'numerical'.  As usual they have come
up with some lovely projects.

We start with Dawn.....
this is so beautiful!


Dawn says.....
For numbers week I've used a Sculpture
 Block that I've carved into a number 6.
 I chose six as that's the number of 
our household minus the cats. 

You do need a long blade to cut right through
 the block so I used a thin kitchen knife after
 going part way through with craft knife. I can 
see lots of possibilities with these blocks
 including making stamps. Just take your time.

To make my project -
I found some tools that may be useful, as I 
couldn't find my carving kit.  Draw out your design.
 Transfer to block by either cutting out and 
drawing around it or place design on top and 
use an embossing tool to go over to leave an imprint
 of design. I did try pencil and tracing but it didn't work.


Carefully cut and carve out design. Use sand
 paper or sanding block to smooth edges
Use smaller tools to carve a design in the block.
 I used a curved tip and gouged out little
 leaf shapes, smoothed the insides with embossing
 tool. and used a quilling tool to make little dot holes. 


Coat with Decoart Media Ultra Matt Varnish
 to seal.
Using Fresco paints in light colours 
paint all over. Paint two coats. Then dry brush
 on a darker shade of paint so can see colour
 underneath in parts. 


Use silver gilding wax on edges.
Sprinkle over some White Ultra Thick 
Embossing Powder and melt.


Add some embellishments to decorate.


 I made a
 rose from paper painted with purple and
 stamped over in teal. Some leaves made
 from a Martha Stewart mold and a bead
 wire thing.


I was really pleased with the outcome.


 It withstood
 a heat tool to dry paint and powder. And a tip if
 you carve a mistake you can fill it in with grunge
 paste or Media Sand paste, dry then sand smooth.
 What do you think? What else can you think of
 with these. I'd love to hear. Thanks for checking 
in here today. X


So what do you think??
I just love it.

This is what Dawn used -

Saturday, 11 July 2015

Altered Book - Dawn Heald


Hi everyone,

This is our second day of the projects 
Altered Book

Today is Dawn's turn...

When I saw this topic I had so many ideas it was difficult to
 choose just one idea. You can make boxes, secret niches,
 shelves, open scrapbooks just to name a few. So I decided
 make an art journal and have a go at the finnabair style for
 the cover. It really is easy to make your own journal.


                  Take a hard back book and with a craft knife remove the 
                inner pages. This can normally be done with just two cuts at
                                            the front and back.


Next cut away the spine with craft knife and ruler. Keep this it
 makes a good bookmark for your journal.


Then make a template for the book binder holes. Keep this as it
 comes in handy when hole punching your journal pages. Cut a piece
 of scrap card the same length of your book, measure and mark
 where you want the holes to go and use a hole punch to make
 the holes.
Then place your template on the book cover and punch through
 the holes already made. Repeat for back cover.
You can guess and punch the holes by eye.


             To create pages for my journal I trimmed some backgrounds
                    made previously, trimmed the book's original dust cover, 
                   and trimmed and glued multiple book pages together and
                      trimmed some single pages then hole punched them. 
             I even started some pages whilst painting this and other projects.


Then it's time to decorate the front cover. Even though most
 of the stamping ended up hidden I still enjoyed the process.
Here is how I did mine.
                

I glued a few layers of torn kitchen roll, let it dry then applied
 two coats of gesso and dried.


Using some Maya Road Spring papers I cut small pieces
 and glued to three areas as shown. Great way to build
 texture in.


I hand rolled some Kaisercraft Texture Stamps and the 
small flower from the Crafty Individuals set on this with 
various Stazon inks.


Then used grunge paste through diamond stencil in a few
 areas. Let dry then glue on some odd die cuts
 here and there.


I Painted some sticky back canvas with flesh colour acrylic
 paint mixed with white. Leave to dry.
Stamp and paint the main image. I changed the hair slightly.


Trim the shape and attach to the cover. Paint it with Ultra Matt
 varnish and then use hot glue to attach a variety of 
embellishments and found objects and shapes from molds.


My metal scrunched flowers are the foil from chocolate coins
 at Xmas.
 Oh forgot I'd glued some lace on there too. Some pieces
 I had previously gesso'd.


I covered the girl image and painted the entire page
 with white gesso. 


I then painted some pieces to stand 
out more.
That was the idea anyway!


Finally I sprayed the entire cover with the Prima Flower 
Bloom sprays. 


 Dried with heat tool and sprayed another
 layer. Dried and coated with gloss varnish.

This is what Dawn used -

From stash
Odd die cuts and lace pieces
 Found objects, beads


So, what do you think, are you going to have a go?
We'd love to hear your comments!

I'll be back tomorrow with another challenge.

Jane x

Saturday, 4 July 2015

Alice in Wonderland - Dawn Heald


Happy Weekend everyone,

So, what have you got planned for this one?

Think it's going to be warm so stay safe in the heat, be 
careful in the sun!

Today is Dawn's turn to show you what
Alice in Wonderland has inspired her to make.....


Take cleaned glass bottle, paint with Matte Medium
 leave to dry.
Stamp script stamp randomly over bottle with jet black
 Stazon ink. Allow to dry.
Paint bottle all over with a thick coating of Rock Candy 
Crackle Paint. Leave to dry.
Then apply light colour alcohol inks all over bottle. 
 Be careful when using the felt applicator as if you repeatedly
 ink over an area a few times the felt will start to stick to
 the crackle paint.

Wrap some wire around the length of bottle.


Make some embellishments to decorate the bottle. 


Using a mixture of paper clay and hot glue with molds
 and handmade paper clay pieces like the toadstools,
 teacup and mad hatter hat.


 Colour with paints and gilding wax.


The clocks are made with Kaisercraft stamp, stamped into the
 clay and cut around with scissors.


When happy glue them to your bottle arranged as you like.

 Job done x

And what a fabulous job it is too!!!!
An amazing project, I'd love to know what
you think.

This is what Dawn used - 

Alcohol Inks - Cloudy Blue, Juniper

There is a lot you can do with clay, hot glue and molds,
do have a go!

Ok, well I guess I shall be back tomorrow with a 
new Weekly Challenge.
Haven't got a clue what I'm going to say this time....
.....any ideas??

Oh and don't forget I am in the shop with Mrs Tando
herself, Di and Helen Chilton, today,
please come and see us....oh and the shop is
air conditioned so luverly and cool....yay!!

Jane x