Showing posts with label Imagination Crafts. Show all posts

Thursday, 7 December 2017

Christmas Animals


Christmas Animals


Hi Everyone!

In the UK the Robin is a
much used Christmas icon
but if you're in the US you'll
probably substitute it with
a Cardinal Bird.................
or so I'm told

I wonder what birds are
Christmas icons in other
countries?...................
...............anyone?

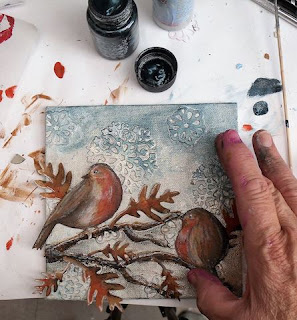
Bit of a treat for you today - 
a small canvas by
Helen Chilton and it
features Robins............


Die cut the snowflakes out of card and arrange
 on a 6" x 6" canvas board.


Glue on with a wet glue and then seal. 
Trim off the edges.


When it's dry paint over with a good layer
of gesso


Let it dry again and then spritz with some 
Imagination Crafts Silver spray.


Blot back and then add some Starlights -
 I dabbed it on with my fingers.


Get out some Grunge Paste, add a blob of
 Toffee Fresco paint to colour it and
 mix together.


Scrape through the branch stencil directly 
onto your canvas.

 Don't worry if it looks a bit messy.


Use up the rest by scraping through the
 leaf stencils onto card. 

When dry, cut them out.


Using the same DecoArt stencil, 
trace some birds onto grey board.


Cut them out and gesso.


I've then added basic robin colours with 
Fresco paints.


To make them come to life, add details 
with coloured pencils.
 
Do the same to the leaves. 

Add a white dot to the eye.


Stick it all down onto the canvas.

 I then decided to add darker tones to 
the top right of the canvas.


Note the shading and highlighting on the 
branches and birds"


This is fun Helen
thank you very much

I am going to have to find time to
make this canvas so I'm off to
see what I have to buy.........

'Till tomorrow

Mickie xx


Saturday, 4 November 2017

Jingle Bells


Jingle Bells


Hallo Everyone!

Whoop! Whoop! It is Saturday 
and here is the last jingly project.
Feel almost sad - it has been such 
fun to see the different 
interpretations applied to the theme

Helen Chilton is going to
see us out with some
winter snowflakes......
jingling all the way of course!


"I used standard sized cards that'll fit
 a standard sized envelope (usually my
 cards never fit anything!) and the 
Precios Marieke Snowflake dies.

This was my first one, very quick and simple, 
in fact too simple for me - I don't like it much!
The greetings are from a
 JOFY and Kay Carley set.


I thought things got a lot better when 
I added some colour in the form of Brushos - 
Pixie Powders would be good too as they've 
got a bit of a shimmer (didn't think of them
 'til afterwards!). You only really need a tiny
 sprinkling of powder here:.


Stamp a greeting and glitter the snowflake...


...and add an embellishment.


Then I thought I'd add a bit more texture with
 some embossing. I've used a Tim Holtz embossing
 folder that looks vaguely like snow, but any 
would do - swirls, patterns etc. 


When embossing directly onto the card like this, 
emboss with the card open so that you can
 get the pattern right up to the middle fold.


Sprinkle the Brushos again - I liked them
 over the textured background....


...and then add the glittered snowflakes 
and twiddly bits.


This one's embossed again and I've 
painted the snowflake with Starlights 
and then glittered it:


As I had the Starlights out, I decided to back
 the snowflakes with a painted circle.


This one ended up like this:


The hardest thing for me with all these was 
keeping the card clean as I'm not 
by nature a clean crafter!"

Products used:

Rich Gold, Orange Oxidised, Bright Fuchsia


Nice little masterclass to send
us jingling on our way Helen.
Many thanks


Now that die looks a useful
one to have in one's stash.....

'Till tomorrow 

Mickie xx


Friday, 13 October 2017

For the Girls

For the Girls


Hallo Everyone

Hope your week has gone well
and you are ready for the
weekend!  Hooray for Friday!

Here is the next instalment
of our current theme, which
I hope you are enjoying and
gaining inspiration from

Helen Chilton has a shrine 
for us today so sit back and
watch the magic unfold....


"I chose the Shadow Box Shrine 
for my Art-C project.

I've started by painting the pieces white 
and sprinkling with Pixie Powders.


Just rub it into the wet paint. I also used Teal Wash.


Then I scraped some Crackle Paint onto one side.


For the flowers, colour some thin card 
with Distress Oxides....


......and then cut out loads with the 
Impression Obsession dies.


Curl them up and wire them with a 
bead in the centre.


I thought the back needed a bit more oomph,
 so I stencilled it in black.


The twirly bits - all provided in the kit - 
have been painted with some of the 
Indian Pink Cosmic Shimmer Metallic Gilding Polish.


The base is painted white and coloured with
 Pixie Powder as before. I then doodled on it in 
black mainly to cover up the fact that I
 can't paint straight lines!


Add a few more loose flowers and 
stick it all together."


Products used:


That is a delightful gift Helen
thank you


You know Everyone, those
flowers are nowhere as fiddly
to make as they look - and
they are quite spectacular 
when wired into a bunch!  All
you need is the die and bits 
of paper from your stash to
get started.......

Just saying....

'Till tomorrow

Mickie xx


PS:  Helen will have us making trees 
at Inky Fingers on 18th October at the
Memorial Hall, Lingfield.  If you would 
like to come and join us please follow
this link   :

and if this is more your style:

Helen will be teaching this at Kit n Kaboodle
on 28th October.  Here's the link if you want
to be there.  Again the venue is The Memorial
Hall, Lingfield.

Mxx