Showing posts with label Alcohol Ink. Show all posts

Saturday, 8 July 2017

Apple for the Teacher


Apple for the Teacher


Hi there!

Oh my, just look what I've got
for you today ............. I hope you
find this as inspiring as I do,
especially as it is a new technique
(to me at least!)

Helen Chilton is painting bottles
but with a difference .......


For my 'Apple for the Teacher' post, 
I've decorated a small Kilner bottle. 


You could put what you like in there: 
vinaigrette, olive oil, flowers etc.

Clean your bottle thoroughly with 
blending solution.


Stamp the Laurel Burch leaves with VersaMark 
and sprinkle with fine detail black embossing powder.


Don't worry if it looks like this,
 just blow on it sharply and....


....hey presto! The excess powder comes off.


Make your own glass paints by dropping 
some alcohol ink into a blob of
 DecoArt Triple Thick Gloss Glaze.


You can then blob it into the design. 
It'll stay where it's put.


You can also mix the colours while still wet - 
I'm adding some Pool glaze to the leaves.


If you paint on the glaze and the colour's not 
intense/dark enough, just add some more 
neat alcohol ink directly on top.


Stamp and paint a tag in the same way.


Finish with string round the top of the bottle
and tie on the tag"


Materials used:
Small Kilner bottle

Thank you for a super project Helen
I can see these being used for all
sorts of occasions 

I do like the idea of making your own
glass paints - and you can dye the
string to match any of the colours
you use too!

'Till tomorrow

Mickie xx

Friday, 31 March 2017

Silhouettes

Silhouettes


Hallo there!

Another lovely day
and I hope, a happy one

Certainly Claire Jackson is
set to make us smile with her
beautiful project, so let's get
going........


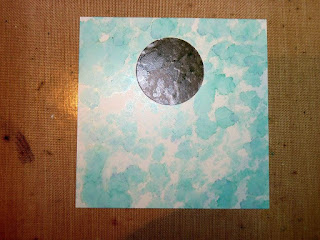
"Cut a piece of yupo 10cm x 10cm. 
Use a piece of masking paper or a post it
to create a mask for the moon. 

Using a felt applicator dab spots of aqua alcohol ink 
over the entire piece of paper. 

On a clean piece of felt pad put a few drops 
of blending solution and go over the aqua 
to create a mottled background.


Tear a piece of card to mask off the upper part 
of the square and create a hill line. 

Apply turquoise ink below the mask. 
Go over with blending solution. 

Move the mask down and add purple twilight 
around the bottom. 

Remove the moon mask and add a mixture of 
turquoise and purple alcohol ink around the 
edges of the square. 

Make sure a few dots overlap the moon
 to create the impression of depth.


 Stamp the rabbits in black Archival ink. 
(Touch up any pale bits with a black Sharpie.)

 Along the bottom, stamp the fairy buttercups
 in cobalt and deep purple. 

Stamp the mini leaves around the sides 
and top in cornflower blue and cobalt. 

Add a couple of drops of aqua ink to a baby wipe 
and gently dab onto the moon to create depth.


Add black stems with a fine permanent pen 
and white highlights with a gel pen. 

Add a very pale grey edge to the moon 
with an alcohol marker.


Stick the top layers of the printer tray together 
and paint the tray and stand in Fresco Finish eggplant. 

When dry, stamp the tray (not the stand) 
with small flowers in mermaid and sherbet. 

Wait for it to be completely dry and paint 
a thin layer of translucent blueberry over the top. 
The flowers will just show through. 
If it’s too thick just wipe it back with a baby wipe.


Rub on a thin layer of pink tulip Alchemy Wax, 
again using a baby wipe to take off any excess. 

It’s hard to see in the photos but it adds a delicate shimmer.


Run a clear embossing pad along the edges
 and emboss in silver embossing powder. 

Cut a piece of patterned paper to go on the back of the tray. 


Assemble all of the pieces together"

Materials used:


Alcohol ink: purple twilight, turquoise, aqua
Archival ink: jet black, cobalt, cornflower blue, deep purple
Alchemy wax: pink tulip


Thank you Claire for such a fun project
Another for my 'To Do' list.......


'Till tomorrow

Mickie xx

Wednesday, 14 December 2016

Collage

Collage


Hi everyone

How're things with you?  Still calm
and relaxed?! ....................... 
You've not been to the shops then?!

Am continuing the collage theme today
with a lovely card from Claire Jackson


For the theme this week I have taken a Carabelle Studio collage stamp 
which includes different elements and forms combined in the one stamp. 

This technique uses yupo synthetic paper and alcohol ink 
and is great to create an effective background quickly. 

Cut a piece of yupo 21 x 7cm. 

Use alcohol markers to roughly colour a sunset sky.


Add a couple of drops of turquoise and aqua alcohol ink to a felt applicator 
and sponge over the top of the sky


Add a drop of raspberry to a clean felt pad and build up the sun. 

Use limeade to build up bushes along the base. 

Use clear blending solution to mix the yellows and oranges together


Add a few drips of blending solution towards the top of the sky 
and let the alcohol spread to create clouds. 

You can go back in with the alcohol markers to add smaller details or define hills or bushes

The inks dry very quickly and can be stamped over in Archival ink.


Stamp the collage image in jet black Archival ink 
before trimming and mounting on a card blank. 

I added a sentiment but it would work equally well without


Supplies:


 Thank you Claire for the
background technique it
makes a beautiful card

See you all tomorrow

Mickie xx


Wednesday, 16 November 2016

Snowflakes


Snowflakes


Hi There!

The theme this week is Snowflakes
shades of things to come

Clear deep blue skies contrasting the white snow
covered landscape........

On that note I shall hand you over to 

Jane:

For my project for Snowflake week I decided to have another play
 with Yupo and Alcohol inks and was pleased 
with the light effect it gives.


I started by colouring my translucent Yupo
 with various layers of Ranger Alcohol inks, 
the very last layer was the pearl mixative.


I die cut 2 different sizes of snowflake,
this one was with Tim Holtz Movers and Shapers die 
and I also punched out some small stars for the centres


The larger snowflake was cut using a Memory box die.
I also cut a couple of snowflakes out of kraft card 
and embossed the centre star shaped cut out 
of these with white embossing powder
 with some fine silver glitter added.


My card blank was then stamped with snowflakes 
using VersaMark and clear embossing powder 
on the edges and then Tumbled Glass DI 
was added with a large brush.

I had a trial lay-out of the positioning of the snowflakes
 before stamping “Let it Snow” 3 times 
in Versa-Magic Ocean Depth ink and 
then brushed with Perfect Pearls mica powder.

After the trial positioning of the snowflakes 
I decided to layer the smaller ones with 
white glitter card underneath. 
These were stuck together using 
foam pads adding extra depth.


The kraft card snowflake was given a 
little Treasure Pewter to the edges 
for an extra sparkle. 

I hope you can see the light, sparkly effect of this 
card as it was difficult to photograph.

Products Used

Tim Holtz Alterations Movers and Shapers

I don’t know about you but I get so excited when it snows
 —— I do hope we get some this winter!


Thank you Jane for a lovely project.
It would be lovely to have a White Christmas

See you all tomorrow

Mickie xx


Saturday, 1 October 2016

Alcohol Inks and Yupo

Morning everyone!

What are you all up to?   I'm having an arty day today; 
the Art Society is having a workshop 
and I will be there! 
We've to bring either watercolour paints and paper 
or acrylics and canvas.  
I shall take the one I know can be painted over if 
and when all goes awry!!


 I'll leave you with 

Jane Castle

who will walk you through her Artful Blooms

Yupo is a new medium for me but I have to say I’m very impressed with how it works with alcohol inks compared to glossy card stock 

I began by dropping small blobs of lettuce and cool peri alcohol ink onto my piece of Yupo.
I was amazed at how much the ink moved on the Yupo and also how much the colours revealed other pigments.


Then I gradually added other colours, stream, stone washed, citrus and cranberry. Once this was dry I added tiny dots of the pearl fixative.  Wow, this really made a huge difference.


Next I tried the conventional way of applying the alcohol inks with the felt and blending tool dragging this across the Yupo in a curved movement. Here I used stone washed, lettuce and cranberry. Once dry I added a couple of drops of blending solution to the felt and lightly dabbed this all over.


Now I have 2 completely different pieces of inked Yupo, 
time to make something with them both.

For the one with the circles and the pearl mixative I felt it would lend itself to something flowery so I inked the edges of a card blank with DI in antique linen, tumbled glass and brushed corduroy.Then stamped the main Lavinia images in versa fine black onyx. Using the small stem of circular flowers from Eclectica EDY12 this was stamped in festive berries and gathered twigs. The top part was stencilled with an Imagination crafts stencil and in the top lefthand corner Artful Blooms was stamped from Eclectica ELB03.


I chose 3 different coloured circles to stamp my Lavinia flower onto using Archival Black ink as I tried a little of the versa fine in the corner of the Yupo and after 20mins it hadn’t dried!


These were then cut out and stuck onto the card with Pinflair glue. A few dots of Glossy Accents were added to a few of the small stems of flowers.


Having watched various videos on how to use Yupo several recommended it for die cutting —— so I gave it a go in the vagabond.


For the larger tag I lightly sanded the edges of the co-ordinations one stamped the image from Lynne Perrelli LPC030, then distress the edges.
Then stamped the pen from the same stamp set onto the Yupo tag and ‘Hello’ from Eclectica ECL01.


This tag set will be used on a card when I’m pushed for time.

I was so pleased I’d tried this synthetic paper as I feel it’s more versatile than the glossy card stock. I found it easier to stamp onto as there is slightly more tooth to the surface of the Yupo, whereas the glossy card sometimes can be slippery. The alcohol inks stay liquid for slightly longer and if you are not happy with what you have produced its easy to wipe it off with some kitchen roll and the blending solution, or just add some more over the top.

List of items used

Ink pads 

Thank you very much Jane for your lovely project
Now, where's my Yupo paper......................?

See you tomorrow everyone for the next Alpha/Dictionary Challenge!

Mickie xx