Showing posts with label Kaisercraft. Show all posts

Wednesday, 25 October 2017

Gifts for the Girls

Gifts for Girls


Hi There!

Hope your week is going
well.  Mine's a bit topsy
turvy.............!

"No change there then" I
hear you say...

.....I seem to have an extra
Gift for the Girls and not
enough Icons (starts tomorrow)
How did that come about?
Don't ask, just enjoy as
Louise Thomson brings you
a delightful extra "gift"

"Previously I have made little wooden 
bird houses in to Christmas tree
 decorations and I had thought I might
 do the same with these adorable 
little ArtC ones. 

At my hubby's suggestion I changed my
 mind and decided to make a baby girls
 mobile but as the project progressed 
it somehow turned in to a decorative 
wall hanging!! 

At least that means there are plenty
 more ideas for future sets!


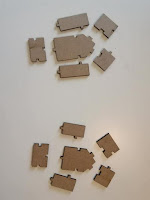
I started by laying out the bird houses 
and painting one side with fresco chalk paint.


The houses were easily assembled 
and glued using pva. 

I painted the outside in Fresco Pixie Dust paint 
and made little hooks for them by twisting
 wire around some round nosed pliers.


I found some cute scraps of paper for 
the roof and cut them to size. 

I pushed the wire loops through the
 paper strips and glued them down


I can't tell you how much I adore
 these little things!


I put scraps of paper in the back and 
stamped a carabelle stamp on to
 some painted card
 adding tiny pieces to the houses


I cut a few more paper scraps to make
 'nesting material' and bunting. 


I painted a few kaisercraft wooden flourishes
 to go with the houses and assembled
 everything with ribbons and thread, 
tied on to a twig from the garden."


Materials;

Wire


Thank you Louise, this project
is a joy and lends itself to so
many occasions 

I have to confess to having a
set of these little houses sitting on
my desk in the guise of
a "work in progress" ...............

Now I know exactly what I
shall make with them....

'Till tomorrow

Mickie xx


Saturday, 21 October 2017

Holiday Album


Holiday Album


Hallo There!

It's holiday time again and
what better time to see
Part 2 of Craftyfield's
Fauxdori Album.  

So without further ado
it is over to you Craftyfield:

"Last month I showed you a no commitment 
type of album, similar to Midoris,
 [read the post here

Rather than using blank pages or a 
standard notebook for my Fauxdori, 
I knew I wanted to use scrapbook papers
 to make mini albums for short holidays, 
weekend trips and the like.

I spotted the Kaisercraft Basecoat IV 
on the Craft Barn website and quickly 
snatched them in case they would go 
the same way as the previous Basecoat 
collections (out of stock everywhere...). 

To me they lend themselves to 
contemporary scrapbooks and particularly 
urban photos, therefore, perfect for 
the pages I had in mind. 

In this picture I show some of the
 papers and directly below, their reverse side. 
Notice how on the reverse of the label area
 (the bit you normally cut off) there are 
quotes printed.


I put together the pages (after cutting
 down to size) in the same way as for 
my Gelli prints/watercolour notebook I did 
last month.

More interesting than the 
paper album, however, are 
folders/inserts for the Fauxdori. 

A basic folder design starts by 
scoring horizontally a 12x12 paper 8" 
(or whatever your page length is),
 making a 4" flap that will hold 
memorabilia, photos etc... 

Then a vertical cut in the middle
 of the flap, or a narrow triangle
 can be cut out instead.


As you can see in this picture, 
I went further and used a die 
to give my folder an extra 
decorative detail.

I turned the paper over (it's double sided)
 and to prevent the contents from 
spilling out the sides, I make a fold 
by scoring at 0.5" left and right. 

By using the paper "sideways" and 
keeping the label I made a feature 
of the printed quote. 

On the flap I created in the previous step, 
I cut out the paper on the score line,
 as shown in the photo, bottom right. 

Do the same to the left.


You can fold the flap and glue it down, 
you now have a perfectly serviceable folder.

But... how about a second tier? 
Yes, a second paper cut down smaller 
(6" tall in my case) and die-cut in 
the same manner as the first one
 is just placed inside the folder
 and stuck in place with the side folds.


 This is how it looks all put together 
and with various item secreted in the pockets. 
Notice how I rounded the corners,
 including the "middle" (I used the 
corner rounder on the folded file folder). 

Rounding the middle, actually creates
 the perfect slot for the elastic that 
will keep the folder in place in the Midori.


There are more options and decorative 
ways of making these folders, a few of these 
are shown here. 

I have used decorative scissors 
(remember those?) to create 
the bottom flap opening.

I also jazzed up my second tier pockets 
by die-cutting the top with a skyline die 
and a Hello die.

You could also use your border and 
corner 
punches, as I said, plenty of options...
 look in your stash and go mad!


You want transparent folders to see 
what treasures you've put away? 
No problems, there are several solutions 
for that too. Use your imagination to
 turn items into folders. 

In this picture what you see is a
 plastic cover for school books 
(with a school book in it!) I picked up 
in France where they are de rigueur and
 readily available.  

I cut such an A4 cover in 2 and scored 
each half in the middle for an A5 size
 plastic folder.


Here's the pocket after scoring, 
with photos in it.

I later sealed the pockets by melting the
 plastic along the scoring line. 
You can run a stitch line instead 
with your sewing machine.

Of course you can use other plastic items 
to turn them into folders, think Zip-loc bags, 
page protectors etc...


 Here I cut flaps in an A4 page protector
 and created an horizontal seam halfway 
down the page and a vertical seam on the 
lower half creating an A5 and 2 A6 pockets. 

Excuse the rough look of this one, 
I made it from an already used and 
abused protector and will use it to
 hold some of my scraps.


 The inserts shown in the Midori, the plastic 
folder in the middle is difficult to photograph!


  From a different angle...


I hope this has inspired you to create
 your own Fauxdori, I'd love to see 
what ideas you come up with... "

Supplies:

Dies

You have certainly inspired me
Craftyfield.  What a fantastic
project Thank you for this and
for potentially saving us a small
fortune on an actual Midori

At this point I should make it clear
that Midori is a trade name and
Fauxdori is Craftyfield's clever
description of her Midori-like book

"Till tomorrow

Mickie xx


Thursday, 19 October 2017

For the Boys


For the Boys

Hi Everyone!

Wouldn't be great if
making gifts for the
boys was just a question
of changing the colour
scheme? ........... 

Actually, I think we
would miss out on a lot
of the fun if we did that
although I did read 
somewhere that the male
brain is wired differently
for colour.  Really?
I'm not sure  .........

Louise Thomson has
an interesting question  .......


"Why do women get all 
the notebooks?! Sure, I love a tiny 
notebook probably as much as most 
crafters but that's not to say that 
there can't be masculine ones too. 

My Dad always keeps a notebook
 in the car to record his petrol 
and mileage. 

My brother has one that he records
 places he's cycled, and yet
 if you look in the shops, most 
notebooks are floral and feminine, 
or at best plain. 

Time to address the situation!


I started with an alterable Kraft notebook, 
fresco paint in Antarctic and some 
Seth Apter stamps. 

I gave the notebook a couple of coats
 of paint and left it to dry.


 I stamped one of the Seth Apter ESA05 set
 in cobalt archival ink onto some tissue paper
and glued to the spine.


 I used aquamarine archival ink 
for the main image


I partially re inked the stamp and stamped 
over the top in the darker blue. 

Using a fine liner I highlighted a few 
of the details. 

I also added some inking around 
the edge of the notebook.


To finish I added metal corners 'tarnished' 
with a little permanent black ink, 
coiled wire and a wooden kaisercraft key 
gilded in silver alchemy wax and attached
 with a little piece of wire."


Thank you Louise.  I think
you have provided a good
solution to the dilemma of
why are little notebooks
often so pretty pretty


I try to keep a stock of
these little notebooks to
hand as I find they do
make nice little presents
and are quite fun to
decorate to suit the
recipient

"Till tomorrow

Mickie xx