Showing posts with label Versamagic. Show all posts

Thursday, 28 September 2017

Drunken Chalks


Drunken Chalks

Hi Everyone!

Glad you could stop by.

Today we have Hazel Harler
with us.  She is going to
demonstrate her take on
the topic, so sit back and
enjoy..........


"For my latest project I've been playing 
with the Drunken Chalk technique.

 For my first card I used Versa Magic
 chalk inks and glossy card. 


I coloured the card with the ink pads 
directly onto the card,


The card was then sprayed with surgical spirit.

When the spirit had dried I covered 
the card with Encore metallic ink.


I sprayed the card with the spirit and the 
metal in the Encore ink separated from 
the rest of the ink 


The card was stamped with Paperartsy stamps
 and Archival ink.

-oOo-

For my second card I sponged Distress Oxide 
onto the glossy card.


I used a pipette to drip the 
surgical spirit onto the card.


I cut the card in half and covered one half 
with Encore metalic ink and 
dripped the spirit with the pipette. 


I loved the effect it made.

To finish the card I used Kaisercraft papers, 
Woodware stamps, black archival and I coloured 
the image with indian ink markers:


-oOo-

I decided to make a Christmas card for my 
next sample. 


I coloured the glossy card with three 
different blue Distress Oxide inks.

 I covered the card with Encore metalic ink.


This is the result after dripping 
surgical spirit onto the card. 


It's a good idea to spray the finished 
background with an acrylic sealer as
 the metal ink will rub of on 
everything that touches it.


 I used a Woodware stamp on the card 
and heat embossed it. 

The image was matted onto red and 
blue card and I trimmed it with some ribbon.

-oOo-

 For my last sample I scribbled some
 Distress Oxide onto glossy card using 
the corner of the inkpads.


 Then sprayed it with surgical spirit.


 I covered one half of the card with the metallic ink 
and dripped some surgical spirit onto it.


I stamped the background with a Woodware stamp
 and coloured it with Indian ink markers."


Materials:


Great tutorial Hazel;
thank you very much
I am sure everyone will
have learned a lot here

I am sure you all agree that
Hazel has produced a beautiful
set of cards using this technique
Do you have a favourite?  
Currently I am favouring the
last one..........but this my
change......

Anyway, I am now off to get
some surgical spirit.......

'Till tomorrow

Mickie xx


Wednesday, 27 September 2017

Drunken Chalks

Drunken Chalks


Hi Everyone!

We've reached the end of the month
already!  To celebrate I thought a bit
of alcohol might come in handy......
......no, not that sort of alcohol.......

Jane Castle will explain.....

"Morning to you all, today I'd like to share
 my attempts/experiences at trying
 this wonderfully named procedure 
"Drunken Chalks", what a fab name! 

I had a play with various cardstock
 before making this greetinge card.


To begin with I used white glossy cardstock
 as my base and the coloured inks are all
 Versa-Magic.


The 3 chalk inks are Sea-Breeze, Pink Petunia 
and Pumpkin Spice. 

These were then sprayed with Isopropyl Alcohol,
 which I'm assured is vertually the same as 
Rubbing Alcohol. 

These began to merge into each other 
forming some lovely blends. 

Then once completely dry I stamped my
 Encore Metallic Gold ink pad over the whole
 card and sprayed on more alcohol. 

This initially looked quite dark but when it 
had dried was much lighter.


For my second piece I used Sage, Mango Madness
 and Ocean Depth with the gold ink to finish.

Feeling a bit more confident now---- 
decided to try some black glossy cardstock 
as my base!


I used the same 3 inks as the first card 
and then used silver metallic ink to finish. 

The metallic shine didn't come through
 as strongly on this ---- maybe
 the colours underneath were a bit too bold.

Now for my last experiment, I had a small 
piece of homemade fabric paper left from 
a previous project. 

( This is extremely easy to make and there 
are various videos available to watch) 

As this has a non-porous coating of 
watered down PVA glue on the surface thought
 it would be worth a try.


The colours used were Sea-Breeze, Mango Madness 
and Perfect Plumeria with silver metallic to finish. 

This dried the quickest and had the best sheen.


Now onto the greetings card,
 I decided to use the 1st, 2nd and 4th pieces 
for my flowers. The smallest flower is the fabric paper. 
I drew around the stencil on the back of my 
coloured card and then cut the flowers out. 
This hasn't got to be very precise!


Then using the smaller flower stencil
 inked the centre design in Walnut Stain DI.


These were then brushed with Cosmic Shimmers
 Red Bronze Mica Powder.

 You can see in this photo the difference 
in the shine of the glossy card and the fabric paper.

Then onto the card blank--
 the flower stems were stamped in 
Peeled Paint DI using a stamp from Jofy 38,
 the small squares stamped in the Sea-Breeze
 and Sage.

 Finally the sentiment was stamped in Perfect Plumeria.


Finally screw head brads were added to the
 flower centres before attaching with Pinflair Glue.


I hope you will give this technique a try 
as it's fascinating to see how the different 
colours react. 

Thanks for stopping by today
 and have a good crafting week."

Items Used

Isopropyl Alcohol/ Rubbing Alcohol


You really had fun with this
one Jane - Many thanks


Apropos the Isopropyl Alcohol -
this is available from the Chemist.
You could of course substitute the
Gin.................!!

'Till tomorrow

Mickie xx


Saturday, 21 January 2017

Card-I-O


Card-i-o


Hallo, nice to see you

Have a card today from
Karen Gist, who's theme
is new baby

Take a look:


I have chosen to make a new baby card as a close friend 
is having a baby boy soon!


Card-I-O stamps are lovely to use in building up a picture. 
They are small and detailed and a brilliant addition to your stamp collection. 

Versamagic inks are chalky so you can get a very delicate feel to your project, though it is harder to photograph!

Firstly I made a background on white card. 
I dabbed some ink onto my craftmat and sprtized with water, 
then swiped the paper over it. 

Because of the nature of the ink you get a lovely soft marble effect.


I cut a circular aperture out of the centre of a square white card blank.
Then I set to with the stamps using the branch from the Oriental Blossom set first stamped with Aquatic Splash and Wheat. 

Then I added a few flowers using Aegean Blue and butterflies 
and leaves using Wheat.

 From the Pitter Patter set I stamped the hearts in Perfect Plumeria


From the Pitter Patter set stamp the babygro in Wheat 

and the rabbits (how cute are they?) in Aegean Blue. 

When they are dry add the teensy clothes pegs in the blue 
and Perfect Plumeria as shown. 

I also 2nd stamped the hearts onto the babygro. 

When dry cut out and glue the pegs to a piece of cord.


Make two holes either side of the aperture and tie the cord in place
 so that it looks like a clothes line. 

Attach some of the marbled card to the inside back of the card. 

Stamp a sentiment onto it so that it shows just below the babygro. 

Add some dots of stickles to add a bit of sparkle.


Supplies:


Thank you Karen - such a cute card

Be good to have a small stock
of these in different colours


'Till tomorrow - stay warm

Mickie xx


Friday, 20 January 2017

Card-I-O


Card-I-O


Hallo everyone

More stamping fun today
from Helen Chilton:

Hi there, Helen here. 

This time I've made a fairly wintry card 
using Card-i-o stamps and VersaMagic ink pads


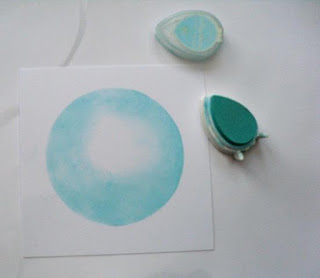
Using a circle stencil, rub Sea Breeze directly onto card, blending as you go


Leave centre white.


Stamp branches round circle in Eggplant


while still wet, sprinkle on some Shabby White embossing powder and heat.


Stamp the pine branch in Turquoise Gem.


Then add the needle sprig in Aloe Vera,


the pine cone in Hint of Pesto,


and the same colour for the robins


Finally add flowers in Perfect Plumeria and Persimmon


Finish off with a tiny word and some Stickles glitter.


The finished card


Stamps used: Card-i-o: Tall Trees, Festive Tweets, Festive Fircones

Other materials:


Beautiful card Helen, thank you.
These stamps really do bring out
the artistic designer in us all


Think I will have to keep my Versamagic 
Ink Pads on my desk - they are so easy
to use - need to use them more..........

'Till tomorrow
Mickie xx