Showing posts with label Mini Albums. Show all posts

Friday, 27 February 2015

Triangles Week - Neil Walker


Good morning everyone, 

It's triangles week here on the blog.

Neil has been very busy and has a beautiful project for
you today.....this is absolutely amazing!


Neil says "Well I was playing around with no particular plan in mind
 and ended up making this. A multiway opening triangle book.


To start, cut some 12 x 12 white card sheets in half diagonally. 
(You can use any square size though.)


Fold each piece in half.


Fold as seen.


Fold the next piece the same and slide in place onto the first. 
Glue the two pieces together.


Repeat until all pieces are used and set to one side and leave to dry 
(Preferably pressed down to keep flat.
Cut two pieces of card slightly larger than the pages for the covers 

out of thick card.


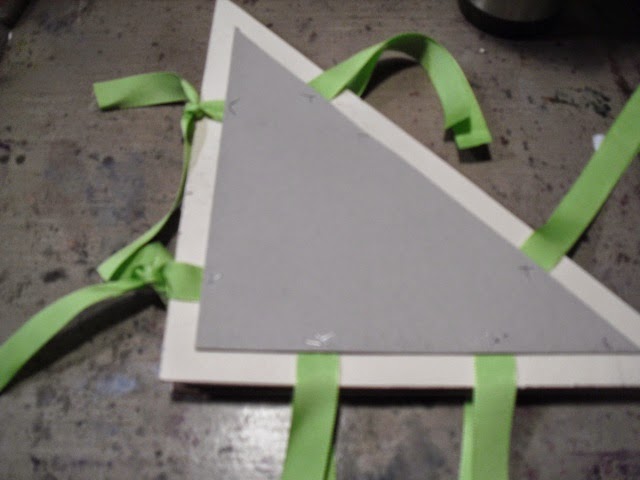
Cut two smaller pieces and other decorative elements for the covers.
Cut 12 pieces of ribbon long enough to be tied and staple them to 

the smaller triangles.
Add strips of double sided tape and glue.


Adhere to the covers.


Adhere the pages to the covers using tape and glue on the first 
and last page. Leave to dry. So, this is one way to open the book.


Or you can flip it round and open it this way.


Or this way


Or this way too.


As you can see, there are a number of different ways to open it, 
and I've not shown them all to you! It was fun to 
make though.
I've coloured the whole thing with Dylusions inks and left to dry. 


 I've then added stamped details to the covers and wrapped the 
edges with decorative tape too before edging with some 
Treasure Gold.


I have punched holes in all 3 corners with a crop o dile. How you tie
 the ribbons determines which edge of the book stays closed 
and the book rings can be used as well to hold the  covers together. 
If you do not tie any ribbons or use rings you can open the whole book
 out This one stretches to about 1,2m LOL".


Wow Wow Wow!!!!

Who is going to have a go then......


This what Neil used -


Doodlebug Textured Cardstock - Lily White
Kaisercraft Texture Clear Stamp - Script
Kaisercraft Texture Stamp - Butterfly
Ribbon
Archival Ink - Jet Black
Stix 2 Ultra Sticky Clear Tape
Dylusions Ink Spray
Book Rings - 50mm
DecoArt Faux Finishing Medium
Treasure Gold - Classic


We'd love to know what you think of Neil's Book!

Don't forget to get your entries in for February's Calendar Challenge.
(The link will put your pic on but just keeps it in the link.
Unfortunately it just didn't seem to be working properly).
March starts on Sunday, wonder what your next two words will be?
Any guesses???


See you tomorrow,


Jane x

Sunday, 8 February 2015

Weekly Challenge


Welcome everybody to our first weekly challenge of the year.

And welcome to our new members who have just joined us here,
I hope you will join in with the challenges. 

I have to apologize to you first regarding the Link for this months 
Calendar Challenge. For some reason it is not showing your pictures
 on the blog but keeping them in the link.
I'm sure it is something I have done......or not done, I'm afraid 
I am learning this job the hard way at times. Hopefully
today's will work properly!


So, our last week on the blog featured mini albums.
The challenge for this week is going to be .......


Mini Albums


We've given you some ideas, lets see what you come up with.
There are no rules other than...it has to be a mini album!!


The winner will receive a £10 voucher (random draw).

Please get your entries in by Sunday Feb 15th midnight.

The winner will be announced on Feb 17th.

As usual you need to use the link at the bottom to add
your project.  Fingers crossed it will work this time.


Just to let you know, as so many people said they couldn't 
get to the shop today to see the demos, I popped down there to see 
what they were up to.  I have some photos to put on here for you to see 
some of the wonderful samples the ladies made.  

Good luck with this weeks Challenge,

See you soon,


Jane x


Saturday, 7 February 2015

Mini Albums Week - Dawn Heald


Welcome to the weekend everyone!

What a week it has been, snowy, rainy and freezing cold!
Typical British winter weather at its best.

So this is our last Mini Albums post for the week and today we have
Dawn showing us what she has created.  
And what a beauty it is too!

Here's what she made ......


“Hello there, so many different ways to make mini albums, so I chose one I like to make.
  Often for the children to decorate as all you need is a piece of A4 Paper and 
it's an easy one to fold.  I decided to make my own pattern paper 
but you can use any paper you like.


I've put the instructions in picture format with instructions on.


To make -

Choose some patterned papers and tear into pieces.  Glue these to a piece
 of ordinary A4 copy paper.


When dry, paint over with a light wash of Nougat paint, dry, then paint a light
 wash of Cinnamon paint.  The nougat brings the papers more together and
 the brown adds some more warmth back in.  Dry.

Sponge Ganache Stazon ink through stencil randomly all over paper.

Paint on a coat of MixedMedia Satin Glaze all over.  This adds a nice sheen, stability
 and it made the paper feel more pliable.  Great for folding!


Then fold your paper as shown in photos, to create your mini album.  The basic fold is
 in landscape, fold in half then in portrait, fold into quarters.  Cut along the middle of the
 long middle line.  Crease well.  


 The basic fold is
 in landscape, fold in half then in portrait, fold into quarters.  Cut along the middle of the
 long middle line.  Crease well.  


  Cut along the middle of the long middle line.  Crease well.  


  I used tape to secure my pages together.  This is optional. Experiment!


You can have pockets by not taping all.


To finish off, line edges with tissue tape and colour with distress ink and edge all pages
 with Ganache Stazon.
To finish off, line edges with tissue tape and colour with distress ink and edge all pages
 with Ganache Stazon.


                       Make a title for front with alphabet stamps.                       
Add pictures.  Job done” 


Well how amazing is that??
Think I might have to have a go myself!


This is what Dawn used - 


From stash

Plain white A4 paper


I do hope you have been inspired this week.
We'd love to hear your comments and what you think of the blog 
now we are back here.

I shall be back tomorrow with a weekly challenge.......

Don't forget to join us!


Have a great weekend,

Jane x


Friday, 6 February 2015

Mini Albums Week - Pauline Wheeler


Morning everyone,
Hope you are all looking forward to the weekend!

This is our second post on Mini Albums this week.
Today Pauline has created a beautiful Mini Album.

Take a look at this......


Cut 10 panels of 7" x 5" thick black card stock 
6 will be for the pages and 4 for the covers.
Cut 4 panels of card 5" long and cut them at
3" - 2" - 1 3/4" - 1 1/2".
Score the 5x3 at 1" on each side with the 5" length vertical.
Score the others at 1/2" Stick the strips inside each other - except the largest 5x3.


Cut your papers to fit how you want them on your pages.


Cover two of the 5x7 panels with your chosen paper. 
Trim the other two panels. 
Stick the front and back covers to the 5x3  spine and stick the trimmed panels
 over to cover the edges.


Now stick the layered section onto the spine.


Add the pages using either red adhesive tape or a strong tacky glue.


Cover the pages with your chosen papers and embellish how you want.


Embellish the cover - I've used an envelope punch board to
 make a bow and lots of metal bits.


Isn't that beautiful?
Hope you are inspired to go and have try this out!
We'd love to hear your comments.


Pauline used - 

Kaisercraft Mister Fox Collection
Kaisercraft Wooden Bird
Black Cardstock
Red Adhesive Tape (extra sticky) or Tacky Glue
We R Memory Keepers Envelope Punch Board

Don't forget we have demos in the shop on Saturday,
pop in and see Carol Cockbain demoing 
the latest Sue Wilson dies, Helen Chilton and the new
 PaperArtsy stamps and Kay Carley showing you how to use the
 fabulous Brusho's.

See you tomorrow with another Mini Album,

Jane x


Thursday, 5 February 2015

Mini Albums Week - Neil Walker


Here we are again, gosh the week is flying by ......

Today I have a treat for you from Neil

Our theme this week is Mini Albums and as usual our
brilliant Design Team have been busy!

This is what Neil says -


"When you go away on holiday do you, like me, collect all sorts of ephemera? 

Brochures, tickets and all sorts of odds and ends that bring back memories

 of your time away. Then this is the perfect little mini album to take along
 with you as it has plenty of places to tuck all those pieces into as well
 as place to write in too.


 I started out by making a bunch of 6 x 6 envelopes out of neutral cardstock using
 the We Are Memory Keepers Envelope Punch Board.
(If you are interested; I have a "how to" post here....


I then started to bind the envelopes using decorative tape to create the pages. 
Lay two envelopes together and join with tape.


Fold the right side envelope over to the left and add more tape to secure. 
Repeat to build up your pages. 
For my album I have a set of 3 pages and a set of 7.


Put together the outer covers from the Shoal Cover Kit; cover one side of and 
envelope with glue and glue in place.


Fold the "flap" of the envelope over to the front of the cover.


Paint the covers with fluid acrylics and stamp the Oriental image with archival ink.


Paint the fish front piece white. Then add a layer of crackle glaze.
 Use Antiquing Cream to add colour and seal with Matte Finish Acrylic Sealer.
 Glue to the book.


 Cut and create a signature and sew it onto the spine of the book in the gap
 between the two envelope sections. Glue the pages to the envelopes.


To finish, sew some molded sea shells onto the loose threads".

Wow!! How amazing is that, thank you Neil.

This is what Neil used -

Neutral card stock
Air Dry Clay

So that's our post for today.

If you fancy visiting the shop on Saturday, three demonstrators
Carol Cockbain, Helen Chilton and Kay Carley 
will be there to inspire you!
Pop in and see what they are up to.

See you tomorrow,


Jane x