Showing posts with label Mixed Media. Show all posts

Thursday, 27 October 2016

Mixed Media


Mixed Media

Hallo everyone! 
We're almost through the month already
Can you believe it?
Me neither, although I seem to be wearing a
jacket more often now when I leave the house!

Here is   Angela Radford

who has given us this beautiful project


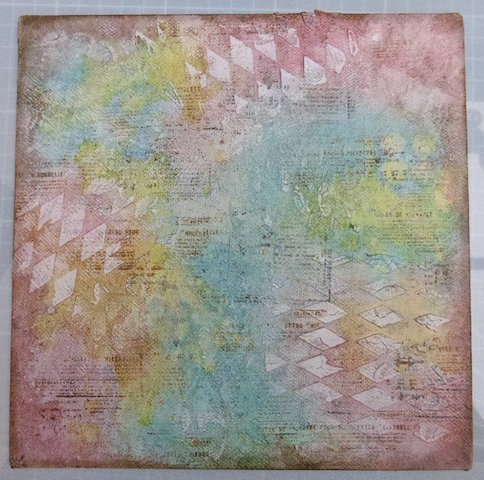
The plan for this project was to create a canvas with lots of dimension.

 I started by tearing two pages from an old book then coloured these with sprays. 

While these were drying I started on the canvas by adding Gesso and Crackle Paste through stencils. Once this was fully dry I coloured it using sprays, drying between each colour.


Tear down the centre of one of the book pages and remove a third from each. Edge the sheets with distress ink. Roll these around a thin paint brush and glue.


Continue to add colour to the canvas using sprays and distress inks and 
then when dry use a text stamp randomly over the canvas.


4. Use a brayer with white Gesso to highlight the raised areas and edge it with distress ink.


Die cut a range of cogs and colour these with sprays and distress inks then stamp over them randomly. I used a Tim Holtz stamp but any text stamp would be good.


Next I made a Masterboard using the same stencils, medium, sprays and inks.


Using the Masterboard, die cut three tags, distress, stamp and colour the edges. I screwed these up a little as this gives more interest and dimension when mounted.


I used an MDF frame and lightbulb from my stash to create the focal image and decorated these with Stampendous Frantage in a variety of colours. You can see here that I splattered the canvas with white paint too.


And here is the finished canvas. Hope you like it.


Happy crafting, Angela x

Materials:
Thank you for a lovely project Angela

The Color Bloom Sprays are, in my opinion, such good value 
when the bottle is empty just fill it up again with water and
you are ready to go again with that luscious colour!
You can do this twice - see the table for instructions
and the colour range is..............awesome!

See you all again tomorrow

Mickie xx


Saturday, 18 June 2016

Infusions - Dawn Heald


Hi everyone,

Hope you all have something
nice sorted for the weekend!

I am catering for 80 people
tonight for a works reunion so I'm
going to be mega busy in the kitchen!
Must try not to have too many 
'cooks perks' !!! Ha ha!! 

Today Dawn is here to show us her 
lovely project using the little bottles
of magic .... Infusions!

  
This time I've decorated an MDF journal page
 and had a good play with these superb
 new Paperartsy Infusions.
What I did....


I painted the board with two coats of white
 gesso then two coats of Snowflake paint.
 Sanded back with sanding Block. Then I
 repeatedly stamped the circle stamp all
 over and heat embossed with Clear Detail
 Embossing Powder and heated with heat tool.


Next I spritzed water and then added
 sprinkles of Infusions in greens and blues.
 Spritzed with water again and left to dry
 naturally to really bring out the walnut stain.
 Then I dabbed ultra Matt varnish in places
 and sponged on some more Infusions powders.


 I took the bold flower stamp and sprinkled
 with Royal Blood Infusions and dabbed Pearl
 Glaze on top with my finger and repeat
 stamped all over board. When dry I did this
 again over stamping some flowers with
 Emerald Isle Infusions. Let dry and 
outline with blue and white pens.
I then added some more background
 Stamping as shown.


For my main images. I painted a piece of
 white Pearl card with Ultra Matt Varnish,
 sprinkled on Infusions in contrasting colours 
and then painted over with brush and more
 Ultra Matt Varnish. Dry. Then stamp
 images.


 Add some coloured pen details,
 cut out and stick to the background board.


Finish with some Stardust Stickles Glitter Glue.


This is absolutely beautiful.
Every time I look at the pictures,
I see something else!

From own stash - Coloured Pens

Well that's all for today folks!

See you tomorrow,

Jane x

Thursday, 2 June 2016

Starlight Paints - Neil Walker


Hi everyone,

Flaming June is here and what
a great start it has made!!  
Rain, flooding, wind and no sign of
the sun!
Nothing changes does it!

This week we are going to look at a
new product and a fabulous one
it is too!
Starlight Paints from Imagination Crafts.
They are amazing to use and the colours 
are beautiful.  You can check them
out here.
Do have a look as they are beautiful
paints and can be used on 
different surfaces.

Neil is starting us off today...

He has painted this lovely box -


Neil says ...
Paint the box using a combination of the three
 colours of paint.


When the base colour is down, add some 
rough strokes of colour as you can see here.


Use a moist wipe to blend the colours in
 which creates a more subtle tonal finish.


Paint the glass with the Starlight paint too.


Dab the paint with a tissue while wet to
 remove the brushstrokes and give a
 more textured finish.


When the paint is dry, cut a piece of card and
 cut out space for the mask in the area you
 want it to go. I found it easier to do it this way
 as I was concerned that taping it to the
 glass would lift the paint when I removed
 it. Use black paste to cover.


Then I got "brave" because I was too
 impatient to wait until it had dried, and
 just laid my next mask over and carefully
 spread the black paste over...


Leave to dry thoroughly.


Cut a piece of card to fit the glass and stamp
 the map as seen, trying not to press too hard
 on the inside edges so it isn't such a straight
 line. Colour with a bit of distress inks in areas
 to create interest. Glue this to the back
 of the glass with Faux Finishing Medium, 
making sure the design faces the correct way
 when the lid is closed (Yes, this is the
 voice of experience speaking!)


To finish the inside you could stamp and colour
 the card, or do as I did and raid your decorative
 tape box.......to finish I edged it with copper tape.


Add some texture by stamping the map along the
 edges of the lid


Everything was then given a coat of finishing
 medium to seal and protect the top.


I brushed it over then dabbed it with a
 scrunched up piece of tissue to remove
 the brushstrokes.


How amazing is this??

So Neil has used the paints on both wood
and glass.

This is what Neil used -

From stash -
Masks
Wooden Specimen Box
Decorative Paper
Copper Tape

the pictures will not do this box
justice, the paints are just
beautiful!!
Do give them a try.

See you tomorrow,

Jane x


Friday, 6 May 2016

Hot Melt Glue - Neil Walker

Good morning all,

Hope you are all well and it's nearly
the weekend again!!  Hope you all 
have something nice planned!

Well it is day two of our Hot
Glue week.  Neil is here to show you
another way of using it.  As well
as being an excellent almost instant adhesive,
there are other uses for this product....

Neil has chosen to use glue as a resist on
a cotton bag...... 


Take one cotton bag... 


Draw your design on the bag using hot glue


Spray over the top using Misters... 


Pick the glue off 


Hey presto...beautiful bag! 


How nice is that.....
I'd love to sit there picking all the bits
of glue off ha ha!!

If you want to have a go, this is what
Neil used -


Hope you are enjoying the sunshine,
I'll see you tomorrow,

Jane x

PS I apologise if this post is not centered,
for some unknown reason it is ok when I 
type it but when I preview it, the whole thing
is on the right hand side and won't let me change
it!!  So your eyes are not playing tricks
but hopefully it will be ok ha ha!! 


Saturday, 19 March 2016

Green - Neil Walker


Morning all,

The weekend is here again!
Hope you all have something excited
planned!
It's our second day featuring Green
and oh my goodness what a fabulous 
project we have here for you from Neil!!
This is amazing, you are going to love it!

Neil has made for us....


An altered letter rack in shades of green!


Cut three pieces of card to fit inside the letter
 rack and apply texture sand through the mask,


Vary your placement to create three different
 pieces.


Apply texture sand to the letter rack.


Leave everything to dry thoroughly.


Use Fluid Acrylic to add colour to the rack and 
the textured card.


Add washes of Transparent Red and Yellow Iron
 Oxide to add age and depth.


Stamp the map image onto white tissue


Apply to the inside areas of the rack with
 Faux Finishing Medium


The finished rack.


Add a bit of metallic highlights with Treasure
 Copper.


Add further detail using Liquid Pearls to finish.

Fabulous Neil, if you want to have a go,
this is what'll you need -


Well that's all for today, I'll
be back tomorrow with our next letter
for The Alpha/Dictionary Challenge!
Oooooh wonder what it will be this time?

Jane x