Showing posts with label Versafine. Show all posts

Friday, 3 March 2017

Street Art


Street Art


Hi there!

Hope your week is on track.

I'm supposed to be doing some
art homework today..........who
would have thought that at this
stage in my life I would be back
to homework!  Haha!

Anyway, here is Jane Castle with
a very nice arty page in her new
journal.......


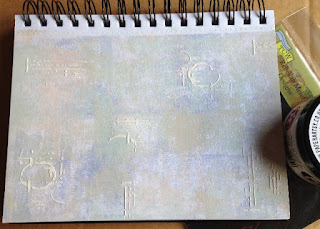
 "I made myself a promise this year to start 
an Art Journal and a Scrap Book. Well the year is 
trundling  along at a pace so I felt I'd better do something 
about one at least so here is my very first page 
of my very first art journal!


I began by applying various layers of Fresco paints 
with a brayer in Wisteria, Blush, Hint of Mint and Stone.


Then once I was happy with the combination added 
some Grunge Paste through a TCW stencil.


This was left to completely dry before applying some 
DI in Weathered Wood to the grunge paste with my finger.


The quote from a PaperArtsy stamp set was then added 
using Denim Adirondack ink. 

I felt this was a very apt quote! 

The dots were stamped in DI Peeled Paint.

Next onto the main stamped images, 
for this I used a selection from Eclectica ETS01. 

As I only wanted the stem part of one stamp I masked 
the unwanted part with a post-it note before inking.


This was removed before stamping onto my page. 
The circle stamp which I chose for my 'Flower Head' 
was marked on the back of the stamp to hi-light the point 
where the 'Stem' and 'Flower' would meet. 

The 3 main images were heat embossed with clear EP.


The circles were then added to the edges and 
using a fine nibbed black pen I added some connecting 
lines and swirls.

Now for a splash of colour......... 
using Claret, Pumpkin Soup, Chartreuse and Autumn Fire 
all transluscent Fresco paints 
and a very fine paint brush I began to fill in various 
sections/segments. 

I finished with a few dots of Metallic Glaze 
on some of the tiny dots.


This was left for a couple of hours to thoroughly dry 
before adding some glossy accents to one section of 
yellow on each of the 3 main images. 

When I went back to take the final pictures I was amazed 
that the Glossy Accents had started to crack ---- 
now I don't know if that was because it's an old bottle 
perhaps 5yrs maybe more 
or that my craft room is outside and it may have 
got too cold for it overnight? 

If you know what caused the cracking please leave 
a message below as I am intrigued"

Material List

PaperArtsy Stamp Sets ETS01, ESN03, EEV06
TCW Mini Raven Mosaic Stencil
PaperArtsy Grunge Paste
Versafine Onyx Black ink


Thank you Jane for sharing your
new journal with us.  We will look
forward to seeing more of it.......

Have been pondering on your dilemma
with the Glossy Accents - I have some of
equal vintage and it is fine so over to you
followers, any ideas?

'Till tomorrow

Mickie xx


Wednesday, 1 February 2017

Buildings

Buldings


Hi Everyone!

Pinch and a punch its the 
first of the month...........

Expect you all remember
that one from your schooldays!

We start the month with a new
theme and Claire Jackson has
a fabulous project for us:


Cut a piece of white card 4”x6”. 
Stamp and emboss the image with black detail embossing powder


Stamp the image on a sticky note or masking paper 
and cut out to make a mask.

Don’t forget to cut away under the bridge and inside the wheel. 

Cover the image with the mask.


Starting an inch from the bottom colour with Distress Ink in
 barn door, wild honey, scattered straw, peacock feathers and faded jeans.


Leave the paper mask in place. 
Tape in place the concentric circles stencil and 
gently dab white acrylic paint through the holes. 

Remove the stencil and paper mask gently and 
dry the paint with a heat tool. 

Wipe any excess paint from the paper mask and put back in place. 

Clean the stencil and put back. 
It doesn’t matter if the stencil is a millimetre out 
as some of the white will show through 
which helps to lift the background


With the stencil in place rub red cherry, mango, banana and margarita mix 
Gelatos over the holes and blend in with a baby wipe. 

Carefully lift off the stencil and the mask


Add shading with faded jeans ink to the edges. 

Stamp, cut out and mount the wording.

With a pale grey marker add a shadow along the base 
of the buildings and in some of the recesses between buildings. 

Highlight some of the windows with red, orange or yellow marker


I have a lot of family and friends living overseas 
and this would make a great greetings card; 
however in this case this card is destined to contain 
theatre tickets for an evening out in town.


Supplies:


What a fabulous card to present
as a Gift Card?!  Thank you Claire
for starting the month off with a bang....
or should I be saying punch? ........!!


'Till tomorrow

Mickie xx

Friday, 13 January 2017

Bokeh


Bokeh


Hallo Everyone!

Hope you are all well and
seasonal bug free................

everywhere I go it seems
that everyone is coughing and
sneezing.................might have
to consider living in quarantine
for the time being ............

Today's Bokeh project is from
Craftyfield, who has a different
take on the technique:

" I started by applying Distress inks to my Kraft tag. 
Some of the lighter colours do not show much at this stage 
but will be revealed in the next stage...


To create the Bokeh effect I have designed my own stencil, 
of course you can use one of the many circles designs available 
but I'm a control freak... and wanted to create the circles one at a time. 

To cut your own, use either circle dies or a circle cutter as I did.


The traditional way to create the Bokeh effect 
is to use white pigment ink but I fancied trying it
 with a Distress Crayon first.

 I stencilled 2 circles with a white Distress crayon to see the results. 
I continued with the pigment ink as I found it easier to 
control the different levels of opacity of the circles.


For the stamping I used the Paper Artsy flowers with Versafine black 
and embossed them in clear powder. T

he sentiment by Kaisercraft is also stamped with Versafine but not embossed.

You can see my embossing powder container (ex take away dish) in which I decant my pot. 
Not much left at the moment!


I pulled out my Gelatos and coloured a circle around the flower heads 
using a stencil, to echo the Bokeh circles.


Quite simple to make, although it did take me a long time 
to stencil all those circles one by one! 


The most difficult part is to know when to stop 
and I hope I haven't gone overboard!"

Supplies:


No, Craftyfield you haven't gone overboard - 
it is a super tag.  I love the technique you
used too, not to mention cutting your own
stencil!


I quite often cut my own stencil's too and I use  
a purpose made product called Punch it And Die

"Till tomorrow

Mickie xx


Friday, 23 December 2016

Merry Christmas


Merry Christmas


Greetings to all!

Claire Jackson is with us again
today with a beautiful Christmas card

Here she is to talk us through it:


Stamp and emboss the reindeer in gold 
on 3 different patterned papers and a plain cream paper


Cut a piece of card 5” square and stamp the wreath 
in pine needles Distress Ink. 

Dust the card with an anti static bag / talc 
to make sure the ink is completely dry before stamping 
and embossing the reindeer in gold over the top


Squish the evergreen bough ink onto a craft mat 
and with a water brush use it to colour the leaves. 

Colour the berries with cardinal red ProMarker

Cut sections from each of the different papers 
and use them to piece together over the reindeer, 
sticking them down with gel medium or clear glue.

Add a shadow around the reindeer with grey ProMarker. 

Add glitter glue to the berries and small gems
 to the saddle and eye


 To mount the reindeer I found some green patterned paper 
and stamped over it with a Card-Io branch in pine needles ink 
to tie it in to the main image.


Materials used:

Lindsay Mason Zentangle Clear Stamp: zendoodle reindeer ready to go
Woodware clear stamp: sketchy wreath 
Card-io clear stamp: greenery 1
Versafine: onyx black
Distress Ink: pine needles, evergreen bough
Multi medium matte
ProMarkers: cardinal red, warm grey 2
Stickles glitter glue: cranberry, distress fired brick
Gems

 Merry Christmas everyone and I wish 2017 brings you good health and happiness
 and of course many hours of happy crafting.

Thank you Claire
We all wish you a Merry Christmas too
and look forward to more crafty goodness
in 2017

Mickie xx