Showing posts with label Blending tool. Show all posts

Thursday, 30 March 2017

Silhouettes

Silhouettes 


Hallo there!

Hope you have a happy day

Jane Castle has dropped by today
with a beautiful cheery project
that's sure to bring a smile or two

"I am a big fan of Lavinia Stamps so was very delighted 
when this topic came up. 

The card I'm sharing with you today 
is fairly simple to produce but has 
a girlie magic about it.


To begin with I stamped Believe onto a piece of shrink Plastic 
in Brilliance Pearlescent Olive and Starlite Black. 

This was then cut to size and 2 holes punched 
at the top before heating to shrink.


This was then threaded with some bakers twine 
and set aside whilst I continued with the card. 

For this I started with a blank DL sized card 
and coloured the background with Distress Inks
 and a blending tool.


Then using a small sponge and a torn piece of paper 
added cloud/mist hi-lights before stamping the bottom 
and sides with the flower border stamp and Starlite Black ink. 

Whilst the ink was still wet I brushed on some 
mica powder to give the fairy dust feel.


The fairies were then stamped in black and as there are 
just 3 dancing fairies on this stamp I positioned the second set 
of 3 so the ribbon at the top entwined to give the appearance 
of it just being one continous stamped image.

I then added detail to the ribbon with a fine black pen and tiny dots. 

Lastly I stamped 2 clusters of stars each side of the Believe banner 
and brushed them with perfect pearls.


The nice thing about cards like this is they are suitable 
or any age group young or more mature!"


Items Used

Shrink Plastic
Distress Inks in Faded Jeans, Wild Honey, Victorian Velvet, Twisted Citron and Pumice Stone
Brilliance ink in Pearlescent Olive and Starlite Black


A delightful card Jane, very many thanks.


This would be a good one to
have as a standby I feel so guess
what I'm going to do this afternoon?!

'Till tomorrow

Mickie xx


Thursday, 12 January 2017

Bokeh

Bokeh


Hallo Everyone!

Our current theme has a bit of a
magical flavour to it and here is
Jane Castle who has given bokeh
a fairyland twist

Sit back and enjoy:

"When the theme Bokeh appeared on the list of topics 
it was something I had not come across before 
so I had to do a little bit of research first 
but now I'm afraid it could become a little addictive! 


To begin with I started with 2 pieces of A5 white card 
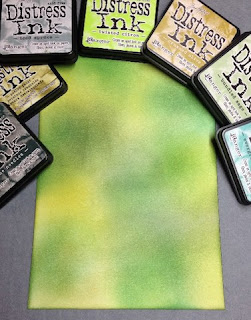
and coloured them with Distress Inks and a blending tool.
The first was a collection of various shades of green.


And the second piece I decided to combine different colours 
but also graduate from light to dark down the length of the card.


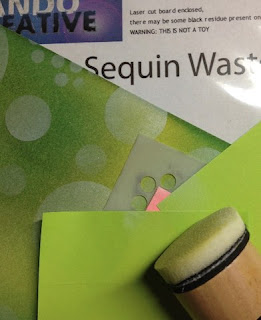
Next comes the fun part ---- I cut some different size circles 
out of a piece of ordinary copier paper to use as a stencil 
and with a clean round blending tool started to add circles of
 Brilliance Moonlight White ink.


I didn't reink the pad every time I made a new circle as I wanted to give the appearance of depth to the background.

I also wanted a few much smaller circles so masked off parts of the sequine waste stencil by Tando Creative


The 2 pieces of card then had to be left to dry completely
 before adding any stamping etc.


With the green background I decided to cut a square 
to use with some Lavinia Stamps and for this 
I just stamped onto the card with black archival ink, 
matted this onto a piece of yellow card and then a piece of green. 

The 4 corners were cut from matt black card 
using Tim Holtz ATC and Corners die.

The paler end of the other piece I really liked 
so cut a tag from this and stamped another Lavinia image 
using archival Watering Can ink.


This is such an interesting way of producing great backgrounds 
that can be varied from the quite subtle to bold and vibrant 
depending on your colour pallet.

if one had a session of making several Bokeh backgrounds 
to have as a stash they would be a great stand-by 
for making a quick card which we all need sometimes"

Materials Used


Thank you Jane - I think it would be
lovely to while away an afternoon
making backgrounds in all
colours to add to one's stash

In fact, I might just do that on
my next free afternoon!

'Til Tomorrow

Mickie xx


Thursday, 22 December 2016

Merry Christmas

Merry Christmas


Hallo everyone

Hope you are all on top of your
festive preparations and can take
a moment to put your feet up 
with a nice cuppa and........relax

We have another card 
for you today from Jane Castle

For my project on the theme ‘Merry Christmas’ 
I decided to go half traditional and half contemporary


(This card design was one that I felt would be easy to make 
several of so there are multiple   stampings in each photo).

I started with a 15cm square card blank which was coloured 
with a blending tool and Distress Inks in 
Stormy Skies, Faded Jeans, Wild Honey and Vintage Photo.

Next I stamped the 3 Kings from Crafty Individuals 270 
in Black Archival and heat embossed using clear EP. 

Then bearing gifts ........ was stamped and heat embossed also


The camels and Kings heads were coloured in using water colour pencils.

The 3 Kings were then stamped onto scrap pieces of coloured card 
and heat embossed.

Then just the cloaks were cut out, slightly curled with a bone folder 
and glued onto the card.

Gold, Frankincense and Myrrh was stamped onto kraft card, 
heat embossed, cut into strips and the edges defined 
with some Treasure Gold in Renaissance.


The stars were then stamped in VersaMark ink onto kraft card 
and heat embossed with white EP.

These were then cut out and also given some touches
of Treasure Gold.


The elegant swirls were cut from some christmassy card stock
using Crafty Individuals Die.

The star was threaded through the swirl before attaching to the card.
The final touch was to add some darker patches of ink 
to the sand to give the impression of depth. 
For this I used my little finger!

As I didn’t use any foam pads to attach the stars etc 
I was pleased that these cards were still thin enough 
not to need a ‘Large Letter’ stamp when posting 
------ My Oh My that can be Sooo annoying!


Materials Used


Finally, I just want to wish you all
Merry Christmas


 Thank you Jane and we all wish you
Merry Christmas


'Till tomorrow

Mickie xx


Thursday, 20 October 2016

Pumpkin, Scarecrow and Halloween

Pumpkin, Scarecrow and Halloween


Hi there 

We're getting well into the season of mists now and
with all the fun of All Hallows Eve to look forward to

So with no more ado, here is another new DT Member


Louise Thomson


To get us in the mood for the new season, 
I have designed and made a scarecrow lantern 
using an old jam jar and a selection of crafty supplies.


First cut a piece of tissue to the correct size for your jar. 


Carefully blend the distress inks on the tissue using your blending tool. 
It is easiest to do this starting in the middle with the scattered straw
 and working outwards to the edges.


Once you are happy with the background colours, 
stamp your scene on to the tissue paper using the 
ground espresso distress ink.


Coat your jam jar in a light coating of 50/50 pva glue and water 
and roll it across the tissue paper scene to stick it down.


Give it a second very light coating of adhesive 
on the outside of the jar using a brush. 
This will also enable you to stick down any bits that need extra work. 

Apologies, at this point I got carried away and forgot to keep taking photographs…

Allow to dry completely before trimming any excess tissue 
from the top or bottom of the jar with a craft knife.

Use a dry paintbrush to add dabs of alchemy wax 
to the rim of the jar and in to the scene.

Make a loop of wire around the top of the jar and twist 
the ends together. Loop another piece through to make a 
handle and twist again!

Add a tea-light to your lantern to complete the look.


Materials used:

Distress inks; tumbled glass, scattered straw, carved pumpkin, lucky clover, ground espresso

Thank you Louise for a delightful
start to the season.  
I liked the re-cycling aspect too

See you all tomorrow

Mickie xx