Showing posts with label Canvas Board. Show all posts

Friday, 15 September 2017

Joseph's Coat


Joseph's Coat


Hi There!

Always good to see you!
Are you enjoying this technique 
as much as I am?   I don't know
what I was thinking when I set
the theme!   Just glad it came
to mind.................

Here is Claire Jackson to take
you through her bright and
cheerful canvas:


"The Joseph’s Coat technique usually involves layering
 ink using a resist to reveal an image. 

I decided to try it with paint and masking.

First I painted a canvas board with three 
shades of pink Fresco Finish paint. 

I’m sure I have mentioned previously that this 
is my favourite craft paint because it dries very quickly 
and is great for stamping and drawing on.


Next I added stencilling with the same 
three shades of pink.


Using a stencil with a smaller design I added 
complementary colours. 


It’s important that the paint is completely 
dry before the next step.

 I stamped the Tracy Scott designs on masking
 paper (you could use sticky notes) and 
cut them out, leaving a small border, before placing 
them on the canvas.


I made sure the masks were properly stuck 
down to prevent paint seeping under the edges.

 I then covered the whole canvas with shades of 
green and turquoise, before adding extra stencilling


When the masks are removed you reveal 
the colours beneath.


 Next I stamped the images directly onto the
 canvas with Archival ink. 

I stamped the foreground flowers first 
and replaced the masks as I went along 
to create depth.


When all the pink areas had been over-stamped 
I removed the masks.


I added white highlights with paint pen 
and gel markers.


 To finish off I added watercolour pencil to 
the images, a few more highlights and some
 blue gelatos around the edges.


Here is a detail of the flowers"


Materials:

Archival Ink: jet black


This has worked out so well
I can see how relaxing it
must be to do this. Thank 
you Claire


Lovely to see that canvas coming
together wasn't it?  Not a hint of
black paint too!

'Till tomorrow

Mickie xx

Thursday, 23 March 2017

Up The Wall


Up The Wall


Hallo Everyone!

Claire Jackson is with us
today to share with us a
beautiful canvas of her
holiday in Rome

You might need to get 
yourself a cuppa and
a comfy chair ............


"I primed a 30x25cm canvas with white snowflake paint 
and added strips of decorative tape to create some 
texture in the background


 Next I built up the background with layers of Fresco Finish paint, 
starting with more opaque colours and then translucent colours on top.
 I wiped back the paint over the tape where it was too opaque.


To continue to build up the background I used a 
dark translucent paint sponged on a small script stamp, 
gold paint sponged on a large pattern stamp 
and sprayed golden walnut through a stencil.


 I added embossing paste through the brick wall stencil
 to some areas of the canvas


The edges were shaded with pine needles Distress Ink 
and Alchemy Wax was used to highlight the edges 
and some of the brick.


 I stamped and embossed the wording 
in white detail embossing powder on wax paper.


I used a dark brown watercolour pencil between the bricks 
to help them stand out.


Next I tore strips of the wax paper and scrunched them up tightly, 
before lightly rubbing them over with the gold wax.


A mini cardboard key was painted and edged with gold wax.


The photo was die cut and attached to the canvas 
and to create more texture I added a mixture 
of gems, microbeads and embossing enamel 
to the corners and around the photo


 I also sprinkled embossing enamel in places over the background


The photo was taken in the ancient Roman town
 of Ostia Antica, just outside Rome.


 If you ever get the chance to visit 
I would thoroughly recommend it."


Beautiful canvas Claire, thank you for
sharing it with us.  A wonderful moment
of what must have been a wonderful holiday


'Till tomorrow

Mickie xx


Saturday, 4 March 2017

Street Art


Street Art


Hi There!

Hope your week went well
and here is Hazel Harler to
set the tone for the weekend

Lots to take in with this canvas
to grab a cuppa, sit back and.......


" I used the lovely Paperartsy/Tracy Scott Gothic Blooms
 on my canvas


I used a brayer to lightly colour my 10" x 8" canvas board
 with Fresco Finish paints


The canvas was stencelled with modelling paste 
and Crafters Workshop stencils


 I again coloured the background with Fresco Finish paints, 
 sprayed water on and let it run down the canvas


then stamped and stencilled some acrylic paint.


The Seth Apter images were stamped onto tissue paper


 The flowers were stamped onto pink patterned paper and cut out


 I cut out the Seth Apter images and glued them to the canvas.


More colour was added with Gelatos


 I glued the flowers to the canvas with matte medium, 
I also covered the whole of the canvas with matte medium.


This is the finished canvas. 


By painting a layer of matte medium over the canvas 
I could add colour and shading with my indian ink markers. 
The matte medium allows the ink to be spread with the fingers,
 it also makes it easier to remove ink with baby wipes.

Here is a close up


 I think this technique might work with other permanent markers 

- I'll have to experiment."


Thank you Hazel - 
a really beautiful canvas


There's a lot of work here
but if taken step by step
 well worth doing
in colours to match your decor

I love a piece of artwork that
stands out in a room - it brings
a whole new ambience

Yes, I'll leave it there..........

'Til tomorrow

Mickie xx

Saturday, 7 January 2017

3D Bloom and Texture

3D Bloom and Texture

Hi Everyone!

Hope you are all wrapped up
warm and cozy on this fine
chilly day!

We have Hazel Harler to talk
us through her stunning canvas
so get yourself a cheery cuppa
and prepare to be A-mazed....


"For my project I used a 6" square canvas board


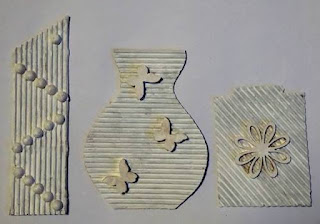
First I cut some vase shapes out of corrugated card 
having the ridges go different ways, 
then I glued some wooden shapes and pearls to them.


The vases then had a coat of gesso


I coloured the vases with acrylic paint.


 then sprayed gold foil Color Bloom on the blue vase, 
brimstone wings on the pink vase and 
dragonfly blue on the pale blue vase


 I used my finger to spread some Treasure Pewter over the vases


I stencilled some modelling paste through a Dreamweaver stencil 
and gave it a coat of gesso when the paste had dried.


 I watered down some acrylic paint , dabbed it on the canvas 
and sprayed with water letting it run down. 
I put the paint on one colour at a time drying it between colours


I thought it was a bit pale so I added some yellow 
paint and some red Gelatos I also splattered some frost Color Bloom


 I used my finger to spread Treasure Pewter 
over the modelling paste and went round the edge with black ink.


 I stamped some Paperartsy tulips.


 I coloured the flowers with pencils and cut them out
 I'd stamped extra flowers so that I could 3D the central petal. 
I glued all the pieces to the canvas."


Suplies used:

Thank you Hazel for your lovely canvas
giving us spring flowers and cheer


I'm thinking this will look lovely on my
mantel shelf and remind me that
spring really is just around the corner.......

'Till tomorrow

Mickie xx