Showing posts with label Glossy Accents. Show all posts

Friday, 3 March 2017

Street Art


Street Art


Hi there!

Hope your week is on track.

I'm supposed to be doing some
art homework today..........who
would have thought that at this
stage in my life I would be back
to homework!  Haha!

Anyway, here is Jane Castle with
a very nice arty page in her new
journal.......


 "I made myself a promise this year to start 
an Art Journal and a Scrap Book. Well the year is 
trundling  along at a pace so I felt I'd better do something 
about one at least so here is my very first page 
of my very first art journal!


I began by applying various layers of Fresco paints 
with a brayer in Wisteria, Blush, Hint of Mint and Stone.


Then once I was happy with the combination added 
some Grunge Paste through a TCW stencil.


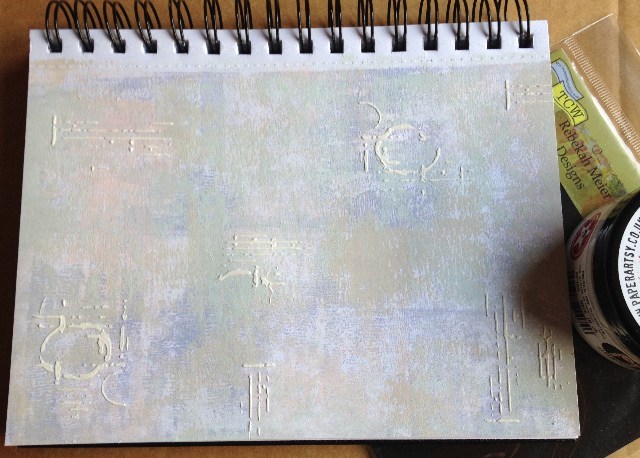
This was left to completely dry before applying some 
DI in Weathered Wood to the grunge paste with my finger.


The quote from a PaperArtsy stamp set was then added 
using Denim Adirondack ink. 

I felt this was a very apt quote! 

The dots were stamped in DI Peeled Paint.

Next onto the main stamped images, 
for this I used a selection from Eclectica ETS01. 

As I only wanted the stem part of one stamp I masked 
the unwanted part with a post-it note before inking.


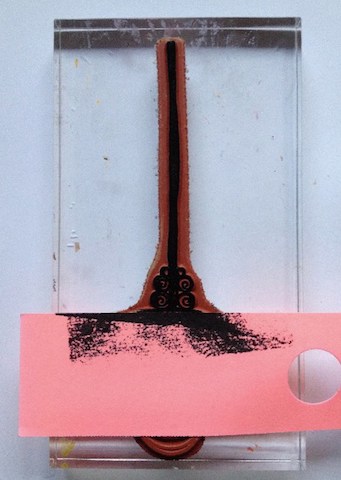
This was removed before stamping onto my page. 
The circle stamp which I chose for my 'Flower Head' 
was marked on the back of the stamp to hi-light the point 
where the 'Stem' and 'Flower' would meet. 

The 3 main images were heat embossed with clear EP.


The circles were then added to the edges and 
using a fine nibbed black pen I added some connecting 
lines and swirls.

Now for a splash of colour......... 
using Claret, Pumpkin Soup, Chartreuse and Autumn Fire 
all transluscent Fresco paints 
and a very fine paint brush I began to fill in various 
sections/segments. 

I finished with a few dots of Metallic Glaze 
on some of the tiny dots.


This was left for a couple of hours to thoroughly dry 
before adding some glossy accents to one section of 
yellow on each of the 3 main images. 

When I went back to take the final pictures I was amazed 
that the Glossy Accents had started to crack ---- 
now I don't know if that was because it's an old bottle 
perhaps 5yrs maybe more 
or that my craft room is outside and it may have 
got too cold for it overnight? 

If you know what caused the cracking please leave 
a message below as I am intrigued"

Material List

PaperArtsy Stamp Sets ETS01, ESN03, EEV06
TCW Mini Raven Mosaic Stencil
PaperArtsy Grunge Paste
Versafine Onyx Black ink


Thank you Jane for sharing your
new journal with us.  We will look
forward to seeing more of it.......

Have been pondering on your dilemma
with the Glossy Accents - I have some of
equal vintage and it is fine so over to you
followers, any ideas?

'Till tomorrow

Mickie xx


Saturday, 26 November 2016

Wax Paper & Acetate

Wax Paper & Acetate


Hello

Today we have gorgeous project to inspire us
for those Cards we still have to make....

Here is Hazel Harler who is Caught in Crystal:


 I haven't done this technique for a few years so 
I thought it was time to have another go.


You will need a sheet of acetate, alcohol inks, glossy accents 
and crumpled tissue paper.
Other items that can be added are glitter, micro beads, 
mica powder, gilding flakes etc

I squeezed stickles and glossy accents over the acetate


Then I dripped in some alcohol ink


I covered the inked acetate with the tissue paper and pressed it down,
 if you are wearing rubber gloves you can do this with your fingers, 
I would suggest you use a ball of kitchen towel 
if you're not wearing gloves. 


Leave to dry preferably overnight.


This is a close up after it had dried


A few sheets of different colours.


 I've made a few cards with some of my acetate.


For this card I stamped the card blank with snowflakes using Fresco metalic glaze, the wooden snowmen were covered with Treasure Pewter wax


For this card I covered some black card with inca gold Alchemy wax and used a Stampendous stamp and die for the poinsettia. The acetate had some glitter added to it.


The acetate can also be die cut, I used a Sizzix die. The card was coloured with distress ink and I layered different handmade papers at the bottom. I added gilding flakes to the acetate


I covered the Tando snowmen with Frantage embossing enamel, I added mica powder to the acetate and the snowy mesh is from my stash.

For the next two cards I stencilled Imagination Crafts sparkle medium using Dreamweaver stencills. The sentiments on most of the cards are remnent rubs


I hope you can give this technique a try as you can get some beautiful results.

Items used:


Hazel this technique is awesome and the cards are beautiful.  
Thank you for sharing this with us

Mickie xx


Saturday, 15 October 2016

Christmas Makes

Christmas Makes


Morning Everyone!!

Woohoo!  It's Saturday!

When you have done all the necessary chores 
here is a fabulous project from 

Claire Jackson 

for you to enjoy 


Stamp the image in Versafine ink on watercolour paper
 and emboss in white.


Overstamp the embossed image with bundled sage, slightly offsetting it.


Repeat with peeled paint...


and again with peacock feathers


Spritz liberally with water and tap ost. blue Brusho around the wreath. 
Try to keep the centre paler. 
Use a wet paintbrush to blend the colour around the wreath 
but take care not to over do it and lose the texture.


With a wet paintbrush dab the berries and blot with a cotton bud 
to lift some of the excess colour. 
Using Promarkers colour the berries with magenta 
and add shading in purple.


Using a fine tip add marine Promarker to the inside of the leaves 
and also in between the leaves. 
Stamp the sentiment in the centre in cobalt archival ink.


Trim the card. 
Add frozen Stickles to the bow. 
Using your finger dab wonderland Stickles across the leaves 
and on the edges of the card.
 Use glossy accents on the berries.


Materials used:

  Thank you Claire 
Truly a card for someone special.

Mickie xx


Saturday, 1 October 2016

Alcohol Inks and Yupo

Morning everyone!

What are you all up to?   I'm having an arty day today; 
the Art Society is having a workshop 
and I will be there! 
We've to bring either watercolour paints and paper 
or acrylics and canvas.  
I shall take the one I know can be painted over if 
and when all goes awry!!


 I'll leave you with 

Jane Castle

who will walk you through her Artful Blooms

Yupo is a new medium for me but I have to say I’m very impressed with how it works with alcohol inks compared to glossy card stock 

I began by dropping small blobs of lettuce and cool peri alcohol ink onto my piece of Yupo.
I was amazed at how much the ink moved on the Yupo and also how much the colours revealed other pigments.


Then I gradually added other colours, stream, stone washed, citrus and cranberry. Once this was dry I added tiny dots of the pearl fixative.  Wow, this really made a huge difference.


Next I tried the conventional way of applying the alcohol inks with the felt and blending tool dragging this across the Yupo in a curved movement. Here I used stone washed, lettuce and cranberry. Once dry I added a couple of drops of blending solution to the felt and lightly dabbed this all over.


Now I have 2 completely different pieces of inked Yupo, 
time to make something with them both.

For the one with the circles and the pearl mixative I felt it would lend itself to something flowery so I inked the edges of a card blank with DI in antique linen, tumbled glass and brushed corduroy.Then stamped the main Lavinia images in versa fine black onyx. Using the small stem of circular flowers from Eclectica EDY12 this was stamped in festive berries and gathered twigs. The top part was stencilled with an Imagination crafts stencil and in the top lefthand corner Artful Blooms was stamped from Eclectica ELB03.


I chose 3 different coloured circles to stamp my Lavinia flower onto using Archival Black ink as I tried a little of the versa fine in the corner of the Yupo and after 20mins it hadn’t dried!


These were then cut out and stuck onto the card with Pinflair glue. A few dots of Glossy Accents were added to a few of the small stems of flowers.


Having watched various videos on how to use Yupo several recommended it for die cutting —— so I gave it a go in the vagabond.


For the larger tag I lightly sanded the edges of the co-ordinations one stamped the image from Lynne Perrelli LPC030, then distress the edges.
Then stamped the pen from the same stamp set onto the Yupo tag and ‘Hello’ from Eclectica ECL01.


This tag set will be used on a card when I’m pushed for time.

I was so pleased I’d tried this synthetic paper as I feel it’s more versatile than the glossy card stock. I found it easier to stamp onto as there is slightly more tooth to the surface of the Yupo, whereas the glossy card sometimes can be slippery. The alcohol inks stay liquid for slightly longer and if you are not happy with what you have produced its easy to wipe it off with some kitchen roll and the blending solution, or just add some more over the top.

List of items used

Ink pads 

Thank you very much Jane for your lovely project
Now, where's my Yupo paper......................?

See you tomorrow everyone for the next Alpha/Dictionary Challenge!

Mickie xx