Showing posts with label Carabelle Studio Masks. Show all posts

Friday, 27 January 2017

Hearts and Flowers

Hearts and Flowers


Hallo Everyone!

Today we have another card
project from Hazel Harler so
sit back and prepare to be
totally inspired


For my card I used a Honey Doo Crafts stamp and a Carabelle Studio mask


On a piece of white card sponge distress ink through the mask. 
I used picked raspberry and scattered straw.


Stamp the image onto the stencilled card and onto white card


Colour the images, I used my Inktense pencils to do this


Cut out the pieces on the white card to 3D the image


Use silicone glue to glue the petals and leaves


 I matted the topper to some black card 
and then glued it to a card blank that I'd made out of a piece pink card. 

I added a heart charm, some dew drops and stamped the sentiment..


 A close up of the flower.


Supplies:

A gorgeous card Hazel
thank you

 I will have to sit down
this afternoon and make a
start on the year's birthday cards
now that inspiration is tapping on
my shoulder......


'Till tomorrow

Mickie xx


Wednesday, 11 January 2017

Bokeh


Bokeh


Hi everyone!

Expect you are all well and
truly back in the swing of
things now and the holiday
fast fading to a dream.........

Claire Jackson is with us 
today with her dreamy card
using the Bokeh technique


Cut a piece of watercolour card to 5” x 5”. 
Choose 4-5 gelato colours in similar tones and one complementary. 
I went for peach, strawberry, lavender, raspberry, grape, 
cotton candy and white. 

Scribble swirly circles over the card and blend 
them together with a baby wipe


Using a stencil add a few circles of different sizes in the complementary colour. 
You don’t need many of these and it’s best if they are not too big


 Add more circles with the white gelato. 
Some can be bolder than others and this helps to 
add depth to the background. 

Keep the larger circles more diffuse and 
the smaller ones more opaque


With a stencil add smaller bolder circles in a few areas in two contrasting colours


Use white paint with a sponge applicator to add whiter circles. 
Continue building up the background by overlapping circles 
of different shades and sizes. 

Add in small bold paint dots with a cotton bud.


Stamp the image in VersaMagic chalk ink which gives a lovely soft finish. 
Run the darkest tone of Gelato around the edge of the card 
and blend in with your finger

Add a die cut sentiment and glitter glue 
before mounting on a card blank.


Thank you Claire.  A lovely project
that Bokeh technique is super


See you all again tomorrow

Mickie xx


Friday, 6 January 2017

3D Bloom and Texture


3D Bloom and Texture


Hallo Everyone!

How're you today? 
Still enjoying the holiday?
Or are you back to the grind and the
holiday rapidly becoming a dim 
and distant memory

Never mind, here is Craftyfield
with a project that is sure to
set the mojo going


 I started with the Weft and Fabric Numbers stencil by Carabelle 
and Memory inks and obtained a lovely soft effect. 

I carried on stencilling with the Chicken wire Reversed Stencil.


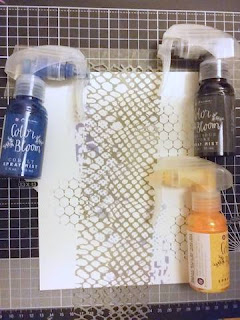
For the next step I used sprays with the Shedded stencil (DecoArt), 
in Cobalt blue and Precious Stone.


Time for the pastes, here I used black gesso 
with the same Carabelle stencil having 
obliterated my previous stencilling with the spray! 

I also used Grunge paste with Pixillated.


As a project progresses I reassess the balance of colours 
and, if I find something not working, I try and change it. 
I didn't like the white in the background so 
I knocked it back with Distress inks. 

I then added Grunge paste through the Inspiration stencil. 

You'll see that the "Inspire" has also changed colour 
in the final photo, simply because it was hard to see 
against the background


My focal point is a Tando frame against that Inspire word 
and I painted it with Imagination Crafts Starlight Paints 
(Dark Orchid, Mint and Platinum)


3 Butterflies of different sizes provide the finishing touches.
 They are from a Crafty Individuals set, and I used 
both line and solid versions of the images, 
line with black ink and solid with blue and oranges dye inks.

In this picture you get an idea of how much shine the
 Starlight paint gives when hit by direct sunlight.


Supplies:


Such an inspiring project Craftyfield 
thank you very much for helping us back into the
creative zone


'Till tomorrow 

Mickie xx


Thursday, 24 November 2016

Zinsky

Zinsky


Hello Everyone

We have a treat for you today
We haven't forgotten that at
this time of year people have
birthdays too

Here's a set of cards to cheer
anyone's day from Claire Jackson


Cut a piece of white card to 4.5” x 6.5” and stamp 
the focal image(s) in Memento ink 
(as it won’t bleed with alcohol markers)

Make a mask to cover the stamping. 
I used masking paper but sticky notes would do


Stencil over the background using two colours of Distress Ink.
Use the small stamps on the background in black ink. 
Remove the masks


Colour the images (I used ProMarkers).
I used a light grey to outline the main images t
o give a slight shadow effect and add subtle depth


Add a computer generated greeting and 
mount on black card on a 5” x 7” card blank.


For a little extra depth I used glossy accents on some of the details


The new Zinski stamps are great for adults and children alike. 
These cards would be very easy to add a number to for a child’s birthday


Thank you Claire for a
A fantastic set of cards 
They do make me smile
in fact
I might be smiling all day .......


Back again tomorrow 

Mickie xx