Showing posts with label Distress Oxide. Show all posts

Tuesday, 9 January 2018

At Random


At Random


Hello Again!

Shaking things up a tad this
month - not necessarily sticking
to our usual days!  Have to keep
you on your toes..........Hehe!

Here is Claire Jackson with a
rather beautiful perfume bottle...:


"I stamped the Blue Fern Studios 
Bottled Sentiments stamp in 
Distress Oxide inks.

 I over-stamped in different colours using
 a stamping platform.
 
I then masked off the images and added 
the background, with a mixture of sponging 
and stamping, before adding the
 sentiment and layering it all up.


I made a little tag, from one of the other 
stamps in the set, using shrink plastic
 and glossy accents."

Thank you Claire - I love the
simplicity of the design and the
colours you have chosen.

That little bottle tag sets it
all off very well.  Just goes to
show you don't need mountains
of stash to start you off

Of course if a highly developed
stash mountain is your goal then
step into the SALE and see what
you can find............


'Till tomorrow

Mickie xx


Friday, 15 December 2017

The Christmas Table


The Christmas Table


Hallo Everyone!

It's getting a lot more like Christmas
isn't it?  Are you panicking or are
you on track?  Don't think I fall into
either category - I just take it as it
comes .............................. and like
the advert I pour another drink for
my guests if I need to make myself
a little crisis time!

We have Angela Radford with
us today and she is going to
share her place settings with us:

"Hi all, here today to show you how I've made
 some Christmas table settings. 

I started with a sheet of white card and
 several colours of Distress ink.


Smoosh it on and dry.


Using the Kay Carley snowflake stencil and 
Distress Matte Medium I applied this over 
the coloured card.
 Leave this to dry before finishing the Masterboard.


Used my Tim Holtz stamp positioner to stamp
 the ElenaZinski Elves.


Colour these and leave to dry.


Back to the Masterboard using the Kay Carley
 stencil and two colours of Distress Oxide in
 with a blending too.


Cut out the Elves. 
I went round the edges of these with a 
black ink and blending tool so that the 
white edges don't show.


 Cut the Masterboard to your chosen size, 
edge with matching colour, score and fold. 
then attach the Elves. 


I have printed the names on the computer,
 edged them and attached with a stapler but 
they could also be stamped on too. 

This should stop them falling out about who's
 sitting where Lol! or maybe not! 

Happy crafting, Angela xXx"


Products used:


These are great Angela, will bring
a smile to every face too!


Don't you just love these
place settings Everyone?
So quick to do too, with
Angela's brilliant Masterboard
technique

'Till tomorrow

Mickie xx


Wednesday, 22 November 2017

Mechanical Greetings

Mechanical Greetings


Hi Everyone!


Brrr!  It is getting chilly out
there now.   Time to snuggle
up to the fire............. should 
have bought some muffins
(the ones that are a bit like
pancakes of course).  

Now when I say mechanical
greetings I probably mean
kinetic greetings but either
way movement is involved!

To start us off, Angela Radford
 has come with a greeting card 
that is just right for the 
mantelpiece ...........


Hi all, Angela here to show you one
 of my favourite ways of getting
 movement in my cards.


 I started with a sheet of watercolour paper
 but lightweight card would work too. 

Use your distress inks on a craft mat and
 smoosh the card through it until you
 get a light coverage.


 Once this was dry I used a Paper Artsy Christmas
 stencil by Kay Carley with several colours of 
Distress Oxides.


Looks okay but I just couldn't resist adding more!


So clear Gel medium next through
 the same stencil and allow it to dry.


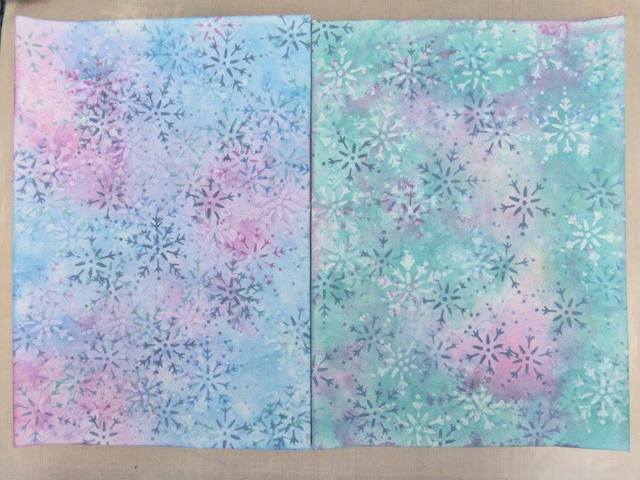
 Now at this stage I could not decide on the
 colours I wanted to use so cut the paper 
into two and then added the colours with 
Distress Oxides.

Splatter water over the colour and 
allow to activate and dab off.


And here are the two samples.

 If you buff the card a little the gelled 
areas will show up more.


 I couldn't resist it! One more technique: 

Splatter thinned paint onto the surface
 and allow it to dry.


At this stage I folded the front of a card blank
 to make a Z fold card and layered this with
 the Masterboard and matching coloured card. 

You will also need a piece of card for the front 
slightly smaller than the size of your chosen
 card blank. 

This front section is not completed
 at this stage as can be seen below.


Now for the fun part using the Elenazinski 
Christmas set 19. 

Stamp these onto card and heat emboss 
with clear embossing powder.

 How cute are they?!


Next the colouring.
 I like to use watercolour pencils for this. 

When these were dry I also added 
glaze to the eyes.


Now cut three strips of clear acetate and
 attach three of the figures to this and the 
other two on each side of the front section. 

I also stamped the sentiment at this stage.


Turn the front section over and attach
 the acetate strip to the back with the 
stamped figures facing you.


Turn this over and bend the acetate 
towards you. Use a bone folder to smooth
 the acetate into position and then it 
can be mounted onto the white card 
and attached to the front.


And here is the finished card. 

It only takes a little draught to make 
these little guys wobble which I just love.


A side view of the Christmas family
 sending their sentiment. 


Hope you enjoyed watching me make 
this fun card xXx


Products used for the Mechanical Family


Such a fun card!  Thank you
so much Angela

I could just see them bobbing about
on my mantelpiece ......... you
have to hand it to PaperArtsy, they
come up trumps every time ....

'Till tomorrow

Mickie xx


Wednesday, 15 November 2017

Crafty Emotions


Crafty Emotions


Hi There!

Everything is gearing towards
the end of next month and all
the happy crafters are beavering
away with seasonal items .....

Well what about all the other
life events that take place
even at this time of the year?

Here's Helen Chilton to start us
off with a small selection of
CAS cards that have nothing
to do with Christmas......


"These are clean and simple cards using
 Craft Emotions clear stamp set: Branches. 

They're all made in the same way 
with a few little tweaks here and there. 


Start off by cutting some masks using 
punches or dies. They need to fit
 a 4"x 4" card blank.


Stick your mask down with masking tape 
and choose your colours - I'm using 
Distress Oxides but dye inks are just as good.


Rub on your colours through the mask, 
blending as you go.


 Leave the mask in place and start 
stamping the flowers in black. 


 Build them up.... 


...and then remove the mask.
 And that's it, your basic card.


You can vary them by adding embellishments 
- here I've dotted some Ranger Enamels.


You can also stamp in the background with
 the mask on (Kaisercraft Texture stamp: Script)
 and bring out a couple of the flowers onto 
the white cardstock.

 Then I've added a greeting 


You can stencil the background with the mask
 in place and then double stamp the greeting.


You can change the shape of your mask
and stencil in the background. 

Finish with Stickles.


You can quickly stamp a border.


As these are Distress inks, you could 
splatter the background and add a
 doodled border.

The possibilities are endless ......."


Materials:


Thanks Helen, that is quite a
comprehensive card set there
to suit many occasions

'Till tomorrow

Mickie xx